
How to Install a Universal Tachometer in Your Classic Car or Truck — Step-by-Step Wiring Guide
, by iFJF Direct, 9 min reading time
, by iFJF Direct, 9 min reading time
Learn how to install a universal 2-inch (52mm) tachometer in your classic car or diesel truck. Step-by-step wiring guide covering GM HEI, canister coil, MSD ignition, and diesel ECU signal connections. Includes mounting tips and product recommendation.
Adding an aftermarket tachometer to a classic vehicle is one of the most useful upgrades you can make. Older trucks and cars — especially those from the 1970s and 80s — often came from the factory with nothing but a speedometer and fuel gauge. A tachometer gives you real-time engine RPM data, which is critical for shift timing, diagnosing engine issues, and protecting your motor from over-revving.
The good news? Installing a universal tachometer is a straightforward weekend project that requires only basic wiring skills. Whether you're working on a square-body GM pickup, a classic Ford truck, a Dodge Ram, or a resto-mod project, the process is nearly identical. Let's walk through it.
For most classic vehicle owners, a standard 2-inch (52mm) universal electrical tachometer is the sweet spot. These gauges typically feature:
We recommend the iFJF Universal 2" 52mm Electrical Tachometer Gauge for this installation. It includes the gauge, mounting hardware, and a detailed English installation manual — everything you need for under $30.
Before running any wires, decide where the tachometer will live. Popular mounting locations include:
Pro tip: If mounting on the steering column, test with a hose clamp first before drilling. On some trucks (like older GM models with column shifters), the outer column sleeve rotates when you shift — in that case, screw directly into the inner column or use a dash-mounted bracket instead.
The iFJF tachometer kit includes a U-bracket mount that works with all of these locations right out of the box.
Almost every universal tachometer uses the same four-wire color code. Here's what each one does:
| Wire Color | Function | Connect To |
|---|---|---|
| White | Dash illumination | Your vehicle's lighting circuit (powers the gauge backlight when you turn on your headlights) |
| Red | Switched 12V power | A fused, ignition-switched source (gauge powers on only when the key is in the "Run" position) |
| Black | Ground | A clean chassis ground or the vehicle's ground bus |
| Green | RPM signal | The tachometer output on your engine — this is the one that matters most (see below) |
The green wire is the heart of the installation — it's how the gauge reads your engine's RPM. The connection point depends on your ignition system:
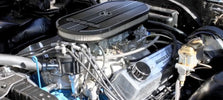
If your vehicle has a GM HEI (High Energy Ignition) distributor — common on 1975-and-later GM small-blocks and big-blocks — this is the easiest connection of all. On the distributor cap, you'll find two terminals: a battery feed wire and a terminal clearly labeled "TACH". Simply plug the green wire onto the TACH terminal using a female spade connector. Done.
This applies to:
✅ Chevy 350 / 454 / 305 small-block and big-block V8s
✅ GMC pickups (C/K series, Suburban, Jimmy)
✅ Pontiac, Oldsmobile, and Buick V8s with HEI conversions
For older vehicles with a round canister-style ignition coil (common on pre-1975 Fords, Mopars, and AMCs), connect the green wire to the negative (-) terminal of the coil. The negative side carries the pulsing ground signal that the tachometer interprets as RPM.
⚠️ Never connect to the positive (+) terminal — that's constant 12V and will damage the gauge.
If you're running an MSD ignition box, Mallory, or any capacitive discharge ignition, use the dedicated tach output terminal on the box. Do not connect directly to the coil — CDI boxes fire multiple sparks, which can give the tachometer a garbled signal or inaccurate reading.
For diesel engines with electronic engine management (including Duramax, Powerstroke, and Cummins from the late 90s onward), the RPM signal comes from the ECU's tach output wire. Check your vehicle's wiring diagram for the specific pinout. For mechanical diesel engines without an ECU, an alternator W-terminal or aftermarket signal adapter may be needed.
Related reading: iFJF Universal Tachometer — full product details and compatibility.
For the Red (power) and White (lighting) wires, your vehicle's fuse box is your best friend — especially on classic GM trucks, which often have dedicated accessory ports labeled right on the panel:
Always use an inline fuse on the red power wire (2–5 amp is sufficient). And never tap into an always-hot circuit — the gauge should power off with the key to avoid draining your battery.
Once everything is connected, turn the key to "Run" (don't start the engine yet). The needle should jump slightly or settle to zero — that's a good sign that power and ground are working correctly.
Start the engine. At idle, a typical gas V8 should read around 600–800 RPM. A diesel will idle lower, around 600–700 RPM. If the reading seems way off, double-check your cylinder selector switch on the back of the gauge — it must match your engine's cylinder count.
Test the lights by turning on your headlights or parking lights. The gauge face should illuminate. If everything checks out, tuck and zip-tie your wires neatly, reinstall any trim panels you removed, and you're ready to roll.
If you own a diesel truck — especially one used for towing, hauling, or off-road work — a tachometer is more than a nice-to-have. Monitoring RPM helps you:
A universal gauge like the iFJF 2" Tachometer installs the same way on a Duramax, Powerstroke, or Cummins as it does on a gas classic — just use the ECU tach output wire instead of an ignition coil.
Yes — if your diesel engine has an electrical tachometer signal output (most modern diesel pickups do), this gauge works. For older mechanical diesels without a tach signal, you may need an alternator W-terminal tap or a magnetic pickup sensor.
Not necessarily. The installation uses a standard 3-wire connection (power, ground, signal). If you're comfortable with basic automotive wiring — installing a stereo, wiring fog lights, etc. — you can handle this. A detailed manual is included. If you're not confident with electrical work, any auto shop can complete this in under an hour.
First, check the cylinder selector switch on the back of the gauge. Setting it incorrectly (e.g., 4-cylinder on a V8 engine) will show the wrong RPM. If the setting is correct but the reading is erratic, check your green signal wire connection and make sure your ground is clean and secure.
Yes. The standard 2-inch (52mm) diameter fits universal gauge pods, A-pillar mounts, and dash bezels. The included U-bracket gives you multiple mounting options.
Ready to add a tachometer to your build? Shop the iFJF Universal 2" 52mm Tachometer Gauge — $29.99 with free mounting hardware and English installation manual included. Ships from iFJF Direct.