
Norcold N811 Not Cooling? How to Reset the Control Board & Replace the Thermistor (Step-by-Step)
, by iFJF Direct, 10 min reading time
, by iFJF Direct, 10 min reading time

Norcold N811 Not Cooling? How to Read Fault Codes, Reset the Control Board & Replace the Thermistor If your Norcold N811 (or older N611) RV refrigerator started thawing out mid-trip, you are not a...
If your Norcold N811 (or older N611) RV refrigerator started thawing out mid-trip, you are not alone. "No Cool" fault codes and a dead display are among the most common RV refrigerator failures in the field — and in most cases they are fixable with under an hour of work and a $20 to $70 part, without calling a mobile RV tech.
This guide walks you through, step by step, how to read the blinking light codes, perform the hard control-board reset, and swap the thermistor — the three fixes that resolve the large majority of N611/N811 cooling failures. We'll finish by covering when the problem actually lives on the optical control board itself and how to replace it.
| At a glance | Details |
|---|---|
| Fridge family | Norcold N611 / N811 (2-way, LP gas + 120V AC) |
| Most common "not cooling" fault | Green light flashing 5 times = no cooling detected |
| #1 quick fix | Power-cycle once, then a hard reset via pin 15 |
| #2 cause | Faulty thermistor (frost/ice indicator) |
| #3 cause | Failed optical control board (blank display / dead buttons) |
| N811/N611 control board | 630762 Optical Control Board from iFJF |
Norcold N611/N811 refrigerators report problems through the small status light on the front panel. The pattern repeats in a loop, and each pattern means a different fault:
The "5 blinks" no-cool pattern is the one you'll see most in winter camping, because the cooling unit freezes up or the flame/power can't keep it within its operating range. If the light isn't blinking at all but the fridge is warm, continue below — that points to a different failure.
An RV refrigerator carries both 120V AC shore power and 12V DC battery. Do not open the back cover with power live. Turn the fridge off, then disconnect:
Wait a couple of minutes for the control board capacitors to discharge before handling the board or connectors.
Many no-cool faults are false positives — the fridge simply "lost the plot" during a temperature swing or after a flame-out. A single power cycle resets it exactly once. To do this:
If the fridge cools and the blinking stops, you're done. If it immediately re-enters the no-cool fault, the board has locked out, and you'll need the hard reset in Step 2.
When a power cycle only works once and the fridge locks back into the no-cool fault, Norcold does not make the manual reset obvious — but it's simple and safe if you follow it exactly.
Unlike the safety power-down above, for the hard reset the board must be powered back up so it can actually perform the reset:
Depending on the unit you'll hear a distinct click within 5 to 15 seconds (in some units the reset is silent). When the click happens, remove the jumper, reconnect all the wiring, and button everything back up. Turn the fridge on — the no-cool flashing should be gone.
If after a successful reset the fridge now flashes a different code — typically one blink every three seconds, the thermistor fault — the temperature sensor is your problem. The good news: it's the cheapest and easiest fix on the whole refrigerator.
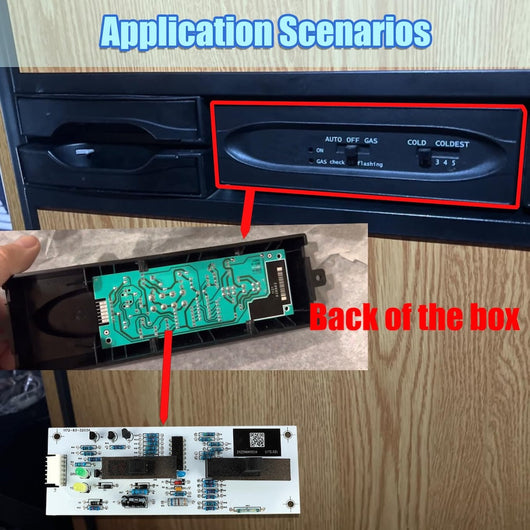
Now for the case that leads most owners to a control board. If the refrigerator has power (the interior light works) but the front display is blank, the buttons won't respond, or the readout is frozen, the problem is usually not the thermistor and not the main power board — it's the optical control board that sits behind the front touch panel and talks to the main board via light-based communication.
This is the board our guide is built around: the 630762 optical control board, which fits all Norcold N611 and N811 models and replaces the board inside Norcold kit 637775.
Twist and pull the control-panel trim straight off the front of the fridge. This exposes the back side of the touch panel where the optical board is mounted.
Note the connector orientation first (or snap a photo). Unplug the small ribbon/connectors from the old board, and pop the board free of its mounting clips. Because it's an optical board, there are no high-voltage connections at the panel — but still work gently since the connectors are small.
Clip the replacement board into the same position, reconnect the connectors in the same orientation, and reinstall the front panel trim. Restore power and test: the display should light, the buttons should respond, and the fridge should accept temperature changes normally.
One thing field techs see constantly: a Norcold N811 whose hard reset works temporarily, then the no-cool or display fault returns. On inspection, the board has visible damage — a melted terminal, a cracked trace, or a burnt coil from repeated flame-outs or power surges. That's the smoking gun: the control board itself has failed and resetting it won't bring it back for good.
In that situation the reliable fix is replacement. For N611/N811 display failure specifically, that means the optical control board — and a direct, all-models fit at a fraction of OEM cost is available here:
630762 Optical Control Board for Norcold N611 / N811 — $69.99
Five blinks repeated in a loop is the "no cooling detected" fault. The control board isn't confirming the cooling unit reached operating temperature — check the LP flame, 12V power, and 120V power first, then perform the pin-15 hard reset described above.
Disconnect power, open the exterior access cover, reconnect power with the fridge on, then jump pin 15 of the 16-pin connector to the ground lug for 5–15 seconds until you hear (or don't hear) the confirming click. A single power-cycle works only once before the board locks out, which is why the pin-15 method is the reliable reset.
It's clipped into one of the cooling fins inside the refrigerator, with two spade connectors (and a lead to the interior light on many models). It detects frost build-up; when it fails, you'll get a rapid or repeated low-blink fault even though the fridge may actually be cold.
That combination almost always points to the 630762 optical control board (the board behind the touch panel), not the power board. Replacing it restores the display and button function in most cases.
Yes. Disconnect both 120V AC and 12V DC before handling any refrigerator electronics, including the optical board at the front panel.
iFJF Direct specializes in hard-to-find RV, generator, and diesel aftermarket parts with US stock and fast shipping. The 630762 optical control board for Norcold N611/N811 is backed by fitment for all serial numbers and priced well below OEM — a proven fix our customers rely on to get the cold back without a service-call.

