
OBS F-Series: How To Install Brake Pads & Rotor for 1987-91 F250/F350
, by iFJF Direct, 21 min reading time
, by iFJF Direct, 21 min reading time
How to Replace Brake Pads & Rotors on 1987–1991 Ford F250/F350 Dually — Complete DIY Guide If you own a 1987, 1988, 1989, 1990, or 1991 Ford F250 or F350 Dually, sooner or later you'll need to do ...
If you own a 1987, 1988, 1989, 1990, or 1991 Ford F250 or F350 Dually, sooner or later you'll need to do a brake job. This isn't some abstract maintenance checkbox — it's one of the most critical safety procedures on any vehicle, and on a one-ton dually, the stakes are even higher. A properly executed brake rotor and pad replacement on your OBS (Old Body Style) Ford can restore braking confidence and save you a trip to the shop. This guide walks you through the entire process step by step, with practical tips from hands-on experience on an actual '88 F350.
Before you start crawling under your OBS Ford, make sure you've got everything laid out. Nothing kills momentum like searching for a 3/4-inch socket in the middle of a job.
| Category | Item | Notes |
|---|---|---|
| Power Tools | 1/2-inch impact gun | Makes rotor bolt removal way faster |
| Sockets | 3/4" socket (rotor bolts) | 8 bolts per rotor |
| Sockets | Socket for spindle nut | Measure your spindle — typically 1-3/16" or similar |
| Breaker Bar | Breaker bar | For final spindle nut torque procedure |
| Hand Tools | Hammer & chisel | For driving out caliper slide pins |
| Hand Tools | Flathead screwdriver | Prying caliper off rotor |
| Hand Tools | Socket wrench set | General assembly/disassembly |
| Cleaning | Brake cleaner (aerosol) | Multiple cans recommended |
| Cleaning | Paper towels / shop rags | You'll go through a lot |
| Cleaning | Shop vacuum (optional) | For final debris cleanup |
| Grease | High-temp wheel bearing grease | Look for disc brake wheel bearing-rated grease, 500°F drop point |
| Fluids | Brake fluid (for cleaning) | Can substitute for brake cleaner in a pinch |
| Safety | Jack & jack stands | Rated for 1-ton capacity |
| Safety | Wheel chocks | Never skip this |
| Replacement | Brake pads | OE equivalent or upgraded semi-metallic |
| Replacement | Brake rotors (2x) | One for each side of the dually axle |
| Replacement | Slide pins (2x per caliper) | ~$5–6 per set, replace if worn |
| Replacement | Cotter pins | Have extras on hand — they break easily |
| Replacement | Dust seals | Replace if cracked or hardened |
The caliper on your OBS Ford F250/F350 is held in place by a set of slide pins — one at the top and one at the bottom. On these older trucks, these pins can seize up over decades, especially if the truck has seen wet or salty conditions.
Using a hammer and chisel, drive each pin out one at a time. You don't need to beat on it aggressively — just enough to break it free. Work one pin loose, then the other. If the pins are in rough shape (corroded, pitted, or seized), plan to replace them. New caliper slide pins for this application run about five or six dollars for a set, and it's money well spent. These pins need to move freely so the caliper can self-adjust as the brake pads wear.
Once you've driven the pins out, set them aside. Some mechanics recommend greasing the new pins before reinstalling them — this keeps them from seasoning (seizing up) again in the future. A small dab of high-temp grease on each pin goes a long way toward long-term service life.
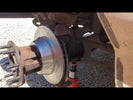
With the slide pins out, it's time to pull the caliper off the rotor. On the F250/F350, the caliper can sometimes wiggle right off, and sometimes it needs a little persuasion. Use a flathead screwdriver or pry bar to gently lever it away from the rotor — but work it evenly on both sides to avoid tilting.
Here is the critical rule: do not let the caliper hang by its brake line. The rubber flex line or the metal hard line connected to the caliper can crack or break if it's stressed while hanging free. If that happens, you've turned a routine brake job into a brake-line emergency. Instead, use a bungee cord, wire, or a coat hanger to hang the caliper from the spring or suspension, or rest it on the axle in a safe position.
Before you completely remove the caliper, this is a great time to address the dust cap behind it. You'll want to remove that dust cap before proceeding to the wheel bearing. If you haven't removed it yet, pop it off with a screwdriver and set it aside.
Now you're looking at the wheel hub, which on a two-wheel-drive OBS Ford looks pretty familiar to anyone who's worked on older American trucks. Here's the stack from outside to inside:
Pull the cotter pin straight out. Keep in mind: these things are brittle after decades of service and tend to snap. It's a good idea to have a few extras on hand because they break when you fold them back and forth to remove them. Once the cotter pin is out, remove both the outer axle nut and the spindle nut. Then slide the outer wheel bearing off — at this point, the entire rotor-and-hub assembly should come free and you can set it aside.
This is a perfect opportunity to inspect your wheel bearings. If they're the original Timken bearings that came in these trucks, you might be surprised — 31-year-old Timken bearings can still be in decent shape because the company used to manufacture far better quality than what you'll find on the shelf today. That said, always inspect for pitting, scoring, or rust.
Turn the rotor-and-hub assembly over and you'll see eight 3/4-inch bolts holding the rotor to the hub. These bolts also have washers, so keep track of everything. Using your 1/2-inch impact gun (or a breaker bar if you're doing it by hand), remove all eight bolts. You might need to clean some of them off first if road grime has built up around the bolt heads — especially if the truck has been driven through a winter season.
Once the bolts are out, the rotor separates from the hub. Now you're left with the hub (which you can set aside or clean up for reuse) and the old rotor. This is a great time to do a full visual inspection of the hub's mounting face and bearing surfaces.
This step is the soul of the whole job, and it's where a lot of DIYers cut corners. Don't be that person. Take your time here.
Use brake cleaner to break up all the old, dirty grease from the bearing surfaces. Spray it on, work it in with a brush or rag, then wipe everything clean. Use fresh paper towels each time — don't keep reusing a rag that's already loaded with old grease and grit. You're aiming for surfaces that look like new, at least on the bearing races and the machined surfaces.
Now that everything is clean, do a thorough visual inspection. Check for:
There are two ways to pack a wheel bearing: the "bearing packer" tool (which you can buy for about $20), or the two-finger method. The two-finger method is free and, frankly, gives you better feel for whether the grease is actually getting worked into the bearing. Here's how it works:
Scoop a generous glob of fresh high-temperature wheel bearing grease into your palm. Press the bearing down into the grease with your thumb and two fingers, forcing the grease up through the rollers. Rotate the bearing and repeat, working grease all the way around. You might feel like you're done, but keep going — when you spin the bearing and you can still hear the individual rollers clicking, it means there's still air pockets. Keep packing until the sound goes away and the bearing feels smooth and loaded with grease.
Use a lithium-complex or equivalent grease with a dropping point of at least 500°F, specifically rated for disc brake wheel bearings. The premium brands have come and gone (Timken's quality has dropped since they moved manufacturing overseas), but any reputable brand will do — Autoguard, Valvoline, and Lucas all make suitable products.
Before bolting on your new rotor, clean the mounting face of the hub thoroughly — any debris here will cause runout in the rotor, which you'll feel as a steering wheel shimmy at speed. Wipe it down with brake cleaner and a fresh rag.
Line the new rotor up with the bolt holes on the hub. Apply a small dab of grease to each of the eight bolt threads — this prevents them from seizing to the hub in the future. Don't overdo it: a small amount goes a long way. Finger-tighten each bolt first to make sure they all start cleanly and don't cross-thread. Cross-threading these bolts is a nightmare because the hub is aluminum (on many models) and the bolts are steel — once they're cross-threaded, you may need a new hub.
Once all bolts are started by hand, use your impact gun to snug them down. You don't need to fully torque them yet — just get them firm enough that the rotor is held in place. If you hear or feel cross-threading during this process, stop immediately.
Slide the repacked outer wheel bearing onto the spindle. It should taper in and seat against the race on the inside. You'll know it's seated when it sits flush and doesn't rock. Place a flat washer over the spindle, then thread the spindle nut onto the spindle by hand.
Before you torque the nut, here's an important step: the bearing needs to be able to move freely so the rollers can set themselves. Spin the rotor a couple of times while lightly snugging the nut — this lets the bearing seat properly. If the nut is too tight, you'll preload the bearing excessively, which will cause it to overheat and fail prematurely.
This is the most critical step in the entire wheel bearing service. The spindle nut needs to be tightened to a specific torque to set the bearing preload, then backed off slightly before the final position is locked in.
Using a breaker bar (not an impact gun — you need feel and control here), tighten the spindle nut until you feel significant resistance when you try to spin the rotor. The goal is to seat the bearing fully. On a half-ton F250, this is typically around 50 lb-ft, but your truck may vary. After seating, spin the rotor again. If it spins more than one or two revolutions freely, it's not tight enough — snug it down a little more. If it's tight and barely spins, you're close.
Once you've found the sweet spot, back the nut off approximately 1/8 of a turn. This is the standard procedure for setting bearing preload — you want the bearing to be snug and stable, but not preloaded to the point of binding. You should be able to spin the rotor freely but with a slight resistance that feels consistent.
With the nut backed off to its final position, it's time to insert the cotter pin. The cotter pin goes through the hole in the spindle — and if the holes don't quite line up after you've backed off the nut, that's normal. You may need to move the nut just slightly (a quarter turn or so) to find a hole that aligns with the cotter pin hole in the spindle. This is part of why you have extra cotter pins.
Insert the cotter pin and bend the legs in opposite directions. If one leg breaks off during driving, the other leg will still hold — that's the logic behind bending them opposite ways. Some mechanics will argue about whether to reuse snap rings, but the general rule is: if you have extras, use them. If you're reusing the existing one, make sure it's not distorted or fatigued.
Finally, clean out the old grease and grime from the dust cap (or use a new one if it's available), add a small amount of fresh grease to the inside lip of the dust cap — just enough to keep contamination out — and tap it into place with a rubber mallet. Use gentle taps until it's flush with the hub face. Don't use a steel hammer on the dust cap, or you'll dent it and it won't seat properly.
Before bolting the caliper back on, it's time to deal with the brake pads and the caliper slides. If you're reusing the old caliper, now is a good time to inspect the slide pins you removed earlier. If they were worn or corroded, install new ones with a light smear of grease.
Apply a thin coat of high-temp brake grease to the slide pin bores in the caliper bracket — this is where the pins travel, and keeping them lubricated prevents future seized-pin syndrome. Slide the new (or inspected) brake pads into the bracket. Make sure the pad with the wear indicator goes on the inboard side if your setup has one.
Slide the caliper back over the rotor and new pads. Align the mounting holes with the slide pins and push the caliper into position. Insert the slide pins and drive them in with a hammer until they're fully seated. Double-check that the caliper sits level and centered on the rotor.
Before you do the final spin test and call it done, you need to clean the friction surfaces of the new rotor. New rotors are coated with a rust-preventative compound that looks like a thin layer of oil. If you don't remove this before driving, your first brake application will be unpredictable at best and dangerous at worst.
Spray the rotor generously with brake cleaner — use it exactly for what it's designed for. Wipe down both sides of the rotor's friction surface, removing all traces of the protective coating. Work in sections: spray, wipe, rotate, repeat. Use fresh paper towels each time until the rag comes up clean on every pass. Don't touch the cleaned surface with your bare hands — the oil from your skin can leave residue that affects braking performance.
While you're at it, wipe down the caliper piston and the brake pad backing plates. Any oil contamination here will reduce friction when the pads engage.
Once everything is clean, do one final spin test: the rotor should spin freely and smoothly without any dragging or catching. If it drags, investigate — is the caliper contacting the rotor? Is a pad edge catching? Is a slide pin binding?
With the rotor installed, also add a tiny dab of grease to the caliper slide pins' contact points on the bracket — just enough to keep them moving freely. Remember: these trucks aren't daily drivers for most owners, so parts that aren't lubricated will seize up between drives.
Q: How often should I repack wheel bearings on my OBS Ford F250/F350?
A: If you have greaseable (sealed) bearings, you should inspect and repack them at every brake job — roughly every 30,000 to 50,000 miles, or whenever you do a rotor replacement. If you're pulling the hub for any reason, that's the time to repack. Non-greaseable ( cartridge-style) bearings on some later models don't require repacking but should still be inspected.
Q: Can I just replace the brake pads without replacing the rotors?
A: Technically yes, if the rotors are still within spec (minimum thickness) and don't have deep scoring, hot spots, or warping. On a truck this age, though, rotors are often worn close to or past minimum thickness, and rust pitting from years of seasonal use makes resurfacing difficult. If the rotors are at or near minimum thickness, replace them — it's not worth the safety risk.
Q: My slide pins are completely seized. What do I do?
A: If the pins won't budge even with penetrating oil and a firm hammer strike, you can drill them out carefully using a slightly smaller drill bit, then tap in new pins. Be very careful not to damage the caliper bracket threads. In some cases, the bracket itself may need replacement if the bore is corroded.
Q: Should I use an impact gun to tighten the spindle nut?
A: No. Use a breaker bar or torque wrench for the spindle nut. An impact gun gives you no feel for bearing preload, and it's very easy to over-torque the spindle nut with an impact, which will destroy the bearing. The correct procedure requires feel and a specific torque spec with a 1/8-turn back-off.
Q: What's the correct torque spec for lug nuts on a Ford F250/F350 Dually?
A: For 1/2-ton and 3/4-ton trucks with steel or aluminum wheels, the standard lug nut torque is 100–110 lb-ft. Always verify against your specific owner's manual. Never use anti-seize on lug nuts — it can cause the nuts to loosen over time due to inconsistent clamping force.
Q: The cotter pin hole doesn't line up. Is something wrong?
A: This is completely normal. After seating the bearing and setting preload, you back the spindle nut off to find a hole that lines up. If the holes don't line up within a reasonable range of back-off, try snugging the nut up slightly and then back off again. You just need to find the position where the hole lines up with the slot in the nut — it doesn't have to be perfectly centered.