
Search results for "Pool Cleaner Parts"

iFJF iFJF Pressure Gauge 0-60 PSI 190058 Replacement for Hayward Pool/Spa Valve Filters Bottom Mount
Product Overview The Pressure Gauge 0-60 PSI 190058 Replacement for Hayward Pool/Spa Valve Filters Bottom Mount is a premium-quality replacement part engineered for durability and precise fitment. Whether you're a professional mechanic or a DIY enthusiast, this component delivers OEM-grade performance at an affordable price. Manufactured with high-grade materials to withstand demanding conditions, it ensures reliable operation and long service life. Designed as a direct-fit replacement, installation is straightforward with basic hand tools — no special modifications required. Each unit undergoes rigorous quality inspection before shipping to guarantee it meets or exceeds factory specifications. Key Features Premium Construction: Built with high-grade materials for maximum durability and corrosion resistance Direct Fit: Precision-engineered to match OEM specifications — no modifications needed Easy Installation: Designed for straightforward bolt-on replacement with standard tools Rigorously Tested: Each unit passes strict quality control checks before shipment Cost-Effective: OEM-quality performance without the dealership price tag Fast Shipping: Ships from our US warehouse with reliable delivery Compatibility Please verify fitment before ordering. This product is designed to be compatible with the following applications: Compatible Brands Hayward Replaces Part # 0-60 PSI, 190058 R ⚠️ Important: Always cross-reference your vehicle's year, make, model, and existing part number before ordering. Contact our support team if you need assistance confirming compatibility. Product Specifications Part Number(s) 0-60 PSI, 190058 R Brand iFJF Condition New SKU FJ-PG-0058 Price $17.99 Why Choose iFJF? At iFJF, we specialize in providing high-quality aftermarket parts and accessories for automotive, powersports, RV, and outdoor equipment. Our mission is simple: deliver reliable, affordable replacement parts that professionals and DIYers can count on. ✅ Rigorous quality testing on every batch ✅ Fast, reliable shipping from US warehouses ✅ Responsive customer support team ✅ Thousands of satisfied customers nationwide Installation Tips Safety First: Disconnect the battery (if applicable) and wear appropriate safety gear before starting. Prepare Tools: Gather all necessary tools before beginning — check product listing for any special tool requirements. Remove Old Part: Carefully remove the existing component, noting the orientation and connections. Compare Parts: Place old and new parts side-by-side to verify fitment before installation. Install New Part: Mount the new component in the same orientation, ensuring all connections are secure. Test: After installation, test operation thoroughly before returning to regular use. Note: If you're unsure about any step of the installation process, we recommend consulting a professional mechanic or technician. Frequently Asked Questions Q: Is this a genuine OEM part?A: This is a high-quality aftermarket replacement part manufactured to meet or exceed OEM specifications. It is NOT a genuine OEM part. Q: Will this fit my vehicle?A: Please verify compatibility using the specifications and compatibility table above. Match your vehicle's year, make, model, and existing part number before ordering. Q: What is included in the package?A: The package includes the Pressure Gauge 0-60 PSI 190058 Replacement for Hayward Pool/ as shown in the product images. Please refer to the listing photos for exactly what's included. Q: How long does shipping take?A: We ship from our US warehouse. Standard shipping typically takes 3-7 business days within the continental US. Expedited options are available at checkout. Q: What is your return policy?A: We offer a 30-day return policy for unused items in original packaging. If you receive a defective product, contact us immediately for a replacement or refund. Q: Do you offer warranty?A: Yes, all iFJF products come with a satisfaction guarantee. If you experience any issues, reach out to our support team for assistance. Order With Confidence Join thousands of satisfied customers who trust iFJF for their parts and accessories needs. With our commitment to quality, fast shipping, and excellent customer service, you can shop with confidence. Click "Add to Cart" now to get your Pressure Gauge 0-60 PSI 190058 Replacement for Hayward Pool/ delivered fast!
$25.99

iFJF WS21X10003 Water Softener Rotor Position Switch - GE Compatible
Product Overview WS21X10003 Water Softener Rotor Position Switch - GE Compatible 7305150. Engineered for reliable performance and precision fitment, this iFJF aftermarket part meets or exceeds OEM specifications for durability and function. Ideal for DIY mechanics and professional technicians alike. Key Features Exact OEM Replacement: Direct fit for GE / SmartWater water softener models using WS21X10003. Reliable Switching: Precision micro-switch ensures accurate rotor position detection for proper regeneration cycles. Easy Installation: Plug-and-play replacement — no soldering or special tools required. Durable Construction: Built to withstand years of operation in humid water softener environments. Compatibility Year Make Model Engine/Notes See Description WS21X10003 Water Softener Rotor Position Switch - Direct Fit ⚠️ Always verify fitment with your specific vehicle year, make, model, and engine before ordering. Contact our support team for compatibility questions. Specifications Specification Value Brand iFJF Product Type Water Softener Parts SKU FJ-JP-X-SS10-CK Price $29.99 USD Why Choose iFJF? Quality Assurance: Every iFJF part undergoes rigorous quality inspection before shipping. Precision Engineering: Manufactured to tight tolerances for guaranteed fitment. Expert Support: Our team of diesel and automotive specialists is ready to help with any questions. Fast Shipping: Orders ship within 1-2 business days from our US warehouses. Frequently Asked Questions Q: Will this fit my water softener model?A: This rotor position switch is designed for GE / SmartWater water softeners. Check the compatibility list for your specific model. It replaces OEM part number WS21X10003. Q: What are signs of a bad rotor position switch?A: The water softener fails to regenerate, gets stuck mid-cycle, displays error codes, or the motor continues running without advancing the cycle. This switch tells the control board the rotor position. Q: Is professional installation required?A: While a handy homeowner can replace this part, we recommend professional installation if you're not comfortable working with water softener internals. Power off the unit and relieve water pressure before starting. Order your WS21X10003 Water Softener Rotor Position Switch - today — fast shipping, expert support, and the quality you can trust from iFJF Direct. 📖 Related Guides & Articles 🔗 Above Ground Pool Plumbing Parts Explained 🔗 DIY ABS Diesel Fuel Tank for Camper Vans 🔍 Explore More Parts Looking for compatible parts? Browse our full selection of Water Softener & Home Parts for your vehicle or equipment. iFJF Direct offers quality aftermarket parts with fast shipping.
$29.99

iFJF FDXLBKP1930 Keypad Kit for H-Series Low NOx Pool Spa/Hot Tub Heater H150F H200F H250F H300F H350F H400F
Overview The iFJF FDXLBKP1930 Keypad Kit is a direct replacement control panel for H-Series Low NOx pool and spa heaters covering models H150F through H400F. When your pool heater's membrane keypad becomes unresponsive — buttons that require multiple presses, dead spots, or a completely blank display — this replacement restores full control of your heater's temperature settings, mode selection, and diagnostic functions. Pool heater keypads are exposed to harsh conditions: direct sunlight, pool chemical vapors, humidity, and temperature extremes. Over time, the membrane overlay degrades, the ribbon connector oxidizes, and the tactile switches underneath wear out. Rather than replacing the entire heater control board ($300-600) or calling for expensive pool service, this affordable keypad replacement gets your heater back under your control in under 30 minutes. Key Features Direct OEM Replacement — Exact fit for H-Series Low NOx pool and spa heaters, models H150F, H200F, H250F, H300F, H350F, H400F Restores Full Control — Fixes unresponsive buttons, intermittent operation, and display issues caused by a worn keypad membrane Pre-Wired Ribbon Connector — Simple plug-and-play installation — disconnect the old ribbon cable, connect the new one, reassemble Weather-Resistant Design — Sealed membrane construction resists moisture, UV exposure, and pool chemical vapors Cost-Effective Repair — Save $300-600+ compared to replacing the entire control board or calling pool service Quick Installation — Complete the replacement in approximately 20-30 minutes with a screwdriver — no special tools or expertise required Technical Specifications Specification Details Part Number FDXLBKP1930 Compatible Models H150F, H200F, H250F, H300F, H350F, H400F (H-Series Low NOx) Connection Type Ribbon Cable (Plug-and-Play) Installation Time 20-30 Minutes Tools Required Phillips Screwdriver Compatibility Heater Series Models H-Series Low NOx H150F, H200F, H250F, H300F, H350F, H400F ⚠️ Verify Compatibility: This keypad is specifically for H-Series Low NOx models. It is NOT compatible with standard H-Series models or other pool heater brands. Check your heater's model number on the rating plate before ordering. Installation Guide Turn Off Power — Shut off power to the pool heater at the circuit breaker — safety first! Remove Control Panel Cover — Unscrew and carefully remove the heater's front control panel cover Disconnect Old Keypad — Gently pull the old keypad's ribbon cable connector from the control board socket Remove Old Keypad — Peel off the old membrane keypad from the control panel face (use adhesive remover if needed to clean residue) Install New Keypad — Peel the backing from the new iFJF keypad, carefully align and press into place, ensuring no bubbles or creases Connect Ribbon Cable — Insert the new ribbon cable into the control board socket — ensure it's fully seated and locked Reassemble & Test — Replace the control panel cover, restore power, and test all buttons for proper function FAQ Q: My heater display is blank — will this keypad fix it?A: A blank display can be caused by: (1) failed keypad membrane, (2) failed control board, or (3) power supply issue. The keypad is the most common and least expensive cause — try replacing it first. If the display remains blank after keypad replacement, the control board may need attention. Q: Some buttons work but others don't — is this the keypad?A: Yes. Individual button failure (like the temp up button working but temp down button not responding) is a classic symptom of keypad membrane wear. The tactile switches under specific positions degrade at different rates based on usage patterns. Q: How do I know if my heater is the Low NOx H-Series?A: Check the rating plate on your heater (typically located on the side or inside the front panel). It will list the model number — H150F, H200F, H250F, H300F, H350F, or H400F. The "F" suffix and "Low NOx" designation indicate the correct model for this keypad. Q: Can I install this without disconnecting gas or plumbing?A: Yes. The keypad replacement is an electrical/control panel repair only. You do not need to disconnect the gas supply, water plumbing, or venting. Simply turn off electrical power at the breaker before beginning. Q: How do I clean the old adhesive residue from the control panel?A: Use isopropyl alcohol (rubbing alcohol) or Goo Gone adhesive remover on a soft cloth. Avoid harsh solvents like acetone or lacquer thinner that can damage the control panel plastic. Ensure the surface is completely clean and dry before applying the new keypad. Q: The ribbon cable looks different from my old one — will it still work?A: The ribbon cable connector is standardized for H-Series Low NOx control boards. If your old keypad has a different connector style, double-check that your heater is indeed an H-Series Low NOx model. Contact iFJF support with your heater model number if you're uncertain. Q: How long does a pool heater keypad typically last?A: In outdoor installations (most common), expect 3-6 years from the original keypad. Factors that shorten lifespan: direct afternoon sun exposure, proximity to pool chemical storage, coastal salt air, and frequent use. Indoor heater keypads typically last 5-10+ years. Q: Does this keypad require any programming or calibration?A: No. The keypad is a simple membrane switch assembly — it sends button press signals to the existing control board, which retains all programming and calibration settings. Just plug in and use. 📚 Related Guides & Articles iFJF Guides & Resources — Expert Tips, Installation Tutorials & Buying Guides
$25.99

iFJF Universal Pool Safety Cover Springs | SS304 Stainless Steel | 5-Pack | iFJF
SS304 Stainless Steel Pool Safety Cover Springs — Universal 5-Pack Secure your pool cover with confidence using the iFJF Universal Pool Safety Cover Springs. Made from premium SS304 stainless steel, these heavy-duty tension springs resist rust and corrosion even through harsh winter conditions, chlorine exposure, and UV radiation. Designed as a universal replacement for most inground pool safety cover systems. Key Features SS304 Stainless Steel: Superior to standard galvanized springs — SS304 resists rust and maintains tension season after season, even in saltwater pool environments. 5-Pack Value: Replace all your worn springs at once, or keep spares on hand for quick swaps when a spring fails mid-season. Heavy-Duty Tension: Precisely calibrated spring rate provides secure cover hold-down without being impossible to stretch during installation. Universal Design: Compatible with most major pool safety cover brands (Loop-Loc, Meyco, Merlin, Anchor, and generic covers). Corrosion-Proof: Won't rust, pit, or weaken from pool chemical exposure, rain, snow, or direct sunlight. Specifications Specification Value Material SS304 Stainless Steel Quantity 5 Springs Per Pack Spring Type Extension/Tension Spring Applications Inground Pool Safety Covers End Type Double Loop End Hooks When to Replace Your Pool Cover Springs Visible Rust or Corrosion: If you see orange/brown rust spots, the spring has lost structural integrity. Loss of Tension: Cover sags or flaps in wind more than it used to? Springs have fatigued. Deformed Coils: Stretched or bent coils mean the spring has been overloaded or has metal fatigue. Age > 3-5 Years: Even quality springs fatigue over time. Proactive replacement prevents mid-winter failures. Frequently Asked Questions Q: Will these fit my Loop-Loc cover?A: Yes. These universal springs are designed to work with all major pool safety cover brands including Loop-Loc, Meyco, Merlin, Anchor, and others. Q: How difficult is spring replacement?A: You'll need the installation tool (spring pulling rod) that came with your cover. Slide the tool through the spring loop, stretch to the anchor point, and hook on. Takes about 2-3 minutes per spring. Q: Can I use these on a saltwater pool?A: Absolutely! SS304 stainless steel is highly resistant to saltwater corrosion, making these springs ideal for salt-chlorinated pools. Q: What's the difference between SS304 and galvanized springs?A: Galvanized springs have a zinc coating that eventually wears off, leading to rust. SS304 is solid stainless throughout — it can't rust because there's no coating to wear through.
$59.99
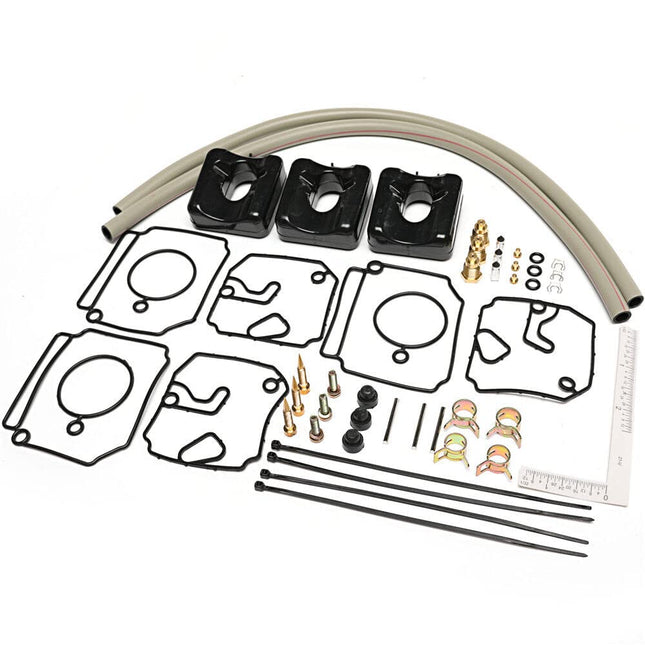
iFJF 18-7768 Carburetor Repair Kit for 40-50HP Outboard — Mercury Mariner
Complete Carburetor Repair Kit for 40-50HP 2-Stroke Outboard Engines The iFJF 18-7768 carburetor repair kit provides everything needed to rebuild and restore the carburetor on 40-50HP 2-stroke outboard marine engines. This comprehensive kit replaces worn gaskets, seals, needle valves, and o-rings — restoring proper fuel metering, idle quality, and throttle response. Compatible with Mercury, Mariner, and other outboards using Tohatsu-sourced powerheads of this era. Key Features Complete Rebuild Kit: Includes all gaskets, o-rings, inlet needle & seat, float bowl gasket, welch plugs, and mixture screw o-ring — everything needed for a full carburetor overhaul. Marine-Grade Materials: Ethanol-resistant gaskets and seals designed to withstand modern E10 fuels that can degrade older rubber components. Precision Fit: Manufactured to exact OEM tolerances for proper float height, fuel metering, and leak-free assembly. Replaces OEM Numbers: Compatible with Sierra 18-7768, Mallory 9-37503, 6H4-W0093-03-00, 6H4-W0093-02-00. Restores Performance: Fixes common symptoms like hard starting, rough idle, bogging on acceleration, and fuel leaks from bowl gasket deterioration. Compatibility Engine HP Range Notes Mercury / Mariner 2-Stroke 40HP, 45HP, 50HP Late 1980s-1990s models (verify carb model) Tohatsu 2-Stroke 40HP, 50HP OEM equivalent fitment Yamaha 2-Stroke 40HP, 50HP Select models — verify carburetor type Cross-Reference Part Numbers Brand Part Number Sierra Marine 18-7768 Mallory Marine 9-37503 Yamaha OEM 6H4-W0093-03-00, 6H4-W0093-02-00 GLM Marine 40310 When to Rebuild Your Carburetor 2-stroke outboard carburetors are precision instruments that meter fuel based on airflow. Over time, the rubber gaskets, o-rings, and float needle seats degrade — especially when exposed to ethanol-blended fuels. A rebuild kit like the iFJF 18-7768 restores factory-spec fuel delivery without the cost of a complete carburetor replacement. Common symptoms indicating a carburetor rebuild is needed: Engine cranks but won't start (fuel not reaching cylinders) Rough or surging idle (vacuum leak from dried gaskets) Bogging or hesitation on acceleration (clogged jets or worn accelerator pump) Fuel leaking from carburetor body (failed float bowl gasket) Engine runs only with choke partially engaged Excessive fuel consumption or fouled spark plugs Installation Tips Work clean: Disassemble on a clean white towel to catch small parts. Photograph each step for reference. Soak and clean: Use carburetor cleaner to soak the disassembled body and jets. Blow compressed air through all passages. Replace in order: Follow the gasket sequence — float bowl gasket last so the float height stays correct during assembly. Check float height: Verify float level specification before closing the bowl. Incorrect float height = rich or lean condition. Prime before starting: Squeeze the primer bulb until firm before cranking. It may take several pulls to fill the rebuilt carb with fuel. Synchronize if twin: On dual-carb applications, adjust linkage so both throttle plates open simultaneously. Frequently Asked Questions Q: Does this kit fit my specific 50HP Mercury outboard?A: This kit fits 40-50HP Mercury/Mariner 2-stroke outboards from the late 1980s through 1990s. To confirm, check your carburetor model number (stamped on the carb body) or verify your engine serial number against the Sierra 18-7768 application guide. Contact us with your serial number if uncertain. Q: What's included in the kit?A: Complete set includes: float bowl gasket, inlet needle & seat assembly, mixture screw o-ring, welch/expansion plugs, bowl drain screw gasket, fuel inlet gasket, and all body-to-manifold gaskets. Everything needed for one carburetor. Q: Can I use this kit if I run E10 (10% ethanol) fuel?A: Yes. The gaskets and seals in this kit are formulated to resist ethanol-related deterioration. However, we still recommend using ethanol-free marine fuel when available, as ethanol attracts moisture and accelerates corrosion in marine environments. Q: How difficult is a carburetor rebuild for a DIYer?A: Moderate difficulty. If you can change a water pump impeller or lower unit oil, you can rebuild a 2-stroke carburetor. The key is cleanliness and organization. Budget 1-2 hours for your first rebuild. Watch a model-specific video tutorial before starting. Q: Do I need any special tools?A: Basic metric socket set, flathead and Phillips screwdrivers, needle-nose pliers, carburetor cleaner spray, and compressed air are sufficient. A carburetor jet cleaning tool set is helpful but not required. Related Blog Posts Marine Fuel Water Separator Guide: Why Your Outboard Needs One Best Water Separator Fuel Filter for Diesel & Marine Engines — 2026 Guide
$49.99
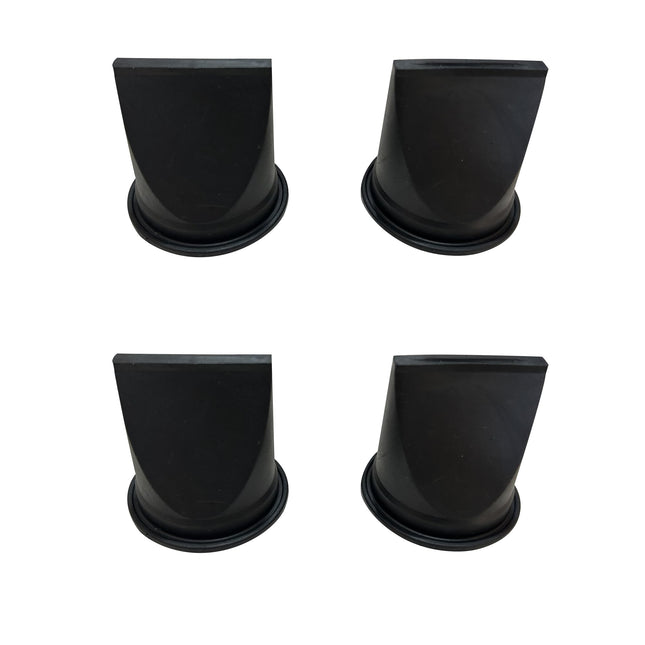
iFJF 385310076 Duckbill Valve Kit for Sealand S&T Vacuum Pumps — 2-Pack Complete Rebuild
385310076 Duckbill Valve Kit — Complete Sealand Vacuum Generator Rebuild (2-Pack) When your Sealand VacuFlush toilet loses vacuum or cycles constantly, worn duckbill valves are almost always the cause. These one-way rubber check valves degrade from waste chemicals and mineral buildup. The iFJF 385310076 Duckbill Valve Kit includes two premium nitrile valves sized for all Sealand S-Series and T-Series vacuum generators. Rebuild your pump in under 30 minutes and restore factory vacuum performance. Key Features Complete 2-Pack Value: Both inlet and outlet valves needed for a proper pump rebuild. Replace both while you have the housing open. Premium Nitrile Rubber: Resists chemical attack from holding tank treatments — outlasts generic silicone valves by 2-3x in chemical-rich environments. Universal S&T Fit: Compatible with S12D, S24D, S32D, T12, T24, T32, and VHT/VG series vacuum generators. OEM-Dimension Match: Precise lip geometry ensures complete one-way seal — no vacuum loss between flushes. Includes Silicone Grease: Pre-applied lubrication prevents tearing during installation and ensures a perfect seal. Compatibility Pump Series Models S-Series S12D, S12DAB, S24D, S32D, S115A, S12, 52A, S32 T-Series T12, T24, T32 VHT/VG VHT12, VHT24, VG4, VG5 Specifications Spec Value Part Number 385310076 Material Premium Nitrile Rubber Valve Type One-Way Duckbill Check Valve Quantity 2 (Inlet + Outlet) Includes 2x Valves + Silicone Grease Packet Symptoms of Failed Duckbill Valves Pump runs continuously without building pressure Weak or incomplete flushes — bowl doesn't clear completely Pump cycles every few minutes without anyone flushing Foul odor from vacuum tank area Hissing sound near pump housing during operation Vacuum gauge shows pressure bleed-down Installation Guide Turn off power at breaker. Locate vacuum generator pump. Remove pump housing cover (4-6 screws depending on model). Note orientation: tapered beak faces toward holding tank on both valves. Remove old valves carefully — they may be brittle. Clean mounting surfaces with a rag. Apply included silicone grease to the lip of each new valve. Press new valves firmly into their seats. Ensure full perimeter contact. Reassemble housing, tighten screws evenly. Restore power. Test with 3-4 flushes. Verify pump shuts off and vacuum holds for 2+ minutes. Frequently Asked Questions Q: How do I know which valve is bad — inlet or outlet?A: Listen near each valve while pump runs — hissing indicates a leak at that valve. Vacuum bleeding immediately after pump stops suggests inlet valve failure. Slow to build vacuum but holds once achieved points to outlet valve wear. When in doubt, replacing both is recommended. Q: How often should duckbill valves be replaced?A: Replace every 2-3 years under normal recreational use. Liveaboards and full-time RVers should replace annually. If you use formaldehyde-based holding tank chemicals, inspect every 6 months — chemicals accelerate rubber degradation significantly. Q: Why buy the 2-pack instead of single valves?A: Both valves wear at similar rates. If one has failed, the other is likely close behind. Replacing both saves you from opening the pump housing again in a few months — and costs less than two single purchases. Q: Will these fit my older Sealand pump?A: Yes. The 385310076 duckbill valve fits all S-Series and T-Series Sealand/Dometic vacuum generators dating back to the 1990s. The design has not changed. Q: Can I do this repair myself?A: Absolutely. This is a 20-30 minute DIY job requiring only a screwdriver. No plumbing or electrical expertise needed. We include step-by-step instructions in every kit. Q: What happens if I install a valve backward?A: The pump will run continuously but never build vacuum — the valve will be forced open instead of sealing. The tapered beak MUST face toward the holding tank. If you make this mistake, simply open the housing and flip the valve around. Related Products 385310076 Duckbill Valve — Single Replacement 385310681 Flush Ball & Shaft Cartridge Kit 385314349 RV Water Valve Kit 📚 Related Guides & Articles Complete Onan Quiet Diesel RV Generator Tune-Up Marine Fuel Water Separator Guide: Why Your Outboard Needs One 📖 Related Guide: VacuFlush Toilet Seal Replacement: Step-by-Step Install Guide →
$25.99
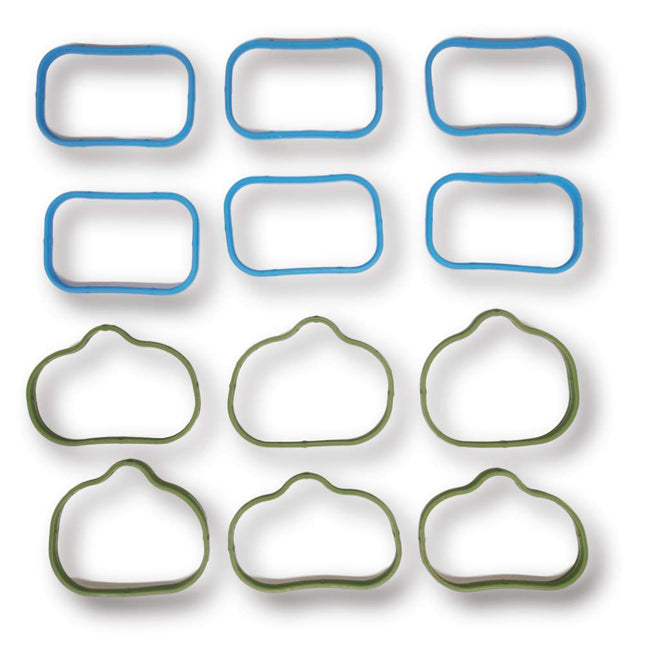
iFJF 5184562AC Intake Manifold Upper/Lower Washer Set for Chrysler Dodge VW 3.2L 3.6L
5184562AC Intake Manifold Upper & Lower Washer Set — Chrysler/Dodge/VW 3.2L 3.6L DOHC The 5184562AC Intake Manifold Washer Set is the complete upper and lower gasket kit you need when servicing the intake manifold on Chrysler Pentastar 3.6L V6 and VW 3.2L/3.6L DOHC engines. Whether you're replacing the oil filter housing, changing spark plugs (rear bank), or addressing an intake leak, these washers ensure a proper seal every time. Matches OEM part number MS97204 / 5184562AC. Key Features Complete Upper & Lower Set: Includes both upper plenum and lower runner washers — everything needed for a full manifold reseal. OEM-Spec Materials: Manufactured from the same multi-layer steel (MLS) composite as factory gaskets for consistent crush and recovery. Precision Die-Cut: Exact port and bolt hole alignment — no trimming, no wrestling during installation. Heat & Oil Resistant: Engineered to withstand continuous exposure to 250°F+ intake temperatures and PCV oil vapor without degradation. Compatibility Year Make Model Engine 2011-2020 Chrysler 200, 300, Town & Country 3.6L Pentastar V6 2011-2020 Dodge Avenger, Challenger, Charger, Journey, Grand Caravan 3.6L Pentastar V6 2011-2020 Ram 1500, ProMaster 3.6L Pentastar V6 2012-2017 VW Routan 3.6L DOHC V6 Various VW Phaeton, Touareg 3.2L DOHC V6 Frequently Asked Questions Q: When do I need to replace these intake manifold washers?A: Any time the intake manifold is removed — common during oil filter housing replacement, spark plug changes (rear bank), thermostat replacement, or addressing P0171/P0174 lean codes caused by intake leaks. Q: Are these washers reusable?A: No. Intake manifold gaskets are crush-type seals designed for one-time use. Reusing old gaskets risks vacuum leaks and lean codes. Always replace with new washers when the manifold is removed. Q: Does this fit both the upper and lower intake?A: Yes. This kit includes washers for both the upper intake plenum and the lower intake runners — a complete set for full manifold service. Q: Is this the same as Mopar MS97204?A: Yes. This set is a direct aftermarket replacement for Mopar part numbers 5184562AC and MS97204, manufactured to meet or exceed OEM specifications.Related Guides & Articles📖 Pentastar 3.6L Oil Filter Housing Replacement — Complete DIY Guide
$23.99
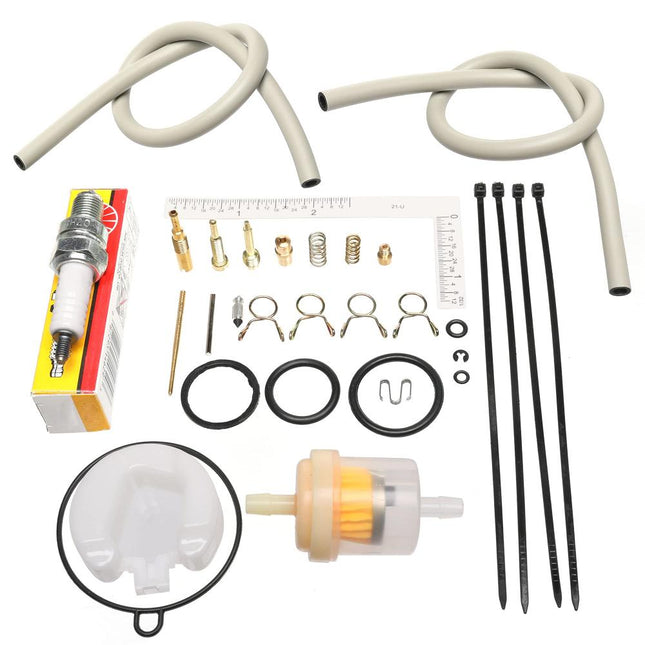
iFJF CRF70 Y-autopart Carburetor Complete Master Repair Rebuild Kit for CRF
Restore your engine's performance with the CRF70 Y-autopart Carburetor Complete Master Repair Rebuild Kit for CRF70F XR70 XR70R. This comprehensive carburetor rebuild kit includes all necessary gaskets, seals, O-rings, and precision components to bring your carburetor back to factory specifications. Whether you're experiencing hard starts, rough idle, or poor fuel economy, this kit provides everything needed for a complete overhaul — eliminating the need to replace the entire carburetor assembly. Key Features & Benefits Complete Master Kit: Includes all gaskets, O-rings, seals, needle valve, float components, and jets required for a thorough rebuild OEM-Spec Materials: Manufactured with fuel-resistant materials that withstand ethanol-blended fuels and modern fuel additives Restored Performance: Eliminates hard starting, rough idle, hesitation, and flooding issues caused by worn carburetor components Direct Fit: Precision-engineered for exact fitment — no modifications required Cost-Effective Repair: Rebuild instead of replace — save hundreds compared to buying a new carburetor assembly Compatibility & Specifications Specification Details Part Number FJ-CRRK52 Replaces CRF70F, CRF70, XR70R Price $21.99 Brand iFJF Direct Condition New Why Choose iFJF Direct? Quality Assurance: Every product undergoes rigorous inspection before shipping to ensure you receive a flawless component Expert Support: Our US-based support team has deep knowledge of diesel engines, powersports, and pool equipment — we're here to help with fitment questions Fast Free Shipping: Orders ship from our US warehouse within 1 business day with free standard shipping on all domestic orders 30-Day Returns: Not satisfied? Return within 30 days for a full refund. We stand behind every product we sell Ready to get your equipment back in top shape? Order the CRF70 Y-autopart Carburetor Complete Master Repair Rebuild Kit for CRF70F XR70 XR70R today and enjoy fast shipping, expert support, and the quality assurance that thousands of mechanics and DIY enthusiasts trust. Related Products Carburetor Cleaner & Tools — Complete your rebuild with professional-grade carburetor cleaning supplies Fuel System Parts — Browse our full selection of fuel filters, lines, and pumps Frequently Asked Questions Q: Will this carburetor rebuild kit fit my engine? A: This rebuild kit is designed for specific carburetor models. Please verify your carburetor part number matches the applications listed in the product description. Common compatible engines are listed in the title. If you're unsure, contact our support team with your engine model and carburetor number for verification. Q: Do I need special tools to rebuild my carburetor? A: Basic hand tools (screwdrivers, pliers, socket set) are typically sufficient. We recommend having a clean workspace, carburetor cleaner spray, and compressed air for cleaning passages. A service manual for your specific carburetor model is helpful but not required — the included components are straightforward to install. Q: What warranty does this product come with? A: All iFJF Direct products are backed by a 30-day satisfaction guarantee. If you're not completely satisfied, return the product for a full refund. We also offer a 90-day warranty against manufacturing defects. Our US-based customer support team is available to assist with any issues. Q: How fast will I receive my order? A: Orders ship from our US warehouse within 1 business day. Standard shipping typically delivers within 3-7 business days to the continental US. Expedited shipping options are available at checkout. You'll receive a tracking number as soon as your order ships. Q: What if this part doesn't fit my vehicle/equipment? A: If the part doesn't fit, we'll make it right. Contact our support team within 30 days for a prepaid return label and full refund. We recommend verifying your vehicle/equipment model, year, and part numbers before ordering to ensure compatibility. Our team is happy to help with fitment questions before you buy.
$29.99

iFJF Cleaner Head Clip Latch Tab Button for V7 V8 V11 V15 Replacement Parts Wand Illumination Tool Cleaner Head Tube Switch Button
Product Overview The iFJF Cleaner Head Clip Latch Tab Button for V7 V8 V11 V15 Replacement Parts Wand Illumination Tool Cleaner Head Tube Switch Button is a premium aftermarket replacement engineered to meet or exceed OEM specifications. Manufactured with precision tooling and quality materials, this direct-fit component restores factory function at a fraction of the dealership cost. Whether you are refreshing a daily driver, completing a restoration, or performing routine maintenance, this iFJF part delivers dependable performance backed by US-based customer support. Key Features Exact Fit Replacement — Designed specifically for Dyson V7, V8, V11, and V15 models. Restores Full Function — Fixes broken wand connections, loose cleaner heads, and latch failures. Durable ABS Construction — Matches OEM material quality and impact resistance. Quick DIY Installation — No special tools required. Most replacements take under 10 minutes. Cost-Effective Repair — Save hundreds over replacing the entire vacuum or buying OEM parts. Specifications Spec Value Brand iFJF Condition New Why Choose iFJF iFJF replacement parts are engineered to match or exceed OEM quality at a fraction of the price. Every component undergoes rigorous quality control before shipping. Designed with the DIY mechanic in mind — direct fit, complete with hardware, and backed by responsive US-based support. Installation Tips Prepare the work area — gather tools and ensure vehicle/equipment is secured. Remove the old component — take reference photos before disconnection. Clean mounting surfaces thoroughly for proper fit of the new part. Install the new iFJF part — follow orientation markings and tighten to specification. Double-check connections and hardware before testing. Test operation to confirm proper function before returning to service. Frequently Asked Questions Q: How difficult is the installation?A: Rated DIY-friendly for those with basic mechanical skills and common hand tools. Most installations take 30-90 minutes. Q: What warranty is included?A: All iFJF products are backed by our satisfaction guarantee. Contact our US-based support team for prompt resolution. Q: How does this compare to OEM?A: Built to same dimensions using equivalent or upgraded materials. Often addresses known OEM weak points with improved designs.
$19.99

iFJF IDXL2DB1930 Display Board for H-Series Low NOx Pool & Spa Heater — Direct Replacement
Product Overview The iFJF IDXL2DB1930 Display Board is a precision-engineered direct replacement for H-Series Low NOx pool and spa heaters. This digital display and control board is the primary user interface for temperature setting, diagnostic codes, and heater status monitoring. Pre-tested for guaranteed functionality. Key Features Direct OEM Replacement: Exact fit for IDXL2DB1930 display boards in H-Series Low NOx heaters. Clear LED Display: Bright, easy-to-read digital display for temperature and diagnostic codes. Pre-Tested: Every board is powered up and tested before shipping — no DOA risk. Wide Compatibility: Works with H150FD, H200FD, H250FD, H300FD, H350FD, H400FD, H250IDL2, and H350IDL2 models. Plug-and-Play: Same connectors and mounting as OEM — no wire splicing or modification needed. Compatibility Brand Model/Part Years/Notes Hayward H150FD Low NOx Pool Heater Hayward H200FD Low NOx Pool Heater Hayward H250FD Low NOx Pool Heater Hayward H300FD Low NOx Pool Heater Hayward H350FD Low NOx Pool Heater Hayward H400FD Low NOx Pool Heater Hayward H250IDL2 Induced Draft Hayward H350IDL2 Induced Draft Technical Specifications Specification Value Part Number IDXL2DB1930 Type Digital Display / Control Board Display LED Digital Readout Compatible Series H-Series Low NOx Installation Direct Plug-and-Play Testing 100% Pre-Shipped Functional Test Why Choose iFJF? Significant Savings: OEM display boards can cost $300-500. Our direct replacement is a fraction of that. Guaranteed to Work: Pre-tested means no returns for DOA units. Fast Shipping: In stock and ships same business day. 30-Day Returns: Full refund if it doesn't solve your issue. Installation Turn off power to the pool heater at the breaker. Remove the heater's front access panel. Disconnect the ribbon cable and power connector from the old display board. Remove mounting screws and extract the old board. Mount the new iFJF IDXL2DB1930 board and reconnect cables. Restore power and verify display functionality. Frequently Asked Questions Q: How do I know if my display board is bad?A: Symptoms: blank display, flickering numbers, unresponsive buttons, error codes that won't clear, or heater won't respond to temperature changes.Q: Will this work with my H-Series heater?A: Yes, if your heater is an H-Series Low NOx model (H150FD through H400FD, or H250IDL2/H350IDL2). Verify your existing board part number is IDXL2DB1930.Q: Is programming required after installation?A: No — it's truly plug-and-play. The board reads settings from the heater's main control board.Q: Does this come with the button membrane?A: This listing is for the display circuit board only. The external button membrane/overlay is sold separately. Related Products HK50AA051 Terminal Board for Carrier HVAC HK61EA033 Rectifier Circuit Board Related Blog Posts How To Perform A Cooling System Flush
$45.99

iFJF PC3Z-6A785-A Air Oil Separator Assembly CCV Filter for 2023-2024 Ford F250-F550 Super Duty 6.7L Powerstroke Diesel
Product Overview The iFJF PC3Z-6A785-A Air Oil Separator Assembly (CCV Filter) is a direct OEM replacement for 2023-2024 Ford F-250 through F-550 Super Duty trucks equipped with the 6.7L Powerstroke diesel engine. This crankcase ventilation filter assembly separates oil mist from blow-by gases before they enter the intake system — preventing oil fouling of the turbocharger, intercooler, and intake valves. Manufactured to IATF 16949 quality standards. Key Features OEM-Spec Replacement: Direct replacement for Ford part PC3Z-6A785-A (PC3Z6A785A) — engineered to match factory fit, form, and function. 2023-2024 Super Duty Coverage: Specifically designed for the latest generation 6.7L Powerstroke diesel in F-250, F-350, F-450, and F-550 Super Duty trucks. Oil Mist Separation: High-efficiency coalescing media separates oil from crankcase blow-by gases, preventing carbon buildup on intake valves and turbocharger compressor wheels. Maintains Proper CCV Pressure: Correctly regulates crankcase ventilation pressure to prevent oil seal leaks caused by excessive crankcase pressure. IATF 16949 Certified: Manufactured under the same quality standards required by major automotive OEM suppliers. Vehicle Compatibility Make Model Years Engine Ford F-250 Super Duty 2023-2024 6.7L Powerstroke Diesel Ford F-350 Super Duty 2023-2024 6.7L Powerstroke Diesel Ford F-450 Super Duty 2023-2024 6.7L Powerstroke Diesel Ford F-550 Super Duty 2023-2024 6.7L Powerstroke Diesel OE Cross-Reference Brand Part Number Ford / Motorcraft PC3Z-6A785-A Why Replace Your CCV Filter? The crankcase ventilation (CCV) system is critical for 6.7L Powerstroke engine health. A failing or clogged oil separator allows excessive oil mist into the intake tract, causing carbon deposits on intake valves, turbocharger compressor wheel fouling, intercooler oil pooling, and increased emissions. Most Ford technicians recommend CCV filter replacement at 60,000-100,000 mile intervals, especially on trucks used for towing or severe service. Installation Notes Located on the valve cover — accessible from the top of the engine bay. Typical installation time: 30-45 minutes with basic hand tools. Ensure the new O-ring seals are properly seated to prevent oil leaks. Clean the mating surfaces before installation for a proper seal. Frequently Asked Questions Q: Will this fit my 2023 F-350 6.7L Powerstroke?A: Yes. This is the exact replacement for 2023-2024 F-250 through F-550 Super Duty trucks with the 6.7L diesel engine. Q: How often should the CCV filter be replaced?A: Ford recommends inspection at 60,000 miles and replacement around 100,000 miles, or sooner for trucks used in severe service, frequent towing, or high-idle applications. Q: What are signs of a failing CCV filter?A: Excessive oil in the intake piping, oil leaks around valve cover seals, increased oil consumption, and visible smoke or oil residue from the crankcase breather. Q: Is this an OEM Ford part?A: This is a premium aftermarket replacement manufactured to meet or exceed Ford OEM PC3Z-6A785-A specifications. IATF 16949 certified. Q: Can I install this myself?A: Yes. This is a bolt-on replacement accessible from the top of the engine. Basic hand tools and 30-45 minutes are all that's needed for most DIYers.
$93.99
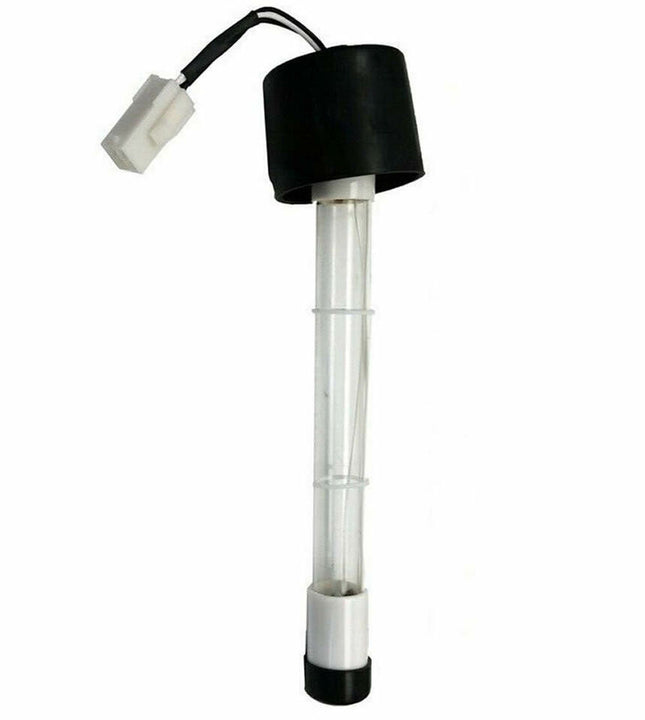
iFJF 6472-841 UV Replacement Bulb for ClearRay XL Pool & Spa — 6472-857 Compatible
Product Overview Maintain crystal-clear, bacteria-free water in your pool or spa with the iFJF 6472-841 UV Replacement Bulb. This high-output ultraviolet lamp is designed for ClearRay XL water sanitization systems, using UV-C light to neutralize bacteria, viruses, algae, and other microorganisms without chemicals. Compatible with 6472-857 bulb specifications, it's the essential replacement to keep your UV sanitizer operating at peak efficiency. UV bulbs lose effectiveness over time — even if they still glow, their germicidal output drops significantly after 12 months of use. Replacing your UV bulb annually ensures your ClearRay system continues to provide effective, chemical-free water treatment that's gentle on skin and eyes. Key Features UV-C Germicidal Output: Emits 254nm wavelength UV-C light proven to neutralize 99.9% of waterborne pathogens ClearRay XL Compatible: Direct replacement for ClearRay XL pool and spa UV sanitization systems Cross-Compatible: Replaces both 6472-841 and 6472-857 bulb specifications Long Service Life: Rated for approximately 9,000 hours of continuous operation (about 12 months) Easy Installation: Standard 4-pin base — unplug old bulb, plug in new one Chemical-Free Sanitation: Reduces chlorine/bromine demand by destroying microorganisms before they multiply 📋 Compatibility Compatible Systems ClearRay XL UV Sanitization System 6472-841 replacement applications 6472-857 replacement applications Pool and spa UV water treatment systems using 4-pin UV-C lamps 📐 Specifications Specification Value Part Numbers 6472-841 / 6472-857 Lamp Type UV-C Germicidal (254nm) Base Type 4-Pin (standard UV lamp base) Rated Life ~9,000 hours Application Pool & spa UV water sanitization Why Replace Your UV Bulb Annually? Declining Output: UV-C output drops 30-40% after 9,000 hours — your water isn't being properly sanitized even if the bulb glows Algae Prevention: A strong UV system prevents algae blooms before they start, reducing chemical usage and shock treatments Health & Safety: UV sterilization kills chlorine-resistant pathogens like Cryptosporidium that can survive in chemically treated water Equipment Protection: A properly functioning UV system prevents biofilm buildup in plumbing and equipment Installation Instructions Turn off power to the UV sanitizer at the circuit breaker Allow the bulb to cool for 15 minutes if recently operated Remove the UV chamber cover according to manufacturer instructions Carefully unplug the old bulb from its 4-pin socket DO NOT touch the new bulb glass with bare hands — use the included sleeve or clean gloves Insert new bulb into socket and reassemble chamber cover Restore power and verify operation ❓ Frequently Asked Questions Q: How often should I replace this UV bulb?A: UV bulbs should be replaced every 12 months (approximately 9,000 hours of operation). Even if the bulb still glows, its germicidal UV-C output drops significantly after one year. Q: Does this fit my ClearRay XL system?A: Yes. This 6472-841 bulb is designed as a direct replacement for ClearRay XL UV sanitization systems used in pools and spas. Q: What's the difference between 6472-841 and 6472-857?A: These are cross-compatible bulb specifications. This replacement bulb meets both 6472-841 and 6472-857 requirements. Q: Can I touch the bulb with my bare hands?A: NO. Oils from your skin create hot spots on the quartz glass that can cause premature failure. Always handle by the ceramic base or use clean gloves. Q: Will this reduce my chlorine usage?A: Yes. UV sterilization neutralizes microorganisms before they can multiply, reducing the chlorine demand by 25-50% depending on bather load and environmental conditions.
$37.99


