

Egr cooler and Oil cooler Replacement on a 6.0 powerstroke
, by iFJF Direct, 14 min reading time
, by iFJF Direct, 14 min reading time
How to Replace the EGR Cooler and Oil Cooler on a 6.0 Powerstroke (Step-by-Step Guide) If you own a 2003–2007 Ford Powerstroke 6.0L, you already know the EGR cooler and oil cooler are the two most com...
If you own a 2003–2007 Ford Powerstroke 6.0L, you already know the EGR cooler and oil cooler are the two most common failure points on these engines. When the factory oil cooler clogs, coolant flow to the EGR cooler drops, the EGR cooler overheats, and before long you're puking coolant out of the degas bottle. Left unchecked, a failed EGR cooler can dump coolant into the intake — and that's how head gaskets get blown.
In this guide, we walk through a complete EGR cooler and oil cooler replacement on a 2005 Ford F-250 with the 6.0L Powerstroke, captured from a real shop-floor repair. You'll see every step from draining coolant to buttoning everything back up, including the real-world gotchas that factory service manuals don't always mention.
This article is written for DIY diesel owners and independent techs who have basic mechanic skills, a decent socket set, and a weekend to spare. The job takes most people a full day (sometimes two if you run into stuck hardware or need a replacement oil cooler housing).
The 6.0L Powerstroke uses a single coolant circuit that flows through the oil cooler first, then into the EGR cooler. The factory oil cooler is essentially a small radiator — fine-pitched fins that clog easily with oil sludge and casting sand. Once the oil cooler restricts flow, the EGR cooler runs hot and its internal solder joints eventually crack.
Rule of thumb: If you're replacing the EGR cooler, always replace the oil cooler too. Skipping the oil cooler means the new EGR cooler will likely fail again from the same restricted coolant flow. It's not a question of if — it's when.
| Tool / Part | Notes |
|---|---|
| EGR Cooler Kit (e.g., Sinister Diesel / Bulletproof Diesel) | Includes EGR cooler, gaskets, intake manifold gaskets, turbo O-rings, and oil cooler-to-EGR hose |
| Oil Cooler Kit | Includes oil cooler, screen (pick-up tube filter), and all gaskets |
| 11 mm socket | For V-band clamps on charge pipes |
| 10 mm socket | Intake manifold bolts, fuel filter housing bolts |
| 13 mm socket | Alternator bolts |
| Flathead screwdriver or 8 mm | Hose clamps on intake boots |
| Penetrating oil | V-band clamps and turbo bolts seize up frequently |
| Hammer + chisel | For breaking loose stuck V-band joints |
| Lint-free rags | Do NOT use red shop rags — fibers will contaminate the oil galley |
| Shop vacuum | Clean out debris around the lifter valley before removing components |
| New coolant (Motorcraft Gold or equivalent) | Drain and refill the system |
| O-ring lube / petroleum jelly | Lubricate O-rings during reassembly |
Start by opening the degas bottle cap to release pressure, then drain the radiator. On this 2005, the tech removed the lower hose and let the system drain while working on other components.
Remove the fan shroud by carefully working your way around the tabs — they break easily. Take your time, work your way down, and pop it off gently. Once the shroud is out, you have clear access to the belt tensioner.
Locate the belt tensioner, release tension with a wrench or breaker bar, and slip the belt off. With the belt out of the way, disconnect the alternator (13 mm bolts) and set it aside — the alternator is always in the way on the 6.0L, so move it early.
Unplug the FICM (Fuel Injection Control Module). You don't need to remove it entirely — just get the wiring harness clear of the intake manifold and turbo area.
Use the 11 mm socket to loosen the V-band clamps on the hot-side and cold-side charge pipes. If the V-band bolts are seized (very common), spray penetrating oil and wait. If they strip, you may need to carefully snap the bolt head off and break the joint loose with a hammer and chisel.
Disconnect the intake hose clamps with a flathead screwdriver or 8 mm socket, and remove the intake boot. Set the charge pipes aside.
Unplug the EGR valve and any remaining wiring connectors around the turbo. Remove the V-band clamp connecting the turbo outlet to the downpipe.
Pro tip: Check the turbo pedestal bolts — on many high-mileage 6.0L trucks, one of the pedestal bolts is missing from the factory. If yours is missing, it's not uncommon, but make a note to replace it during reassembly.
Once all fasteners are removed, carefully pull the turbo up and out of the valley. Have a drain pan ready — on this truck, a significant amount of coolant had pooled in the downpipe, confirming the EGR cooler was leaking internally.
Disconnect all fuel lines to the upper fuel filter housing. Remove the three bolts securing the fuel filter housing and lift it out of the valley. With the housing out of the way, remove all 10 mm intake manifold bolts.
Safety warning: Before pulling the manifold, thoroughly clean the top of the engine around the lifter galley. Vacuum up any dirt, debris, or loose material. If anything falls down into the cylinders or valve area, you'll have a much bigger problem on your hands.
Slide the intake manifold back and lift it up and out. Set it aside on a clean surface.
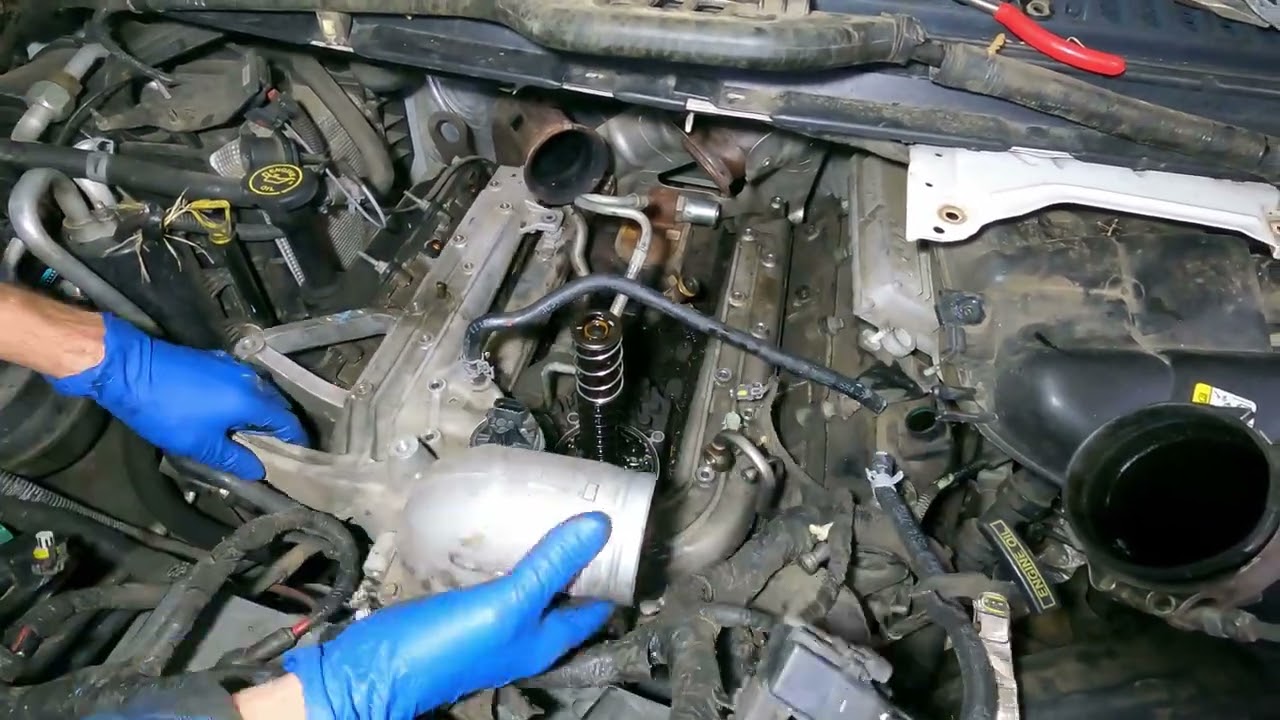
With the intake manifold out, the oil cooler assembly is fully exposed. Remove the oil cooler housing bolts and carefully lift the entire assembly out.
Expect a mess. A significant amount of oil will drain down the back of the block when you pull the cooler. Have shop towels and a drain pan positioned underneath.
Once the cooler is out, inspect the pick-up screen in the lifter valley. On this truck, the screen was completely clogged and physically falling apart — pieces of the screen material were disintegrating into the oil supply. If your truck has never had the oil cooler replaced, you'll almost certainly find a destroyed screen.
Clean the lifter valley thoroughly using lint-free rags only. Regular red shop rags shed fibers that can clog oil passages and destroy bearings. Vacuum up any loose debris and wipe everything down with clean lint-free cloth.
Separate the oil cooler core from the lower housing. Clean the housing thoroughly and inspect it for cracks — the plastic tower on the housing can crack during removal. On this job, the housing was cracked, requiring a replacement from the Ford dealership.
Double O-ring check: When installing the new housing, verify that the coolant adapter insert has only ONE O-ring. The replacement housing in this case came with a double O-ring from the factory, which would have caused a sealing issue. Remove the extra O-ring before assembly.
Install the exhaust gasket at the rear of the EGR cooler mounting area. Slide the new EGR cooler into position.
Critical step: Install the coolant supply hose that connects the oil cooler to the EGR cooler (included in the kit) BEFORE final positioning. This hose is nearly impossible to route once both coolers are bolted in place.
Replace the large O-ring on the EGR cooler-to-up-pipe connection. These O-rings tend to shift during installation, so leave the connection slightly loose on the back side until the cooler is seated, then tighten everything down.
Before starting, cycle the key a few times to build oil pressure. Fire the engine and let it idle while checking for leaks around all connections — particularly the V-band joints, oil filter housing, and coolant connections.
If the V-band is leaking boost (whistling or hissing under throttle), stop and fix it immediately. Boost leaks cause the turbo to work harder and run hotter, which defeats the purpose of the cooler replacements.
Take the truck for a 15–20 minute test drive, bringing it up to full operating temperature. Monitor the temperature gauge — it should climb steadily and stabilize in the normal range. Watch for any fluctuation that might indicate air in the cooling system.
| Tip | Why It Matters |
|---|---|
| Use lint-free rags exclusively around the lifter valley | Red shop rags shed fibers that can clog oil galleries and destroy engine bearings |
| Always replace the oil cooler when doing the EGR cooler | Restricted oil cooler coolant flow is the root cause of most EGR cooler failures — replacing only the EGR cooler is a band-aid fix |
| Inspect the new oil cooler housing for double O-rings | OEM replacement housings sometimes ship with an extra O-ring that will cause sealing problems at the coolant adapter |
| Check the turbo pedestal for missing bolts | Many 6.0L trucks are missing one pedestal bolt from the factory — replace it during reassembly to prevent turbo movement |
| Leave the EGR cooler-to-up-pipe connection slightly loose during installation | The large O-ring shifts easily; pre-positioning the connection prevents having to fight it blind |
| Brand | Part / Kit | Notes |
|---|---|---|
| Sinister Diesel | EGR Cooler + Oil Cooler Kit | Tube-style EGR design, less prone to soot clogging vs. factory radiator-fin style |
| Bulletproof Diesel | EGR Cooler Kit | Industry standard for 6.0L EGR replacement; similar tube design to Sinister |
| Motorcraft (OEM) | Oil Cooler Assembly | Factory replacement; same design that clogs — consider upgrading to aftermarket |
| Ford Dealership | Oil Cooler Lower Housing | If your original housing is cracked (plastic tower breaks), order from Ford with self-tapping bolts |

This 6-piece fuel filter kit covers both the lower lifter pump filter and the upper fuel bowl filter on 2003–2007 Ford F250/F350/F450/F550 Super Duty and 2003–2005 Excursion with the 6.0L Powerstroke diesel. Replaces Motorcraft 3C3Z-9N184-CB.
If you're already in the engine bay replacing your EGR and oil coolers, it's the perfect time to swap your fuel filters too — everything is already apart.
Shop Now →Plan for a full day (8–12 hours) if everything goes smoothly. If you encounter seized V-band clamps, broken fan shroud tabs, or need to source a replacement oil cooler housing, budget for a second day. This job was split across two days because the original oil cooler housing was cracked and required a dealership replacement part.
Technically yes, but it's strongly discouraged. The oil cooler is the root cause of most EGR cooler failures — when it clogs, coolant flow to the EGR drops, causing the EGR to overheat and crack. Replacing only the EGR cooler without addressing the oil cooler means the new EGR cooler will likely fail again from the same restricted coolant flow.
Use Motorcraft Gold (VC-8-A) or an equivalent ELC (Extended Life Coolant) designed for diesel engines. Do not mix coolants — flush the system completely before refilling with the correct type. Always open the degas bottle cap before draining to release system pressure.
Oil in the coolant on a 6.0L usually comes from a failed oil cooler — the internal oil-to-coolant heat exchanger develops cracks or the O-rings fail, allowing engine oil to mix with coolant. This is a clear sign that both the oil cooler and EGR cooler need immediate replacement. Driving with contaminated coolant will cause rapid degradation of the EGR cooler and can damage other cooling system components.
Yes, on the 6.0 Powerstroke the intake manifold must be removed to access the oil cooler assembly. Some techs try to cheat by lifting one side, but since you need to pull the oil cooler itself (not just the EGR cooler), the manifold has to come all the way out. Budget extra time for cleaning the lifter valley — keeping debris out of the cylinder bores is critical.
 5-Micron Fuel Filter Conversion Kit for 2011-2020 Ford 6.7L Powerstroke — 121003
$90.00
5-Micron Fuel Filter Conversion Kit for 2011-2020 Ford 6.7L Powerstroke — 121003
$90.00
 140-2897 Air Filter for Cummins Onan QD Generator — HDKAH HDKAK HDKAJ HQDPA HQDPC
$17.99
140-2897 Air Filter for Cummins Onan QD Generator — HDKAH HDKAK HDKAJ HQDPA HQDPC
$17.99
 68157291AA and 68436631AA Fuel Filter for 2019-2020 Ram 2500-5500 6.7L Diesel Engines 68065608AA PF46152
$29.99
68157291AA and 68436631AA Fuel Filter for 2019-2020 Ram 2500-5500 6.7L Diesel Engines 68065608AA PF46152
$29.99
 68157291AA Fuel Filter and 68065612AA Silver Canister Housing Cap for Ram 6.7L 2011-2020 2500 3500 4500 5500 Diesel Engine
$51.99
68157291AA Fuel Filter and 68065612AA Silver Canister Housing Cap for Ram 6.7L 2011-2020 2500 3500 4500 5500 Diesel Engine
$51.99