FASS vs AirDog: Complete Duramax Lift Pump Installation Guide
,
by iFJF Direct,
25 min reading time
Complete step-by-step guide to installing a FASS or AirDog lift pump on 2001-2010 Duramax trucks. Covers LB7, LLY, LBZ, LMM engines with tools list, wiring diagrams, priming instructions, and troubleshooting.
Is your Duramax hard to start, rough idling, or losing power? If you own a 2001-2010 Duramax (LB7, LLY, LBZ, or LMM), you might be surprised to learn that GM didn't equip these trucks with a factory lift pump. At iFJF Direct, we've helped hundreds of Duramax owners solve fuel delivery problems — and this guide walks you through every step of installing a FASS or AirDog lift pump, from choosing the right model to complete installation and troubleshooting.
🛒 iFJF Direct Recommends:
Pair your lift pump upgrade with our 1R-0750 Duramax Fuel Filters (3-Pack) — the most popular secondary filter for 2001-2016 Duramax engines. A fresh set of filters ensures your new lift pump performs at its best from day one.
1. Why Your Duramax Needs a Lift Pump
The Factory Fuel System Problem
Unlike Cummins and Power Stroke engines, 2001-2010 Duramax trucks rely on the CP3 injection pump to suck fuel from the tank rather than having a lift pump push it. This works — sometimes.
At moderate power levels with a healthy fuel system, the CP3 can pull enough fuel. But over time, fuel lines, fittings, and seals degrade. Air leaks develop. The symptoms are familiar to many Duramax owners:
Hard starting or no-start conditions
Rough idle
Low power, won't rev past 1,100 RPM
Inconsistent problems at various fuel levels
⚠️ Common Misconception:
These symptoms often get blamed on a bad fuel filter or filter housing. While those ARE the most common culprits (cheap and easy to fix), a lift pump doesn't fix the root cause — it covers symptoms or reveals the real problem. Either outcome moves you forward.
Benefits of Adding a Lift Pump
Benefit
Description
Consistent Fuel Delivery
Eliminates air leaks and cavitation — your CP3 gets steady fuel pressure every time
Better Filtration
FASS filters down to 2 microns vs. factory 4 microns — cleaner fuel means longer injector life
Extended Filter Life
Larger filter media means longer change intervals — fewer trips under the truck
Future Power Support
Supports 600-1,000 HP depending on pump selection — room to grow
Simplified Troubleshooting
Pushes fuel through small leaks, reveals bigger problems — no more guesswork
2. FASS vs AirDog: Which Should You Choose?
The Short Answer: Both Are Excellent
FASS and AirDog are nearly identical products with lifetime warranties. Either is a solid choice. At iFJF Direct, we don't sell lift pumps directly — but we do stock the filters and maintenance parts you'll need for whichever system you choose.
Pump Sizing Guide
GPH Rating
Supported Horsepower
Best For
100 GPH
Up to 600 HP
Stock or mildly modified trucks
165 GPH ⭐
600-1,000 HP
Built trucks or future power plans — best value
💡 Pro Recommendation:
The 165 GPH pump costs only ~$50 more and works perfectly on stock trucks. It gives you headroom for future modifications without any downside. Buy once, cry once.
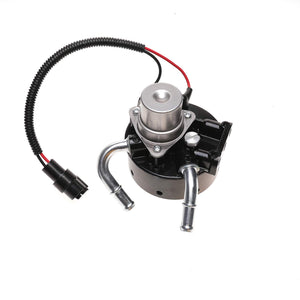
Why I Chose FASS
For this installation, I selected a FASS Titanium Signature 165 GPH. The deciding factor was simple: it was a blem model that saved $200 compared to the AirDog equivalent. Both products are excellent. If you're deciding based on price, availability, or brand preference, you can't go wrong either way.
Key Difference: Plumbing Design
Feature
FASS
AirDog
Supply Connection
Quick-connect fitting at fuel cooler
Direct to sending unit in tank
Return Line
Filler neck T-fitting
Same
Emergency Bypass
✅ Easy — reconnect factory lines
⚠️ Requires removing line from sending unit
🔧 FASS Advantage:
If your lift pump fails on the road, you can disconnect the quick-connect fittings, restore factory plumbing, and drive home. The AirDog requires more work to bypass because you've removed the factory supply line entirely.
The exact filter your Duramax needs. Compatible with 2001-2016 LB7/LLY/LBZ/LMM/LML engines. OEM-grade filtration at a fraction of dealer prices. Stock up before your lift pump install — you'll want fresh filters for the break-in.
Safety glasses — non-negotiable when cutting the filler neck
Consumables
Item
Purpose
Diesel fuel (1-2 gallons)
Filter priming
WD-40
Pump priming (alternative method)
Blue Loctite
Pump mounting bolts
Spiral wrap
Fuel line protection
Magnetic zip tie holders
Clean routing without drilling
Zip ties (black, UV-resistant)
Secure all lines
4. Installation: 5-Step Walkthrough
#
Step
What You'll Do
⏱️ Est. Time
1
Plumb the Truck
Install supply, feed, and return fittings
45-60 min
2
Prepare the Pump
Install fittings and mount to bracket
20 min
3
Mount the Pump
Attach assembly to truck frame
30 min
4
Plumb the Pump
Connect all fuel lines
30 min
5
Wire and Prime
Electrical connections and system startup
45 min
💡 Time-Saving Tip:
FASS recommends wiring first so you can run the pump upside-down with WD-40 to prevent dry start. I chose to spray WD-40 into the pump inlet and let it sit overnight instead. Either method works — pick what fits your schedule.
1
Plumb the Truck
Disconnect the Supply Line
Remove fuel cooler bolts — Two bolts hold the cooler bracket to the frame. Remove these and let the cooler drop down for access.
Disconnect the factory quick-connect — Use your 1/2" fuel line disconnect tool at the fitting near the front of the fuel tank.
🚨 Critical Warning:
Do NOT attempt this with a full fuel tank. When you disconnect the supply line, fuel will siphon from the tank. Have a bucket ready, and expect to get wet.
Route the new supply line — Connect one end of your supplied fuel hose to the factory supply line from the tank. Route the other end toward the engine, leaving it loose for now.
Install the Return Fitting
Cut the filler neck — The return fitting installs between the fuel cap and the tank. Use a utility knife to cut the filler neck hose.
Install the T-fitting — This is a directional piece welded at an angle. The fuel outlet MUST point toward the tank.
🚨 Danger:
If installed backward, fuel sprays toward the cap. If you refuel with the engine running and remove the cap, you'll get a diesel shower. Double-check orientation before tightening.
Secure with hose clamps — Tighten both sides of the T-fitting.
2
Prepare the Pump
Install Pump Fittings
Before mounting, install the two fittings into the pump housing:
Fitting
Location
Orientation
90° Elbow
Supply (from tank)
Pointing upward
Straight
Feed (to engine)
Threaded into outlet
Torque Specification: 18 ft-lbs. Use a vise to hold the pump while tightening to avoid bending internal components.
Assemble the Mounting Bracket
Attach pump to bracket — Use the supplied spacers between pump and bracket. The mounting holes are offset, so verify correct orientation.
Install rubber isolators — These go between the frame bracket and the pump bracket to reduce vibration transfer.
Leave mounting bolts finger-tight — You'll torque these after everything is aligned on the truck.
3
Mount the Pump
Location: Front Bed Mount Bolt
The pump mounts to the front bed-to-frame bolt, located just behind the filler neck. Remove this bolt (18mm) to attach the frame bracket.
Bracket Configuration
The instructions show one configuration, but you may need to experiment. My setup used a "sandwich" orientation that provided the best clearance between:
Leaf spring bolt
Truck body
Filler neck
📐 Fitment Note:
The pump hangs down slightly below the frame — this is normal. Aftermarket mounts (like Worly Fab) can raise it higher inside the frame rail if clearance is a concern.
Final Assembly
Apply blue Loctite to the three pump-to-bracket bolts
Torque all hardware — 9/16" bracket bolts and 7/16" pump bolts
Verify clearances — Check for interference with suspension movement
4
Plumb the Pump
Connect Fuel Lines
Connection
From
To
Notes
Supply
Tank quick-connect
Pump inlet (90° fitting)
Route over frame rail, use spiral wrap at contact points
Feed
Pump outlet
Engine feed line
Route under body mount
Return
Filler neck T-fitting
Pump return
Loop behind fender panel
Installation Tips
Pushing Hose onto Barbed Fittings:
Apply oil or diesel to the fitting
Push hose onto fitting using a block of wood as a backing surface
Don't push past the rib on quick-connect fittings — it needs room to lock
Protecting Fuel Lines:
Use spiral wrap anywhere lines contact frame or body
Magnetic zip tie holders secure lines without drilling
Avoid sharp bends or kinks
Line Routing Strategy
Supply line: Over the body mount on frame, along outside of frame rail
Feed line: Under the body mount, along truck body
Return line: Behind the fender panel to filler neck
💡 Pro Tip:
If you have extra fittings, a 90° fitting on the pump's lower connection and a 45° on top would keep lines off the body completely. Standard fittings work fine, but this is a future upgrade consideration.
5
Wire the System
Relay Installation
Mount the relay under the hood on the driver's side firewall. A factory bolt works well — you may need to enlarge the relay mounting hole with a step bit.
Wiring Connections
Wire
Connection
Notes
Relay ground
Frame ground
Dedicated ground point
Pump power
Battery (+)
Fused at harness
Relay trigger
Switched fuse source
Use fuse tap at TBC1 (ignition)
Pump ground
Chassis ground
Don't rely on mounting bolt alone
⚡ Ground Problem — Learn From My Mistake:
My initial ground at an engine bolt didn't work. The pump wouldn't run. Moving the ground to the AC condenser bracket solved it immediately. Always verify ground continuity before assuming the pump is bad.
Clean Wiring
Cut harness to length — Remove excess wire rather than coiling it
Secure with zip ties — Attach to factory harness along the frame rail
Route away from hood hinge — Prevent interference when hood opens
5. Priming and Startup
Filter Priming Procedure
Install primary filter (suction side) and tighten
Thread secondary filter loosely — leave it 1-2 turns from tight
Turn on ignition to activate pump
Let pump run until fuel fills the secondary filter and air escapes
Tighten secondary filter once fuel appears
🔧 Why This Works:
Leaving the secondary filter loose allows air to escape without back pressure. The pump primes quickly because it's only pushing fuel, not compressing air. This is the single best trick for a clean first start.
First Start Checklist
Turn ignition on — Listen for pump (very quiet, barely audible with engine off)
Wait 10-15 seconds for system to pressurize
Start engine — It should fire immediately
Check for leaks — Inspect all connections
Test drive — Monitor for any issues
6. Filter System Deep Dive
FASS vs Factory Filtration
Spec
Factory AC Delco
FASS System
Primary Filter
N/A
14-4 micron (water separation, pump protection)
Secondary Filter
4 micron
2 micron (final filtration) ✅
Filter Media Volume
Small
Large — longer service intervals
Understanding the FASS Filter Layout
The FASS filter arrangement is unconventional:
Primary filter (inlet): 14-4 micron, captures water and large particles
Secondary filter (outlet): 2 micron, final polish before injectors
Most traditional systems use a 20-micron primary and 2-micron secondary, where the primary catches large debris before the pump. The FASS claims superior water separation, but I prefer the traditional approach for maximum filter life.
💡 Future Plan:
Once my FASS filters are used up, I'll switch to Baldwin filters to match my Excursion — standardization simplifies maintenance. At iFJF Direct, we carry Duramax-compatible filters that work with both factory and aftermarket setups.
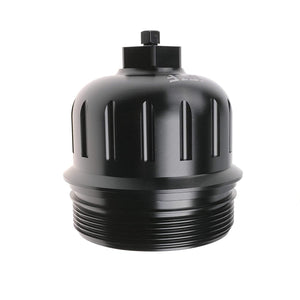
1R-0750 Fuel Filter + Aluminum Refit Head — Duramax 6.6L
Upgrade your factory filter housing with our billet aluminum refit head. Eliminates the common leak point on 2001-2016 Duramax engines. Includes 1R-0750 filter — the same premium filtration your CP3 and injectors deserve.
After driving with the FASS system for several days, the results were immediate:
Every start is consistent — No more hard starts or rough idle
No power loss — Truck runs at full power every time
Zero pump noise — Barely audible with engine off, completely silent in the cab
No More Uncertainty
Before the lift pump, problems occurred randomly — at any fuel level, after sitting for any duration. The truck might run fine for weeks, then refuse to rev past 1,100 RPM. That stress is gone.
Fuel Economy Monitoring
The truck has averaged 20 MPG highway for its entire life. I'll monitor to see if consistent fuel delivery improves economy, but the primary goal — reliable starting and running — is accomplished.
8. Troubleshooting Common Issues
Pump Won't Run
Check
Solution
Fuse
Verify fuse tap connection at fuse box
Ground
Move ground to verified chassis point (not engine bolt)
Relay
Listen for relay click when ignition turns on
Wiring
Verify all connections at pump and relay
Hard Start After Installation
Check
Solution
Air in system
Re-prime filters using loose secondary method
Loose fittings
Tighten all hose connections
Fuel leak
Inspect all connections, check filler neck T-fitting
Pump Noise
The FASS Titanium Signature is extremely quiet. If yours is loud:
If your truck starts reliably and runs strong, you don't need one immediately. But a lift pump is preventive insurance — it eliminates the CP3's strain of pulling fuel and catches air leaks before they become no-start problems. Think of it as protecting your $3,000+ injection system.
Can I install a lift pump on an L5P (2017+) Duramax?
The L5P already has a factory lift pump from GM, so this guide doesn't apply directly. However, the filtration principles still matter — check out our L5P Billet Fuel Filter Housing Cap for an easy factory system upgrade.
How long does the installation take?
Plan for 4-6 hours if it's your first time. Experienced mechanics can do it in 3 hours. The biggest time-eater is routing fuel lines cleanly — don't rush this part. A clean install now means zero problems later.
Will a lift pump fix my hard start problem?
Maybe. Hard starts can be caused by: (1) air in fuel lines — lift pump helps, (2) bad fuel filter — replace first (cheap fix), (3) leaking filter housing — rebuild kit available, (4) failing CP3 — lift pump won't fix this. Diagnose before you upgrade. At iFJF Direct, we always recommend checking your filters first — it's the most common culprit and the cheapest fix.
FASS or AirDog — which is more reliable?
Both have lifetime warranties and near-identical failure rates. The real difference is the FASS emergency bypass — you can revert to factory plumbing on the side of the road with basic tools. That alone makes FASS the winner for daily drivers and work trucks.
Summary: Is This Project Right for You?
✅ Install a Lift Pump If:
You have starting issues at various fuel levels
Your truck has rough idle or low power intermittently
You're planning power modifications
You want better fuel filtration and CP3 protection
Leaking fuel filter housing — Cheap rebuild kit available
Air in factory fuel lines — Inspect all connections
🛒 iFJF Direct Take:
A lift pump is an upgrade, not a miracle cure for neglected maintenance. Fix the basics first, then add the pump for long-term reliability. When you're ready, we've got the Duramax filters and fuel system parts to keep your truck running strong — whether you're on a factory setup or an aftermarket FASS/AirDog system.
🔧 Keep Your Duramax Running Strong
iFJF Direct stocks premium diesel filters, fuel system parts, and Duramax upgrades — all at direct-to-you prices with fast shipping across the USA.
This article is based on a complete FASS Titanium Signature 165 GPH installation on a 2006 LBZ Duramax with 175,000 miles. Installation steps are applicable to all 2001-2010 Duramax engines (LB7, LLY, LBZ, LMM).
Questions? Drop a comment below. If this guide helped you, share it with other Duramax owners dealing with the same fuel system frustrations.


 L5P Billet Fuel Filter Cap 2017-2023 Duramax Silverado Sierra 2500HD 3500HD | iFJF
$55.99
L5P Billet Fuel Filter Cap 2017-2023 Duramax Silverado Sierra 2500HD 3500HD | iFJF
$55.99
 12642623 Fuel Filter Head + 1R-0750 Refit for 2005-2016 Duramax 6.6L
$87.99
12642623 Fuel Filter Head + 1R-0750 Refit for 2005-2016 Duramax 6.6L
$87.99
 1R-0750 Secondary Fuel Filter for Duramax 6.6L & Cat (3-Pack)
$87.99
1R-0750 Secondary Fuel Filter for Duramax 6.6L & Cat (3-Pack)
$87.99
 1R-0750 Fuel Filter Housing for 2001-2016 Duramax 6.6L — Aluminum
$49.99
1R-0750 Fuel Filter Housing for 2001-2016 Duramax 6.6L — Aluminum
$49.99