
ISINFLASH Smart Battery Kill Switch How To Installation
, by iFJF Direct, 17 min reading time
, by iFJF Direct, 17 min reading time
How to Install a Smart Battery Kill Switch: Complete Step-by-Step Guide (2026) How to Install a Smart Battery Kill Switch: Complete Step-by-Step Guide By iFJF Technical Team June 25, 2026 15 min read ...
Is your car battery constantly dying? Want to add an extra layer of security to your vehicle? A smart battery kill switch might be exactly what you need. In this comprehensive guide, we'll walk you through everything you need to know about installing a remotely controlled battery disconnect switch.
Whether you're storing a classic car for the winter, want to prevent theft, or just tired of dealing with dead batteries after your vehicle sits for a few days, this DIY installation guide will help you get the job done right.
A smart battery kill switch (also known as a remote battery disconnect switch) is an electronic device that allows you to completely cut power from your vehicle's battery without manually disconnecting the cables. Unlike traditional mechanical disconnect switches that require you to physically access the battery and turn a knob, smart switches can be controlled remotely using a key fob or locally using buttons on the device itself.
These devices are particularly popular among:
The specific model we're installing in this guide is a remotely controlled battery disconnect switch with local control capability. It features:
Modern vehicles are never truly "off." Even when parked, your car's computer systems, alarm, clock, and various modules draw power from the battery. This is called parasitic drain, and it can completely drain a healthy battery in as little as 2-3 weeks in some vehicles.
By installing a battery kill switch, you can completely isolate the battery when the vehicle won't be used for an extended period. This is especially important for:
A battery disconnect switch can serve as an effective theft deterrent. When the battery is disconnected, the vehicle cannot be started, even with the original keys. This adds an extra layer of security beyond your factory alarm system.
Pro Tip: Mount the switch in a discreet location and keep the remote fob separate from your regular keys for maximum security benefit.
In the event of an electrical fire or accident, being able to quickly cut all power to the vehicle can be life-saving. A remotely accessible kill switch allows you to disconnect power even if you can't safely access the battery compartment.
Deeply discharging a lead-acid battery significantly reduces its lifespan. By preventing complete drain during storage, you can extend your battery's life by months or even years, easily paying for the cost of the switch.
Before starting the installation, gather these tools and materials:
Now let's walk through the complete installation process. The entire job should take about 30-45 minutes for most vehicles.
Park your vehicle on a level surface and engage the parking brake. If you're working in a garage, ensure adequate ventilation. Gather all your tools and the battery switch kit.
Optional but recommended: Take a photo of your current battery connections before disconnecting anything. This serves as a reference if you get confused during reassembly.
Locate your vehicle's battery. Identify the negative terminal (marked with a "-" symbol or black cable) and the positive terminal (marked with a "+" symbol or red cable).
Using your wrench or socket, loosen the negative terminal nut and remove the cable. Tuck the cable safely away from the battery post to prevent accidental contact.
Why negative first? Disconnecting the negative terminal breaks the circuit, making it safe to then disconnect the positive terminal without risk of shorting to the vehicle chassis.
The smart battery kill switch is designed to replace the connection between your battery's negative post and the vehicle's ground cable. Here's how:
Pro Tip: Apply a thin coat of dielectric grease to the terminals to prevent corrosion, especially if you live in a humid or coastal area.
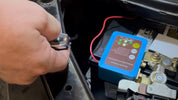
The "sense line" is a small wire that connects from the kill switch to your battery's positive terminal. This serves two critical functions:
Here's how to install it:
What happens when you connect the sense line? You'll likely hear the switch "click" or see an LED light up. This indicates it's sensing battery voltage and is now armed.
Before you button everything up, it's crucial to test the installation:
Troubleshooting: If the switch doesn't respond to the remote, check the sense wire connection to the positive terminal. If the vehicle won't start with the switch "ON," check all connections for tightness and corrosion.
Once you've confirmed everything works:
Understanding how your new battery kill switch works will help you use it effectively and troubleshoot any issues.
One of the most important features of a quality smart battery kill switch is voltage sensing. Here's why it matters:
When your engine is running, your alternator is producing electricity (typically 13.5-14.5 volts). The kill switch detects this higher voltage and "knows" the engine is running. If you accidentally press the "OFF" button or the remote gets triggered while driving, the switch will NOT disconnect while it senses alternator voltage.
This is a critical safety feature. Imagine if your battery disconnected while you were driving at 65 mph—you'd lose power steering, power brakes, headlights, and the engine would stall. The voltage sensing prevents this dangerous situation.
When does the switch allow disconnection? Only when voltage drops to battery-only levels (around 12.0-12.6 volts), indicating the engine is off.
Smart battery kill switches offer two control methods:
Both methods typically do exactly the same thing: open or close the circuit between your battery's negative post and the vehicle's electrical system.
You might wonder: "If the switch needs power to operate the remote receiver, won't it drain my battery too?"
Quality smart switches are designed with ultra-low power consumption. They typically draw less than 5-10 milliamps when armed and in standby mode. At this rate, it would take months to significantly drain a healthy car battery.
Some advanced models also feature:
Let's dive deeper into the specific scenarios where a smart battery kill switch provides the most value.
Classic cars often lack modern power management systems. Additionally, many classic car owners only drive their vehicles seasonally. A battery disconnect switch is practically essential for:
Diesel trucks, especially those used for towing or off-road, often have two or more batteries. These batteries are larger and more expensive to replace. A smart kill switch can:
RVs and boats have extensive electrical systems with refrigerators, alarms, propane detectors, and other devices that draw power even when "off." A battery disconnect switch is standard equipment on most RVs and boats, but upgrading to a remote-controlled model adds convenience—you can disconnect the battery from inside the cabin or cockpit.
While a battery disconnect switch shouldn't be your only anti-theft measure, it's an effective layer in a comprehensive security strategy. Thieves typically won't spend time trying to figure out why a vehicle won't start—they'll move on to an easier target.
Advanced security tip: Some enthusiasts install a hidden switch that must be closed before the remote battery switch will function. This creates a "two-key" system that's extremely difficult for thieves to defeat.
Even with a straightforward installation, you might encounter these common issues:
Possible causes:
Solution: Check the sense wire connection first. Then try pairing the remote again. If problems persist, test with a new battery in the fob.
Possible causes:
Solution: Tighten all connections. Check the switch's current rating—for most vehicles, you need at least 250A continuous rating. Clean battery terminals with a wire brush.
Possible causes:
Solution: This is a serious safety issue. Stop driving immediately and check all connections. Test your alternator's output voltage (should be 13.5-14.5V with engine running). If the problem persists, replace the switch.
Possible causes:
Solution: Test the switch by measuring voltage on both sides with a multimeter. If the switch is working, you may have accessories wired directly to the battery that bypass the switch. Reroute these through the switch.
A: Generally, no. Installing a battery disconnect switch is a reversible modification that doesn't affect the vehicle's core systems. However, if you have a new vehicle under warranty, check with your dealer first. Some manufacturers have been known to deny warranty claims if they can attribute a problem to aftermarket modifications.
A: While technically possible, it's not recommended. Disconnecting the negative terminal is safer because the negative side is connected to the vehicle chassis (ground). If you disconnect the positive terminal and your wrench touches any metal part of the car while working on the switch, you'll create a short circuit. Always install on the negative side.
A: With a quality switch that has minimal parasitic draw (5-10mA), a healthy battery should hold its charge for 3-6 months. However, lead-acid batteries naturally self-discharge at about 1-2% per month, so after 6 months, you may need a trickle charge before starting the vehicle.
A: Yes! In fact, this is an excellent combination. Connect your battery tender to the battery side of the switch (before the disconnect). This way, you can keep the battery charged during storage while still having the ability to quickly disconnect if needed.
A: Most smart battery kill switches have local buttons on the device itself, so you can still operate it manually. Additionally, most models allow you to pair multiple remotes, so you can order replacement fobs and pair them to your existing switch.
A: Battery disconnect switches are legal in all 50 states and most countries. In fact, some insurance companies offer discounts for vehicles with enhanced anti-theft devices. Contact your insurance provider to see if you qualify for a discount after installation.
A: Most DIY enthusiasts can install a battery kill switch in 30-60 minutes with basic hand tools. However, if you're not comfortable working with automotive electrical systems, or if your vehicle has a complex electrical system (luxury cars, hybrids, EVs), consult a professional installer.
Installing a smart battery kill switch is one of the most cost-effective upgrades you can make to your vehicle. For less than $50-100 in parts, you get:
The installation process we've outlined above should take less than an hour for most vehicles. Once installed, using the switch is as simple as pressing a button on your key fob or the device itself.
Pro Tip: Make it a habit to disconnect your battery whenever you park for more than a few days. Your battery (and your wallet) will thank you.
Shop Smart Battery Kill Switches: Looking for a reliable, remote-controlled battery disconnect switch? Check out our selection of smart battery kill switches designed for cars, trucks, RVs, and boats. All our switches feature voltage sensing, local and remote control, and are backed by our satisfaction guarantee.
Have questions about installing a battery kill switch on your specific vehicle? Drop a comment below or contact our technical team. We're here to help!