
How-to replace & rebuild the diesel fuel filter head on a Duramax engi
, by iFJF Direct, 16 min reading time
, by iFJF Direct, 16 min reading time
How to Replace & Rebuild the Duramax Fuel Filter Head — Complete Step-by-Step Guide If your Duramax is leaking fuel near the filter housing, struggling to prime, or stalling shortly after startup, the...

If your Duramax is leaking fuel near the filter housing, struggling to prime, or stalling shortly after startup, the fuel filter head is likely the culprit. The filter head on a 6.6L Duramax (LB7, LLY, LBZ, LMM, LML) is a multi-function component — it mounts the filter, houses the hand primer pump, contains the fuel heater, and manages the supply-side fuel path. When it fails, it can introduce air into the system, cause hard starts, or leak fuel onto your engine bay.
This guide walks you through a complete teardown and rebuild of the Duramax fuel filter head using a service rebuild kit. This is real shop-floor knowledge adapted from a hands-on technician's tutorial. By the end, you'll know exactly how to diagnose a bad filter head, strip it down, clean it, install new seals, and reinstall it confidently.
| Item | Notes |
|---|---|
| Flat-blade screwdriver | Standard straight blade for prying and loosening hose clamps |
| T20 Torx screwdriver or bit | For removing primer pump and heater screws (T20 size) |
| Small pick (pick tool) | Essential for removing O-rings without damaging sealing surfaces |
| Clean engine oil | For lubricating O-rings and lip seals during installation |
| Brake cleaner or solvent | To clean housing and parts before reassembly |
| Fuel filter head rebuild kit | Contains all 6 seals: O-rings, lip seals, check ball spring |
| New fuel filter | Always install a fresh filter when reinstalling the head |
| Optional: Aluminum bleeder screw | Upgrades the fragile plastic bleeder to a CNC aluminum unit |
Before tearing into the job, make sure the filter head is actually the problem. Here are the three most common failure symptoms:
If you see fuel pooling near the bleeder screw or around the primer pump, the O-rings have hardened or the plastic bleeder screw has cracked. The stock plastic bleeder is notorious for stripping or cracking after a few filter changes.
The Duramax doesn't have a factory lift pump. The hand primer on the filter head is what draws fuel from the tank. If the primer feels "mushy" or won't build a vacuum after 10–15 pumps, the internal seals are compromised and air is entering the system.
If the truck starts but immediately dies, or runs rough for the first few seconds, air is being drawn in through the filter head before the CP3 injection pump. This is a classic sign of a failed primer pump seal or check valve.
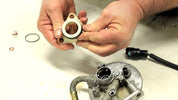
Safety first: relieve fuel system pressure before disconnecting any lines. Loosen the bleeder screw to bleed off pressure. Disconnect the fuel lines (supply and return) and unplug the electrical connector for the fuel heater. Remove the mounting bolts and lift the entire housing out of the engine bay. Set it on a clean workbench.
Start by removing the plastic bleeder screw at the top of the filter head. Set it aside. If you're upgrading to an aluminum bleeder screw (recommended — grab our rebuild kit with aluminum bleeder), this is the time — the plastic units are prone to cracking and stripping, and the aluminum upgrade is a direct replacement that won't fail again.
Remove the screws holding the hand primer pump assembly. Important: Note the ground wire under one of the screws — this is for the fuel heater and must be reinstalled in the same location. Once the screws are out, grasp the rubber boot with the red wire and give it a slight twist while pulling it off the heater terminal.
Carefully remove the plunger assembly by lifting it straight off. Note the coil spring underneath it and set it aside — this spring provides the return force for the primer. Remove the attachment plate, then grab the white plastic portion of the primer and use a twisting motion to remove the metal cap.
Use a pick tool to remove the O-ring on the top of the filter head and discard it. Turn the filter head upside down and remove the two screws that hold the heater assembly to the head. Gently push down on the top of the heater plug and push the heater out of the housing.
⚠️ WARNING: Hold the filter head in a vertical position when removing the heater assembly. There is a small check ball and spring inside that will roll away if you tip the housing over. Remove the ball and small spring and set them aside in a safe place.
Remove the small O-ring on the heater housing and discard it. If you're reusing the stock plastic bleeder screw, remove the O-ring from it as well — this also gets replaced during the rebuild. Do not attempt to remove the molded rubber seals inside the primer housing — these are not serviceable and damage can occur if you try to pry them out.
Take this time to clean the filter housing and all of the loose parts. Use brake cleaner or solvent to get all the corners clean. Any contamination left inside will end up in your fuel system and potentially damage the injectors. Dry everything completely before reassembly.
Open your rebuild kit and lay out all six seals. Start by taking the small black seal and installing it on the heater assembly. Roll it down until it seats on the step in the plastic. Next, install the O-ring on the filter head assembly. Use a small amount of clean engine oil to lubricate the seals — this prevents pinching during installation.
Reinstall the smaller diameter spring followed by the check ball. Apply a small amount of engine oil to the ball so it seats properly. Carefully guide the heater assembly back into the housing and reinstall the two screws. Tighten them evenly — these just need to be "snugged up," not over-torqued.
With the old lip seals removed from the plastic primer housing, clean it up with a couple of shots of brake cleaner and dry it thoroughly. Begin installing the new lip seals: install the seal closer to the flange first, with the lip pointing towards the flange. Install the second seal with the lip away from the flange. Roll your fingers around the seals to ensure they are fully seated — when properly installed, the lips will oppose each other.
Apply a small amount of engine oil to the seals. Install the new O-ring on the filter housing and apply a small amount of oil. Set the plastic primer housing back on the filter head and use gentle pressure to seat it, being sure to align the openings with the housing. Drop the large diameter spring into the spring seat, followed by the hand primer cap and finally the retainer flange. Use a light wiggle motion and push the primer cap down until the flange sits flush on the filter head, then install the screws loosely to hold it. Evenly tighten down all the screws.
Press the heater connector back on. Install the new orange O-ring onto the bleeder screw. If you're using the stock bleeder, simply install the new O-ring and reinstall it. Highly recommended: Upgrade to our CNC aluminum bleeder screw (included in the rebuild kit) — it's not prone to cracking or stripping like the plastic unit and is a direct replacement part.
Before reinstalling the head on the truck, test the hand primer. Place your thumb over the inlet side of the unit and pump the primer a few times. It should pull a vacuum against your thumb within just a few pumps. If it doesn't, disassemble and check that the check ball and lip seals are installed correctly.
Mount the filter head back on the engine. 💡 Pro move: This is the perfect time to install our 1/2" filter head spacer kit — it adds tool clearance for future filter changes and takes 5 extra minutes during reassembly. Reconnect the fuel lines and the heater electrical connector. Important: Install a new fuel filter before starting the engine. The arrow cast into the head indicates the direction of fuel flow — make sure the filter is installed in the correct orientation. Prime the system using the hand primer until fuel flows steadily from the bleeder port, then tighten the bleeder screw and start the engine.
| Tip | Why It Matters |
|---|---|
| Always upgrade to the aluminum bleeder screw | The stock plastic bleeder strips easily and can leave fragments inside the housing. The aluminum upgrade is ~$15 and eliminates this failure point forever. |
| Lubricate every O-ring with clean engine oil | Dry O-rings can pinch or twist during installation, leading to immediate leaks. A drop of oil ensures they seat correctly. |
| Don't remove the molded primer seals | These are not serviceable. Trying to pry them out will damage the primer housing and require a complete replacement head ($200+). |
| Keep the check ball and spring safe | These are tiny and easy to lose. Do this step over a parts tray or magnetic mat. |
| Brand | Part Number | Notes |
|---|---|---|
| ACDelco (GM OE) | 12642623 | Complete filter head assembly (includes primer, heater, bleeder) — ~$180–$220 |
| Alliant Power | AP63407 | Rebuild kit (all seals, check valve, bleeder O-rings) — ~$25–$35 |
| Dorman | 904-401 | Complete filter head assembly (aftermarket, budget option) — ~$120–$150 |
| iFJF (ifjf.net) | Rebuild Kit (FJ-SL6AD4-CK) | 6-piece seal kit + aluminum bleeder screw — fixes leaks & restores primer ($13.99) |
| iFJF (ifjf.net) | Spacer Kit (FJ-MDP-AD04) | 1/2" aluminum spacer + bleeder screw + bolts — filter changes in minutes ($15.99) |

Everything you need to rebuild the filter head seals and upgrade the bleeder screw in one kit. Includes 2 nitrile plunger U-cups, 4 Viton O-rings, and a CNC-machined billet 6061-T6 aluminum bleeder screw (black anodized). Fixes the three most common Duramax fuel system headaches: fuel leaks, mushy primer, and stripped bleeder screws. Fits 2001–2013 LB7, LLY, LBZ, LMM engines.
💡 Save $200+ vs. replacing the entire filter head housing. The seals in this kit fix 90%+ of filter head issues.
Shop Rebuild Kit →
Add 1/2" of clearance for frustration-free filter changes forever. This billet 6061-T6 aluminum spacer plate relocates the filter head outboard just enough to get your hands and tools in. Includes a CNC aluminum bleeder screw upgrade and 4 Grade 8 bolts (short for 2001–2010, long for 2011–2017). Available in Blue, Red, and Gold anodized finishes. Fits all 2001–2017 Duramax engines (LB7 through LML).
💡 15-minute install. Works with stock fuel lines. Pairs perfectly with the rebuild kit above — rebuild the seals, add the spacer, enjoy easy filter changes for life.
Shop Spacer Kit →Yes — if the housing itself isn't cracked and the primer pump mechanism is still functional, a rebuild kit (O-rings, lip seals, check ball) is all you need. The molded seals inside the primer housing are not serviceable, so if those have failed, you'll need a complete new filter head assembly.
The classic test: pump the hand primer with the bleeder screw loose. If fuel flows out but the truck still won't start (or starts and immediately stalls), air is entering the system before the primer — meaning the primer seals or check valve have failed. Another telltale sign: the primer feels soft and won't build resistance after 10–15 pumps.
GM doesn't publish a specific torque for these small screws. The correct approach is to "snug them up" evenly — tight enough to compress the O-ring seal, but not so tight that you strip the soft aluminum housing. If you want a number, 20–25 in-lb (2.3–2.8 Nm) is a safe range. Never use an impact driver on these screws.
Yes. Once the filter head has been opened to air, any contaminant inside the housing can get into the new filter. Plus, if you're already in there, a fresh filter is cheap insurance. Use a high-quality filter (ACDelco TP3018, Baldwin BF7633, or equivalent) and prime the system fully before starting.
Largely yes. The LML filter head is similar in design but has a different heater connector and slightly different primer pump geometry. The rebuild principles are the same, but make sure your rebuild kit is specifically for the LML if you have that engine. The aluminum bleeder screw upgrade works on all Duramax years (2001–2016).
Disclaimer: This guide is adapted from a hands-on video tutorial. Always consult your GM service manual for torque specifications and safety procedures. ifjf.net is not responsible for any damage resulting from improper installation.
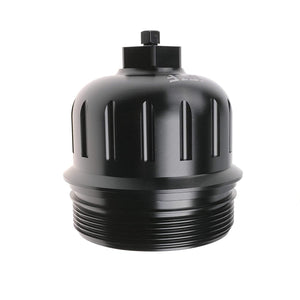 L5P Billet Fuel Filter Cap 2017-2023 Duramax Silverado Sierra 2500HD 3500HD | iFJF
$55.99
L5P Billet Fuel Filter Cap 2017-2023 Duramax Silverado Sierra 2500HD 3500HD | iFJF
$55.99
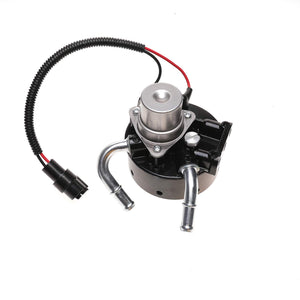 12642623 Fuel Filter Head + 1R-0750 Refit for 2005-2016 Duramax 6.6L
$87.99
12642623 Fuel Filter Head + 1R-0750 Refit for 2005-2016 Duramax 6.6L
$87.99
 1R-0750 Secondary Fuel Filter for Duramax 6.6L & Cat (3-Pack)
$87.99
1R-0750 Secondary Fuel Filter for Duramax 6.6L & Cat (3-Pack)
$87.99
 1R-0750 Fuel Filter Housing for 2001-2016 Duramax 6.6L — Aluminum
$49.99
1R-0750 Fuel Filter Housing for 2001-2016 Duramax 6.6L — Aluminum
$49.99