
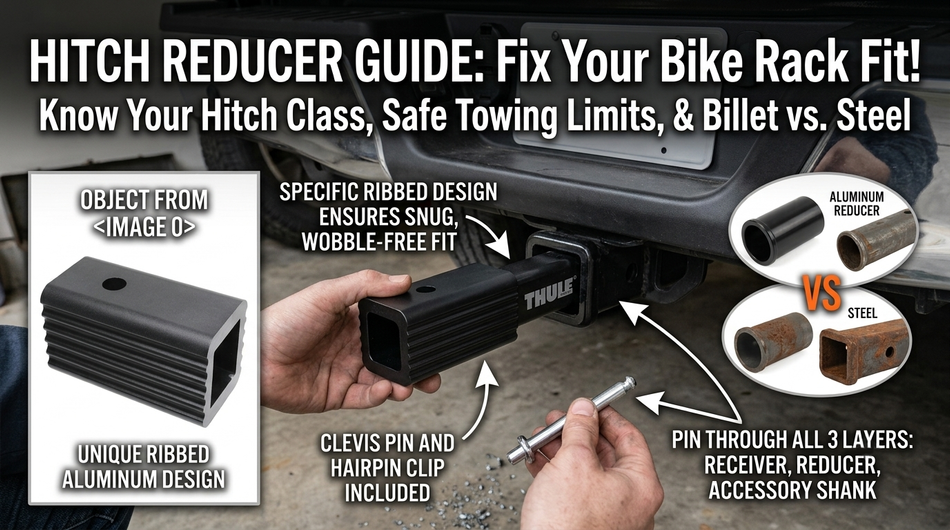
Trailer Hitch Adapter Buying Guide: How to Choose the Right Receiver Reducer for Safe Towing
, by iFJF Direct, 9 min reading time
, by iFJF Direct, 9 min reading time

Classic Saturday morning situation. You score a deal on a used Thule bike rack — $60, barely used. Get it home, slide it toward your truck's receiver... and it rattles around like a marble in a coffee can. The rack has a 1-1/4" shank. Your truck has a 2" receiver.
You're not alone. This is the #1 reason guys end up searching "hitch adapter" at 10pm on a weeknight.
A hitch reducer sleeve — sometimes called a receiver adapter — bridges different receiver sizes. It slides into your larger receiver and provides a smaller opening so your accessory fits tight. Simple part. But buying the wrong one? That's where people get hurt. Literally.
This guide covers which hitch class you have, when a reducer is safe to use, billet vs. steel, and the 3 mistakes I see in my shop every spring.
There are five hitch classes. Your receiver opening size tells you what class you're dealing with:
Here's the thing most guys don't realize: your tow rating doesn't change when you use a reducer. If your Class III hitch is rated for 8,000 lbs but your 1-1/4" accessory is only rated for 2,000 — you're limited by the accessory. Not the hitch. Not the reducer. The weakest link rules.
Three scenarios where a reducer sleeve makes sense:
1. Bike racks and cargo carriers. Most are built with 1-1/4" shanks. Your truck has a 2" receiver. This is the 90% use case.
2. Downsizing for lighter loads. Maybe you swapped trucks but kept your old ball mount. A reducer lets you run your existing gear.
3. Multi-vehicle households. One vehicle has a 2" receiver, the other has 1-1/4". A reducer means one set of hitch accessories works on both.
When NOT to use one: If you're towing a 5,000 lb trailer through a reducer to a 1-1/4" ball mount — stop. Buy the right 2" ball mount. Reducers are for accessories, not heavy towing. The 1-1/4" shank ball mounts are typically only rated to 3,500 lbs.
I've installed hundreds of hitch accessories. Here's the real-world comparison after 15 years in a truck shop:
| Feature | Billet 6061-T6 Aluminum | Steel (Stamped/Welded) |
|---|---|---|
| Rust Resistance | Won't rust. Period. | Rusts after 1-2 winters |
| Tolerances | CNC-machined to ±0.005" | Stamped — sloppy fit common |
| Weight | ~2 lbs | ~4-5 lbs |
| Strength (Compressive) | 42,000 PSI yield | 36,000-50,000 PSI (varies) |
| Wobble | Tight fit, minimal play | Often needs shimming |
| Price (Quality) | $30-$50 | $15-$25 (cheap ones) |
The iFJF 2" to 1-1/4" Billet Aluminum Hitch Adapter ($33.99) is CNC-machined from a single block of 6061-T6. No welds. No seams. One piece of aluminum carved into shape. The black powder coat finish doesn't chip like painted steel. Pulled mine out after a full Michigan winter — looked exactly like day one. The stamped steel one I tried before? Brown within 8 weeks.
Steel reducer sleeves aren't bad — they're just the wrong tool for anyone who parks outside. If you're in Arizona and your truck lives in a garage, steel works fine. But for the rest of us dealing with rain, salt, and road grime, billet aluminum is a one-and-done purchase.
Step 1: Clean your receiver tube. Any grit, rust scale, or old grease will make the reducer bind. Hit it with a wire brush and a shot of WD-40 if it's crusty.
Step 2: Slide the reducer sleeve into your 2" receiver. The flange face should sit flat against the receiver opening. If it doesn't seat flush, check for debris inside the tube.
Step 3: Insert your hitch pin through the reducer AND your accessory shank. This is critical — the pin must capture both. A 5/8" hitch pin is standard for 2" receivers. The iFJF 1/2" x 4" Hitch Pin Set ($43.99 for 2-pack) uses a clevis-style handle — no tools needed to remove, and the hairpin clip won't vibrate out at highway speed.
Mistake #1: Pinning only the reducer. I see this constantly. Customer installs the reducer, pins through the receiver and reducer... but forgets the accessory needs its own pin. Result: the bike rack slides out on the first hard brake. You're dragging $2,000 worth of mountain bikes down the highway. Pin through all three layers: receiver wall, reducer, accessory shank, receiver wall.
Mistake #2: Using a 1-1/4" to 2" adapter for heavy towing. This is the dangerous one. A reducer that goes from small receiver to large accessory (so you can use a 2" ball mount on a 1-1/4" receiver) multiplies the lever arm. The tongue weight is now acting on your hitch with 2-3x the mechanical advantage. Your Class I receiver is rated for 200 lbs tongue weight. With an adapter+extender, 100 lbs of tongue weight can snap it. Don't do it.
Mistake #3: Skipping the anti-rattle device. Even a well-machined aluminum reducer will have a few thousandths of clearance. At 70 mph, that translates to an annoying clunk over every expansion joint. An anti-rattle bolt or wedge clamp costs $10-20 and eliminates it completely. Most billet reducers include one — make sure yours does.
If you're running a modern Super Duty, Ram HD, or Silverado 3500, your receiver is likely 2-1/2" — not 2". These trucks have massive tow ratings (20,000+ lbs on a gooseneck) and need the larger receiver to handle the tongue weight. But most hitch accessories — ball mounts, bike racks, cargo carriers — are still built for 2" receivers.
Same rules apply: get a billet reducer, don't stack adapters, and pin through all layers. The iFJF 2-1/2" to 2" reducer is the big brother of the 2" to 1-1/4" model — same 6061-T6 billet construction, same powder coat, just scaled up.
Check out our full range of towing accessories for hitch pins, clevis sets, and receiver adapters. We also cover related truck maintenance in our GMT-400 Ball Joint Guide and EGR Delete Science Guide.
A: The reducer itself doesn't lower capacity — but your accessory does. If you're using a 2" to 1-1/4" reducer, you're limited to whatever the 1-1/4" accessory is rated for (typically 2,000-3,500 lbs). The reducer sleeve exceeds the strength of the smaller receiver class, so it's never the weak point.
A: You can, but grease it first. Aluminum reducers left in steel receivers for months without anti-seize will eventually bond through galvanic corrosion. Apply anti-seize to the outer surface, and remove/re-grease every 6 months if you leave it in.
A: A well-machined billet reducer with tight tolerances (±0.005") will minimize wobble significantly compared to stamped steel reducers. But to eliminate it completely, you need an anti-rattle bolt or wedge-style clamp. Most quality billet reducers include this hardware.
A: The 2" to 1-1/4" reducer lets you use 1-1/4" shank accessories (bike racks, small cargo carriers) in a standard 2" receiver. The 2-1/2" to 2" reducer adapts heavy-duty truck receivers down to standard 2" accessories. They're different tools for different trucks — don't try to use one for the other.
A: Yes. 6061-T6 billet aluminum has a yield strength of ~42,000 PSI. A typical 2" to 1-1/4" reducer sleeve handles compressive loads far exceeding what any 1-1/4" accessory can generate. The failure point in any reducer setup is virtually always the smaller accessory shank or the hitch pin — not the reducer itself.