GMT-400 Riveted Ball Joint Removal: Chevy C/K How-To Guide
, by iFJF Direct, 12 min reading time
, by iFJF Direct, 12 min reading time

🛒 Parts Used in This Guide 12642623 Fuel Filter Head Kit w/ 1R-0750 Refit for Duramax 6 $75.99 Shop Now → 1R-0750 Fuel Filter Aluminum Head for 2001-2016 Duramax 6.6L $49.99 Shop Now → 1R-0750 Fuel Fi...
Home › News › GMT-400 Riveted Ball Joint Removal: Chevy C/K How-To Guide
Factory lower ball joints on 1988-1998 Chevy and GMC C/K trucks (the GMT-400 platform) are riveted to the lower control arm with four steel rivets — and those rivets are the single hardest part of the job. This guide walks you through the proven drill-punch-chisel method a working technician used on his own GMT-400: center-punch each rivet, step-drill from 1/8" up to 7/16", knock the heads off with an air chisel, and drive the shanks out with a punch and a 3-lb sledge.
Why bother? A worn lower ball joint on a GMT-400 causes wandering steering, clunks over bumps, and uneven inner-edge tire wear. The good news: once the factory riveted joints are out, every aftermarket replacement (MOOG, Mevotech, ACDelco) bolts in with supplied hardware — you will never fight rivets on this truck again. This is a driveway-level job with hand tools, a drill, and an air chisel. Plan on 45-60 minutes per control arm, most of it spent on the rivets.
This guide is written for 1988-1998 Chevrolet C1500/C2500/C3500 and GMC Sierra C/K trucks, plus GMT-400-based Blazer, Tahoe, Yukon, and Suburban models with riveted factory lower ball joints. As of 2026, these trucks remain one of the most-restored platforms in the used diesel and gas truck market, so parts availability is excellent.
You need a drill with three bit sizes, an air chisel, and basic striking tools. The step-drill sequence matters — jumping straight to a large bit walks off-center and ruins the control arm hole.
| Item | Notes |
|---|---|
| Center punch + hammer | Marks rivet centers so the drill bit doesn't walk |
| Drill + 1/8" bit | Pilot hole, about 1/2" deep — just below the control arm surface |
| 1/4" drill bit | Second step of the drill sequence |
| 7/16" drill bit | Final size; also used to clean up holes after chiseling |
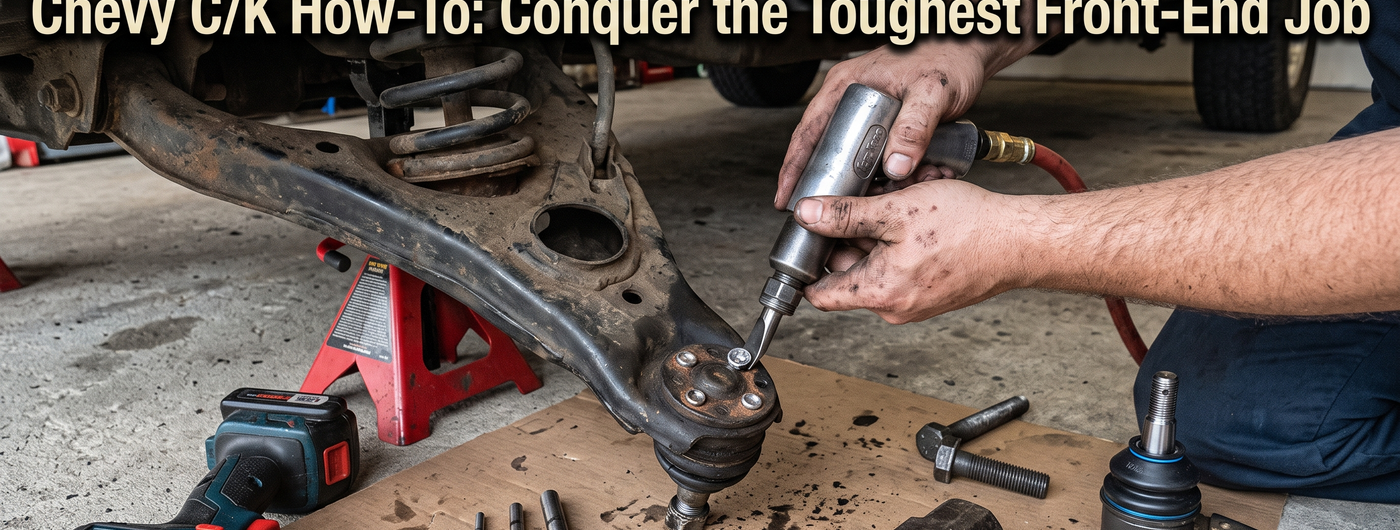
| Air chisel with flat blade | Knocks the drilled rivet heads off |
| Punch (old bolt works) + vise grips | Drives rivet shanks out of the control arm |
| 3-lb sledge hammer | More controlled than a full-size sledge in tight quarters |
| WD-40 or cutting oil | Keeps drill bits cool while drilling hardened rivets |
| Replacement lower ball joint | Bolt-in aftermarket unit, e.g. MOOG K6145T — see cross-reference below |
Attack the four rivets from the bottom side of the lower control arm — after experimenting on both sides, the technician found the bottom approach works best on the GMT-400. With the control arm exposed (knuckle separated and spring tension safely released, or the arm off the truck), locate the four factory rivets that clamp the lower ball joint flange to the arm.
Safety warning: If you do this on the truck, the front coil spring stores lethal energy. Support the lower control arm with a jack or use a spring compressor before separating anything, and keep the truck on jack stands rated for its weight — never on the jack alone.
Punch a dimple in the exact center of each of the four rivets with a small punch and a hammer. This single step decides whether your drill bits track true or wander off-center. Take your time here — a crooked pilot hole makes every following step harder.
Drill the center of each rivet about 1/2" deep — you only need to get below the surface of the control arm, not through the rivet. Run the sequence in three passes:
Spray WD-40 on the bit while drilling to keep it cool — these rivets are hard steel and will eat a dry bit. Moderate drill speed with firm pressure cuts better than high RPM.
Fit a flat-blade chisel in the air hammer and attack each drilled rivet head from the side. Because the center is hollowed out, the heads shear off with a few seconds of hammering. After the heads pop off, run the 7/16" bit back into each hole to square up the bottom — this gives your punch a flat surface to ride against in the next step.
Hold a punch against each rivet shank and drive it through with the 3-lb sledge. The technician's setup was nothing fancy: an old bolt held with vise grips as the punch. Most shanks pop out in a few solid hits. If one refuses to move — one of his four did — drill it slightly deeper and hit it again. Expect at least one stubborn rivet per arm.
With all four rivets out, the factory lower ball joint slides straight out of the control arm. Every mainstream aftermarket replacement for the GMT-400 platform bolts in place using supplied nuts and bolts — no riveting, no pressing on this style. Torque the new hardware to the spec printed on the instruction sheet in the box (specs vary by brand; do not guess), install the grease fitting if supplied, and pump the new joint full of grease before setting the truck back on its wheels.

Working on Chevy/GMC front ends runs in the family. If your newer 2007-2019 Silverado or Sierra 1500 sits nose-down, this 2" front leveling kit installs on top of the factory struts to level the stance and clear larger tires — no coil spring removal required on most installs.
If you're already turning wrenches on a GM front end, this is one of the highest-value upgrades per dollar you can bolt on.
Shop Now →| Tip | Why It Works |
|---|---|
| Always attack rivets from the bottom of the control arm | Tested both sides on this truck — the bottom approach gives a straighter drill angle and better chisel access on GMT-400 arms |
| Step-drill in three sizes instead of one big bit | A 7/16" bit started cold will walk off the punch mark; the 1/8" pilot keeps everything centered |
| Re-drill each hole after the heads come off | Squaring the bottom of the hole gives the punch a flat seat, so hammer energy drives the shank instead of deforming it |
| Only drill ~1/2" deep — don't drill through | You just need to break the head free below the arm's surface; drilling the full shank wastes bits and time |
| Keep WD-40 on the bit | Factory rivets are hardened; heat dulls a dry bit in one rivet |
Aftermarket lower ball joints for 1988-1998 Chevy/GMC C/K trucks are bolt-in replacements. Common options below — always confirm fitment by year, drivetrain (2WD vs 4WD), and GVWR before ordering, since C1500, K1500, and 2500/3500 arms use different joints.
| Brand | Part Number | Notes |
|---|---|---|
| MOOG | K6145T | Front lower, greaseable, popular problem-solver design for GM trucks |
| Mevotech | MK6145T | Direct MOOG-pattern equivalent with upgraded boot seal |
| ACDelco (Gold) | 84GJ16M | Front lower fitment listed for 1988-1995 Chevy K1500 |
While the front end is apart, inspect the rest of the steering linkage. Worn tie rod ends often accompany dead ball joints on high-mileage GM trucks — our guide on installing tie rods on your GM truck covers that job step by step. And if you're weighing suspension upgrades afterward, read leveling kit vs lift kit: what your truck really needs before you spend. You can browse all Chevy/GMC parts in the full iFJF catalog.
GM riveted the original lower ball joints at the factory for fast, permanent assembly-line installation. Rivets never loosen, but they must be destroyed to replace the joint. All aftermarket replacements for 1988-1998 C/K trucks bolt in, so you only fight the rivets once.
Three sizes: 1/8" for the pilot hole, 1/4" for the intermediate step, and 7/16" for the final pass. Drill only about 1/2" deep — just below the control arm surface — then shear the heads off with an air chisel and punch the shanks out.
It's much harder. The air chisel shears the drilled rivet heads off in seconds. Without one, you'd need to drill each rivet head completely away or cut it with a grinder, risking damage to the control arm face. A basic air hammer and compressor pay for themselves on this job.
Yes. MOOG K6145T, Mevotech MK6145T, and ACDelco lower ball joints are bolt-in replacements for GMT-400 trucks. Confirm your exact fitment by year and drivetrain — 2WD (C-series) and 4WD (K-series) use different joints, and 2500/3500 HD arms differ from 1500s.
Classic symptoms on GMT-400 trucks: clunking over bumps, wandering steering, and inner-edge tire wear. Jack the truck under the lower control arm and pry the tire vertically — visible movement or play at the joint means replacement time.
Budget 45-60 minutes per side for a first-timer with the right tools. The drilling and rivet removal consumes most of that; the new joint bolts in within minutes. Expect at least one stubborn rivet that needs deeper drilling.
Since you're already working on your truck, these maintenance items take minutes to swap while everything's apart: