
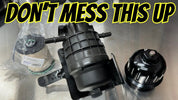
HOW TO Avoid Issues Replace Duramax 3.0 Fuel Filter
, by iFJF Direct, 14 min reading time
, by iFJF Direct, 14 min reading time
How to Replace the Fuel Filter on Your Duramax 3.0 (L5P LM2/LZ0) — Complete Guide How to Replace the Fuel Filter on Your Duramax 3.0 (L5P / LM2 / LZ0) — Complete Step-by-Step Guide 📅 June 27, 2026 ⏱️ ...
The GM 6.6L Duramax L5P diesel — found in the 2017–2024 Silverado 2500/3500, Sierra 2500/3500, and the 3.0L LM2/LZ0 in lighter-duty trucks — uses a spin-on fuel filter element mounted on the driver's side fuel rail. Like all diesel engines, the L5P is highly sensitive to fuel contamination. Water, sediment, and microbial growth can destroy injection components worth thousands of dollars.
GM recommends fuel filter replacement at every 15,000 miles (24,000 km) or 2 years — whichever comes first. If you run biodiesel blends, operate in dusty environments, or frequently tow heavy loads, inspect it more often.
Signs you need a fuel filter change:
Gather these before you start. The filter is accessible from under the truck — no need to drop the tank or remove the cab.
| Item | Notes |
|---|---|
| 36mm low-profile socket | 3/8" drive recommended; low-profile clears the tight space |
| 3/8" drive ratchet or breaker bar | Torque can be tight from the O-ring seal |
| Extension (3–6 inch) | Needed to reach the filter cap from below |
| New fuel filter — GM ACDelco or equivalent | Look for Made in Czech Republic label + GM part number on the filter |
| Shop towels / rags | Fuel will drip; have plenty on hand |
| Diesel fuel (for lubrication) | A small squirt bottle or dip from the fuel line |
| Optional: drain pan | Place under the housing drain plug |
| Optional: aftermarket aluminum cap | More durable than factory plastic; ~$30–50 on Amazon |
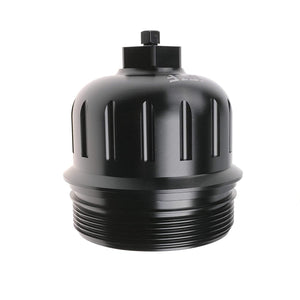
On the 2017–2024 Duramax L5P (6.6L V8), the fuel filter housing is bolted to the driver's side fuel rail — accessible from underneath the truck. You don't need a lift; a standard jack and jack stands work fine.
The housing consists of:
Before loosening anything, use a shop rag and degreaser to clean the filter cap and surrounding area. Dirt that falls into the fuel system will travel straight to your injectors — an expensive mistake.
Locate the drain plug on the bottom of the filter bowl. Loosen it with a 10mm hex or Allen key. Let fuel drain into a pan. This reduces spill significantly when you remove the cap.
Using your 36mm low-profile socket, break loose the cap. It will feel tight — this is normal. The O-ring seal creates significant resistance. Unscrew the cap fully and lift it off. The old filter element will come out with it.
Fuel will drip from the cap; keep a rag handy. Set the cap aside on a clean surface.
The spin-on filter simply pulls off the cap. Visually inspect the old filter:
This is critical. Remove all debris, sediment, and old fuel from the bowl. Use fresh diesel fuel as a rinse if needed. Any contamination left behind will shorten the life of your new filter.
Check the drain plug O-ring on the bottom — replace it if it's cracked or hardened.
The new filter slides onto the cap's center hub. A new O-ring is pre-installed on the filter — do not add extra O-rings. The cap O-ring goes on the cap itself (see Step 7).
The OEM filter kit includes two O-rings:
To remove the old bowl O-ring: pinch and roll it off the filter hub. To install the new one: roll it on, making sure it seats fully in the groove — not just resting on top.
Apply a small amount of clean diesel fuel to both O-rings. Diesel is an excellent lubricant for rubber seals and makes threading the cap much easier. Do not use engine oil, grease, or petroleum jelly.
Align the cap and thread it on by hand first. Then use the 36mm socket to snug it down. The correct torque is 18 ft-lb (24 N·m). The cap will feel tight as the O-ring compresses.
Visual check: When properly seated, there should be no visible gap between the cap and bowl. If you see a gap, the O-ring is not seated correctly — back it off, re-lubricate, and try again.
If the cap is too tight without lubrication, the O-ring may have been installed incorrectly or double-stacked.
Every filter kit includes new O-rings for a reason. The cap O-ring and bowl O-ring are single-use items that lose elasticity after compression. Reusing them guarantees a leak.
Dry rubber O-rings can pinch, roll, or tear during installation. Always lubricate with diesel fuel before threading. A properly lubricated cap threads smoothly. A dry cap will feel abnormally tight before it's fully seated.
GM specifies 18 ft-lb. Over-tightening can crack the bowl or damage the O-ring groove. Under-tightening allows fuel to leak under pressure. Use a torque wrench or a calibrated ratchet set to 18 ft-lb.
Air in the fuel system prevents the injectors from firing. After installing the filter, you must prime the system (see below). Skip this step and you'll be stuck with a truck that cranks but won't start.
The drain plug at the bottom of the housing has its own O-ring. Inspect it every service. If it's worn, cracked, or missing, replace it — fuel leaks from the bottom look like a catastrophic failure even when the cause is a $2 O-ring.
You'll find both OEM plastic caps and aftermarket billet aluminum caps on Amazon for the Duramax L5P filter housing (~$30–50). Here's the comparison:
| Feature | Factory Plastic Cap | Aftermarket Aluminum Cap |
|---|---|---|
| Material | Reinforced plastic (OEM spec) | 6061-T6 billet aluminum |
| Heat resistance | Good | Superior |
| Durability | Good for stock use | Better for heavy-duty/towing |
| Price | Included in filter kit | $30–50 extra |
| O-ring compatibility | OEM fit | OEM O-rings fit perfectly |
| Installation | Direct swap | Direct swap |
For most owners, the factory plastic cap is perfectly adequate. The aluminum upgrade makes sense if you:
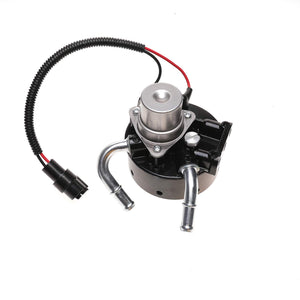
After installing the new filter, the L5P's high-pressure fuel pump must be primed. The good news: the L5P does not require a manual priming pump. The electric lift pump does this automatically.
Here's the procedure:
If the truck cranks but won't start after priming, there may still be air in the system. Wait 30 seconds and try again. If it still won't start, verify the cap O-ring is seated correctly and check the fuel line banjo fittings for leaks.
The Driver Information Center (DIC) on your Duramax will continue to show the old fuel filter life percentage until you reset it. Here's how:
If your truck doesn't have a DIC reset option (some older models), the light will turn off on its own after a few driving cycles as the ECM registers the new filter via the fuel pressure sensor data.
Replacing the fuel filter on your Duramax 3.0 (L5P, LM2, or LZ0) is one of the most cost-effective maintenance tasks you can perform — a $30–50 filter and 30 minutes of your time can prevent injector failures that cost thousands. The process is straightforward for anyone comfortable working under a truck, with one critical exception: the O-rings.
Take your time on the O-ring installation. Lubricate generously. Check for zero gap when the cap is threaded. And always prime the system before your first startup. Follow this guide exactly and you'll have zero leaks and a truck that starts perfectly every time.
Ready to fix that fuel system? Shop our tested Duramax L5P upgrade parts below:
 L5P Billet Fuel Filter Cap 2017-2023 Duramax Silverado Sierra 2500HD 3500HD | iFJF
$55.99
L5P Billet Fuel Filter Cap 2017-2023 Duramax Silverado Sierra 2500HD 3500HD | iFJF
$55.99
 12642623 Fuel Filter Head + 1R-0750 Refit for 2005-2016 Duramax 6.6L
$87.99
12642623 Fuel Filter Head + 1R-0750 Refit for 2005-2016 Duramax 6.6L
$87.99
 1R-0750 Secondary Fuel Filter for Duramax 6.6L & Cat (3-Pack)
$87.99
1R-0750 Secondary Fuel Filter for Duramax 6.6L & Cat (3-Pack)
$87.99
 1R-0750 Fuel Filter Housing for 2001-2016 Duramax 6.6L — Aluminum
$49.99
1R-0750 Fuel Filter Housing for 2001-2016 Duramax 6.6L — Aluminum
$49.99

