
Kohler Wellworth Triangle Toilet Tank Bolt Replacement: Stop the Leak With GP51487 Kit in 30 Minutes
, by iFJF Direct, 10 min reading time
, by iFJF Direct, 10 min reading time

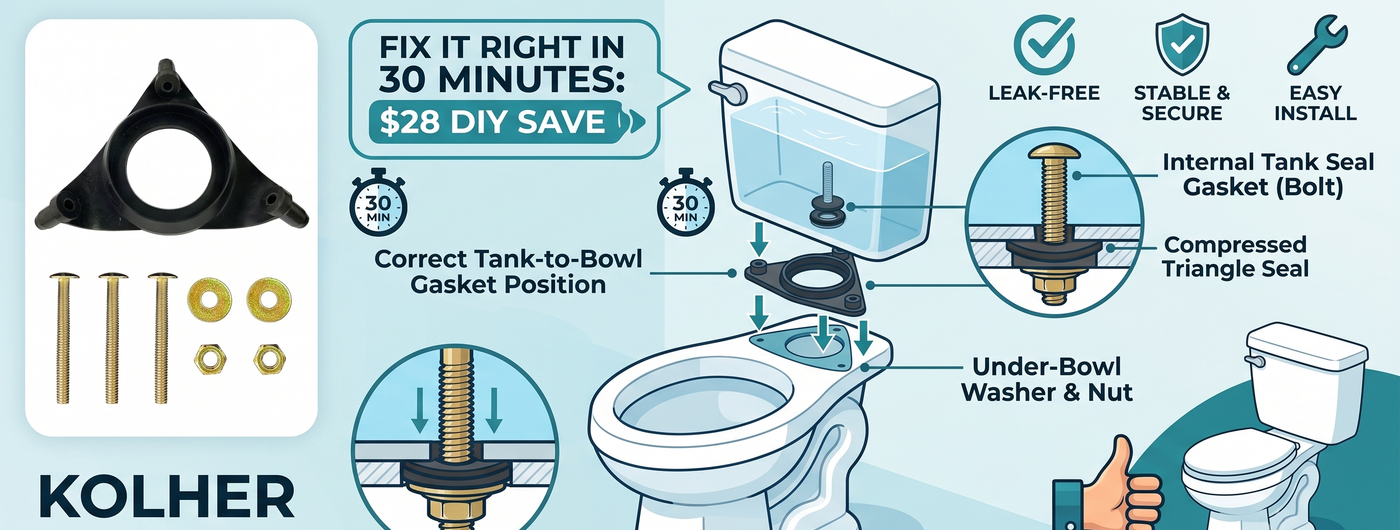
Water puddling around the base of your Kohler Wellworth toilet? Tank wobbling when you sit down? Rust stains running down from the tank-to-bowl connection? You need a new tank bolt assembly. The Kohler Wellworth uses a triangle-shaped gasket and three-bolt mounting pattern — a design that works great for stability but confuses anyone used to the standard two-bolt round setup found on most toilets. The GP51487 Tank Bolt Assembly Kit has everything you need: the triangle gasket, three bolts with rubber washers, nuts, and the thumb-turn bolt heads.
This is a $28 fix. Ignore it and you're looking at a warped floor, subfloor rot, and a much bigger bill.
Kohler used decent hardware on the Wellworth, but rubber gaskets dry out and metal bolts rust. Here's what to look for:
The GP51487 Tank Bolt Assembly Kit replaces the entire set of Kohler Wellworth triangle toilet hardware:
Shut off the water supply valve behind the toilet. Flush and hold the handle down to drain as much water as possible. Use a sponge or a wet-dry vac to get the last inch of water out of the tank bottom. You want it bone-dry — water will drip out of the bolt holes the moment you loosen them otherwise.
Unscrew the supply line nut from the fill valve at the bottom of the tank. Have a small container ready — there's always some water left in the line. If the nut won't budge, give it a shot of penetrating oil and wait 5 minutes.
Inside the tank, hold each bolt head with a large flathead screwdriver. Underneath the tank (reach up from behind the bowl), use your wrench on the nut. Turn counterclockwise. The three bolts are arranged in a triangle pattern — remove all three.
If the bolts are rusted solid, spray penetrating oil on the nuts from underneath and wait 10 minutes. If that still doesn't work, you can cut the nuts off with a hacksaw blade or Dremel. The bolts are brass and cut easily. Just don't slip and crack the porcelain.
Lift the tank straight up and set it on its side on a towel. The old triangle gasket will either be stuck to the tank or the bowl — peel it off.
Use a wire brush or Scotch-Brite to scrub the tank-bottom surface where the gasket sits. Remove every trace of old rubber and mineral buildup. Do the same on the bowl's tank-mount surface. A rough surface means the new gasket won't seal. Take the extra 5 minutes here.
Check the three bolt holes in the tank for cracks. Hairline cracks around bolt holes are common on old Wellworths. If you find one, you need a new tank — no gasket will seal a crack.
Place the new triangle gasket on the bowl's tank-mount surface. The gasket is keyed — it only fits one way. The three holes should line up exactly with the bolt holes in the bowl.
Insert each bolt from inside the tank: rubber washer under the bolt head, then through the hole. On the underside, slide on the flat metal washer, then thread on the nut. Hand-tighten all three first. Then tighten with the wrench in stages:
CRITICAL: Alternate between the three bolts as you tighten. If you crank one bolt down completely before starting the others, the tank sits crooked and the gasket pinches unevenly. Tighten all three together in small increments. The triangle design is less forgiving than two-bolt setups — even pressure is everything.
Reconnect the water supply line. Turn the water on. Watch the tank fill and check for leaks at every bolt, the supply line connection, and the tank-to-bowl seam. Run your finger along the bottom of the tank where it meets the bowl — dry should be dry.
Flush a few times. Re-check for leaks. If you see a dribble, tighten the nearest bolt slightly. Don't overdo it — overtightening cracks porcelain. If it still leaks after a quarter-turn snug, the gasket isn't seated right and you'll need to drain and re-seat it.
It fits the Kohler Wellworth models with the triangle tank-to-bowl bolt pattern — which is most Wellworth two-piece toilets manufactured from the 1990s onward. The kit also fits some Sterling and Kallista models that use the same Kohler triangle gasket design. If your tank has three bolts in a triangle pattern (not two side-by-side), this is the right kit.
You can, but it's a bad idea. The gasket is the real failure point — bolts rust because the gasket fails and lets water through. If one bolt is shot, the gasket is compromised and the other two bolts are on their way out. Do all three bolts and the gasket in one shot.
With proper installation (even torque, clean surfaces), expect 8-12 years in normal household water conditions. Hard water with high mineral content may shorten that to 5-7 years. The brass bolts themselves last decades — it's the rubber that degrades.
Drain the tank, loosen all three bolts, and check that the triangle gasket is centered and flat. Sometimes the gasket shifts during tightening. Reseat it, hand-tighten the bolts again, then alternate-quarter-turn tighten. If it still leaks, the tank or bowl mating surface may have a crack or chip — inspect closely with a flashlight.
No. The tank-to-bowl gasket seals the connection between the tank (top half) and bowl (bottom half). The wax ring seals the bowl to the floor flange. They're two different seals in two different places. If water is on the floor around the base of the toilet and it's clean water (not from the bowl), it's likely the tank bolts. If it's dirty water or happens after flushing, it's the wax ring.