Full Smog Delete 5.8L Windsor Ford Bronco/F-150: What it Takes
, by iFJF Direct, 21 min reading time
, by iFJF Direct, 21 min reading time

🛒 Parts Used in This Guide 12642623 Fuel Filter Head + 1R-0750 Refit for 2005-2016 Dura $87.99 Shop Now → 1R-0750 Fuel Filter Aluminum Head for 2001-2016 Duramax 6.6L $63.99 Shop Now → 1R-0750 Fuel Fi...
If you've been wrestling with a smog system failure on your 1994–1995 Ford Bronco or F-150 equipped with the 5.8L (351 cid) Windsor V8, you already know the frustration. Those vacuum lines are cracked, the smog pump is groaning, the EGR valve is sticking, and every check-engine light under the sun is on. The parts are expensive and often discontinued — and the internet has no single clear guide that shows you exactly what to remove, what to keep, and how to keep your ECU happy afterward.
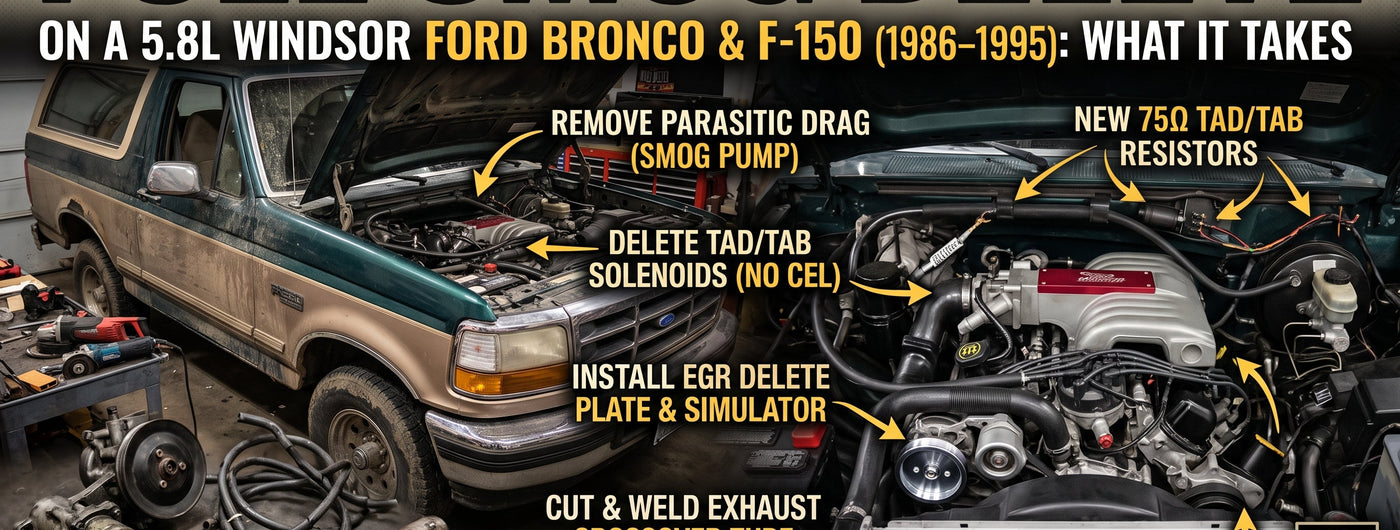
This guide fixes that. Based on a real hands-on smog deletion on a 1994 Ford Bronco 5.8L, we'll walk through every component you need to remove, what to plug or weld shut, how to prevent check engine lights, and what the engine bay looks like afterward. By the time you're done reading, you'll know whether this job is right for your truck and exactly what to buy to do it once.
As of 2026, smog delete conversions remain one of the most-searched modifications for 1980s–1990s Ford trucks and SUVs, particularly among owners of 5.8L and 5.0L engines who are tired of chasing emissions-related failures on 30-plus-year-old vehicles. This tutorial covers the complete removal of the smog air pump, EGR system, TAD/TAB solenoids, canister purge, and all associated vacuum lines on the 5.8L Windsor platform.
A complete smog delete on the 5.8L Windsor removes every emissions-control component that adds complexity without contributing to engine reliability. Here's what lives on the 1994–1995 5.8L and what you're pulling out:
| Item | Notes |
|---|---|
| 75Ω resistor (×3) | Install one in each EGR/TAB/TAD solenoid connector. Prevents CEL without buying expensive new solenoids. |
| EGR delete spacer plate | Blocks the EGR ports on the intake manifold. Verify fit for 5.8L Windsor before ordering. |
| EGR delete wiring harness plug | Plugs into the factory EGR harness connector; sends closed-circuit signal to PCM. Eliminates CEL. |
| Smog pump dummy/fill-in pulley | Replaces the smog pump pulley to maintain belt routing. Must match the original pulley diameter. |
| Sawzall (reciprocating saw) | For cutting exhaust crossover pipe and smog pump bracket bolts that won't break free. |
| Angle grinder | Smoothing cut pipe ends before welding. Also cuts rusted bolts. |
| MIG welder | Weld the cut exhaust crossover pipe stubs and any open fittings shut to prevent exhaust leaks. |
| Vacuum line kit ( assorted 3/16" & 1/4") | Replace cracked lines if rerouting AC or heater controls. Some lines double as vacuum sources for the fuel pressure regulator. |
| Basic socket/wrench set (SAE) | 1994 Bronco uses SAE fasteners throughout. 7/16", 1/2", 9/16" will cover most bolts. |
| Penetrating oil | For rusted smog pump mounting bolts and bracket fasteners. |
The EGR valve sits on the passenger-side intake manifold, directly in front of the valve cover. On the 5.8L Windsor it's held by four bolts and feeds into an aluminum spacer plate. Begin by disconnecting the negative battery terminal — you're working near electrical connectors for the TAD/TAB solenoids.
Unplug the EGR solenoid electrical connector (it shares a wiring path with the TAD and TAB solenoids in the main wiring bundle near the firewall). Remove the four EGR valve bolts and lift the valve off. Install the EGR delete spacer plate with a new gasket (or high-temp silicone if reusing the surface). Torque to spec — SAE flange bolts to approximately 15–18 ft-lb; do not overtighten into aluminum threads. The factory EGR wiring harness plug now gets its matching delete plug: push it in until the locking tab clicks. This signals the PCM that the EGR valve is still present and functioning — no CEL.
If you skip the delete plug and leave the harness unplugged, you'll get a P0401 (insufficient EGR flow) code within a few drive cycles. A 75Ω resistor is the budget alternative: install it between the two signal wires at the EGR connector and tuck it into the harness sleeve. Either approach works; the resistor is the better choice if your delete plug hasn't arrived yet.
The TAD (Thermostatic Air Diverter) and TAB (Thermostatic Air Bypass) solenoids are mounted on a bracket near the passenger-side valve cover, above the smog pump. Each solenoid controls vacuum routing to different parts of the smog air injection system. By 2026, the original vacuum lines are almost certainly cracked, brittle, and weeping at every connection. The solenoids themselves are also prone to internal vacuum leaks.
Rather than replace all eight weathered vacuum lines (a tedious job sourcing 30-year-old SAE line), just delete the solenoids entirely. Unplug both connectors and zip-tie the harness out of the way. Install a 75Ω resistor in each connector (the same resistor works for all three solenoids — EGR, TAD, TAB — they're all identical 75Ω signal circuits). This is the same technique diesel tuners use with glow plug resistors and emissions-related sensors. The resistors prevent "circuit open" codes from the PCM.
Label the connectors and resistors before zip-tying the harness back so you or a future mechanic knows what's been done. Some owners remove the entire solenoid bracket for a cleaner look, but the bracket can stay — it's bolted to the valve cover and removing it risks disturbing the valve cover gasket.
The smog air pump is bolted to the front of the engine on the passenger side, below the alternator. Its belt wraps around a dedicated pulley on the smog pump and a second pulley on the crankshaft (or a jackshaft). When the smog pump seizes, the belt either shreds immediately or puts enough drag on the system to hurt fuel economy.
To remove the smog pump:
The smog pump bracket is now free of the pump. If you plan to remove the bracket entirely, you'll need to source a shorter belt to route around the remaining accessories. Many owners leave the bracket in place to avoid belt routing headaches — the bracket doesn't interfere with spark plug access once the pump is gone.
Here's the part most guides skip: the smog pump routes fresh air through a Y-shaped crossover tube that bolts to both cylinder heads, delivering air to each exhaust port. When you remove the smog pump, this tube is dead weight and must be closed off — otherwise you'll have an exhaust leak at the open pipe stubs.
Using a Sawzall with a metal blade, cut the crossover pipe as close to the cylinder head fittings as possible. You want to cut the pipe section that runs between the two heads and exits the engine block. After cutting, clean up the pipe stubs with an angle grinder so the weld surface is flat and clean.
Weld each pipe stub completely shut — a plug weld is sufficient. Use a MIG welder set to short-circuit mode for the thin-wall steel tubing. After welding, allow to cool and then apply a coat of high-temperature exhaust paint or POR-15 to prevent surface rust. A properly welded closure will never leak.
Important: The crossover tube on the 5.8L Windsor also serves as a passage between the two cylinder banks in some configurations. On the 1994 5.8L single-exhaust layout, it's purely smog-air plumbing and safe to block. Verify your specific engine's exhaust routing before welding — some 5.8L setups have the crossover serving as an EGR feed tube. If you're unsure, photograph everything before cutting.
The canister purge valve (sometimes called the "can pee" in owner forums) sits near the firewall and routes fuel tank vapor through a charcoal canister and into the intake manifold. The system also includes a purge line running from the fuel tank to the canister and a smaller purge line to the intake. After smog deletion, the PCM no longer commands purge cycles, so all of this hardware is surplus.
Locate the canister purge solenoid near the passenger-side frame rail or firewall (it'll have an electrical connector and two small vacuum hoses). Unplug the connector and pull both vacuum lines. Remove the purge valve from its bracket and set aside or discard. Cap the vacuum port on the intake manifold with a small vacuum cap — this is the source of a potential vacuum leak if left open.
The charcoal canister itself (usually mounted near the fuel tank or frame rail) can stay in place — it doesn't affect performance if the lines are disconnected and capped. If you're removing it for weight or clearance, disconnect both fuel-tank vapor lines and plug them with fuel-line-rated caps.
This is an easy one to overlook, and it causes hard-starting or stalling if missed. The fuel pressure regulator on the 5.8L Windsor sits on the fuel rail and requires a small vacuum reference line from an intake manifold port. When you start disconnecting vacuum lines during smog deletion, this line is often the one that gets accidentally pulled loose — and the truck will stall at idle because the regulator thinks fuel pressure is too high.
Trace the small black vacuum line from the fuel pressure regulator to its source on the intake manifold. Mark both ends with tape before disconnecting anything. If you've already pulled the line and lost track of it, the MAP sensor is a good vacuum source: it provides manifold absolute pressure reference and is active at all RPM ranges. Route a new line from the MAP sensor vacuum port to the fuel pressure regulator fitting and secure with a worm-gear clamp or spring clamp.
While you're at it, check the AC/heater vacuum control lines. The HVAC blend doors are also vacuum-operated on the 1994 Bronco. If you disturb the vacuum tree during smog deletion, your AC might default to defrost-only or not switch modes at all. A rerouted or replaced line (1/4" vacuum hose, available at any auto parts store) fixes this in minutes.
After everything is reassembled, start the engine and let it reach operating temperature. Watch the dashboard for CEL. On a properly executed smog delete with the 75Ω resistors installed, the PCM will see closed-circuit signals from all three deleted solenoids (EGR, TAD, TAB) and register no faults. If a CEL appears, use a code reader to check the specific fault — a P0401 (EGR flow insufficient) or P0411 (secondary air injection fault) indicates a circuit issue, not a flow problem. Re-seat the resistor connections or check for a broken wire in the harness.
On this particular 1994 Bronco 5.8L, the only CEL that appeared post-deletion was traced to a loose fuel pressure regulator vacuum line (knocked during reassembly) — once reseated, the truck idled smoothly and the light went out. Always double-check every vacuum line before declaring the job done.
With everything removed and the smog system gone, the engine bay looks dramatically cleaner. More importantly, you can now see straight down to the ground from the engine compartment — no more buried components, no tangled web of cracked vacuum lines. Spark plug changes on the passenger-side bank, which previously required removing the smog pump bracket, now take 15 minutes instead of an hour. The water pump and thermostat housing are fully accessible. The oil dipstick is visible at a glance.
According to forum members on F150Forum and Bronco forum communities, the most commonly cited benefit of smog deletion on the 1994–1995 5.8L Windsor is improved reliability — especially for trucks used as work vehicles or off-road rigs where a smog pump failure mid-job is not an option. Several owners report a 1–2 MPG improvement after smog delete, consistent with removing the parasitic load of the belt-driven air pump.
| Tip | Why It Matters |
|---|---|
| Photograph everything before cutting | Wiring and vacuum routing varies slightly between 1986–1995 model years. Reference photos save hours of head-scratching during reassembly. |
| Mark every disconnected connector with tape and marker | The EGR, TAD, and TAB connectors look nearly identical. Labeling prevents accidentally swapping resistor positions, which won't cause a fault but makes troubleshooting harder later. |
| Leave the smog pump bracket in place if belt routing works | Rerouting the accessory belt to fill the gap left by the smog pump pulley adds complexity. The bracket adds negligible weight and costs nothing to leave. |
| Weld the crossover pipe rather than using rubber plugs | Exhaust temperatures will eventually degrade rubber plugs. A proper plug weld is a permanent seal that won't fail at highway speeds. |
| Test-drive before declaring the job complete | Idle quality, throttle response, and AC operation all need verification. Some vacuum issues only manifest under load. |

This kit delivers everything you need to delete the EGR system on your 1986–1995 Ford truck or SUV running the 5.8L (351W), 5.0L (302), 4.9L (300 I6), or 7.5L (460) engine. The EGR simulator plug replaces the factory EGR harness connector and sends the correct closed-circuit signal to your PCM, preventing check engine lights without resistors or code readers. The block-off plate seals the EGR ports on the intake manifold with a machined aluminum plate and new gasket.
If you're tackling a full smog delete like the one in this guide, this kit is the foundation piece — order it before you start so the delete harness is ready when you pull the EGR valve.
Shop Now →| Application | iFJF Part / Kit | Fitment |
|---|---|---|
| EGR Simulator + Block Off Plate | iFJF EGR Simulator Eliminator & Block Off Plate Kit (1986–1995 Ford F-150 F-250 F-350 Bronco Mustang 4.9L 5.0L 5.8L 7.5L) | All 1986–1995 Ford trucks and SUVs with 4.9L, 5.0L, 5.8L, 7.5L engines |
| Alternative EGR Delete Harness + Plate | iFJF EGR Simulator & Block Off Plate Kit (1986–1995 Ford F-150 Bronco Mustang 2.8L 4.9L 5.0L) | Earlier body style 1986–1992 Ford trucks, 1986–1991 Bronco IIs, and 1986–1995 Mustang 5.0L |
| Smog Pump Delete / Fill-In Pulley | Universal or application-specific smog pump pulley (verify diameter matches original before ordering) | Most 1970s–1990s smog-pump-equipped V8 engines |
| Smog Delete Wiring (CEL Prevention) | EGR Delete Simulator 1986–1995 Ford F-150 Bronco 5.0L 5.8L | Ford 5.0L/5.8L Windsor engines, 1986–1995 F-Series and Bronco |
Will a smog delete cause a check engine light on my 1994 Bronco?
Not if you use a proper EGR delete harness or 75Ω resistor in the EGR connector. The factory PCM monitors the EGR circuit resistance; when it sees an open circuit (disconnected connector), it sets a CEL. The delete harness or resistor keeps the circuit closed, tricking the PCM into thinking the EGR valve is still there and functioning.
Does smog delete affect fuel economy?
Yes — usually positively. Removing the smog air pump eliminates the parasitic load of the belt-driven pump. Many 5.8L Windsor owners report 1–2 MPG improvement after smog delete. However, gains depend on driving style and how much the smog pump was dragging before removal.
Is smog delete legal for street use?
This varies by state and county. In California and states with strict emissions testing (ASM/OBD-II), smog delete modifications can cause a vehicle to fail inspection. Many rural counties in other states have waived emissions requirements for older vehicles (pre-OBD-II, typically 1995 and older). If your vehicle is registered in an emissions-testing state, check local laws before proceeding. For off-road use, racing applications, and pre-emissions-testing era vehicles, smog delete is widely accepted.
Can I still pass inspection after smog delete?
In states that require only a safety inspection (lights, brakes, tires), smog delete won't affect the outcome. In states requiring OBD-II emissions testing, a deleted smog system will likely trigger a failure — the PCM runs active tests on EGR and secondary air systems during the drive cycle. Some tuners use OBD-II emulators to pass emissions checks, but legality varies.
How long does a full smog delete take?
Plan for a full day (6–10 hours) on your first attempt. The job involves cutting and welding exhaust components, removing multiple belt-driven accessories, and sorting vacuum lines that haven't been touched in 30 years. With all parts on hand and the engine cold, experienced DIYers can complete it in 4–6 hours. The hardest part is accessing the smog pump mounting bolts from behind the engine block — approach from the top (one knee on the valve cover, one on the frame rail) for best access.
Since you're already working on your truck, these maintenance items take minutes to swap while everything's apart: