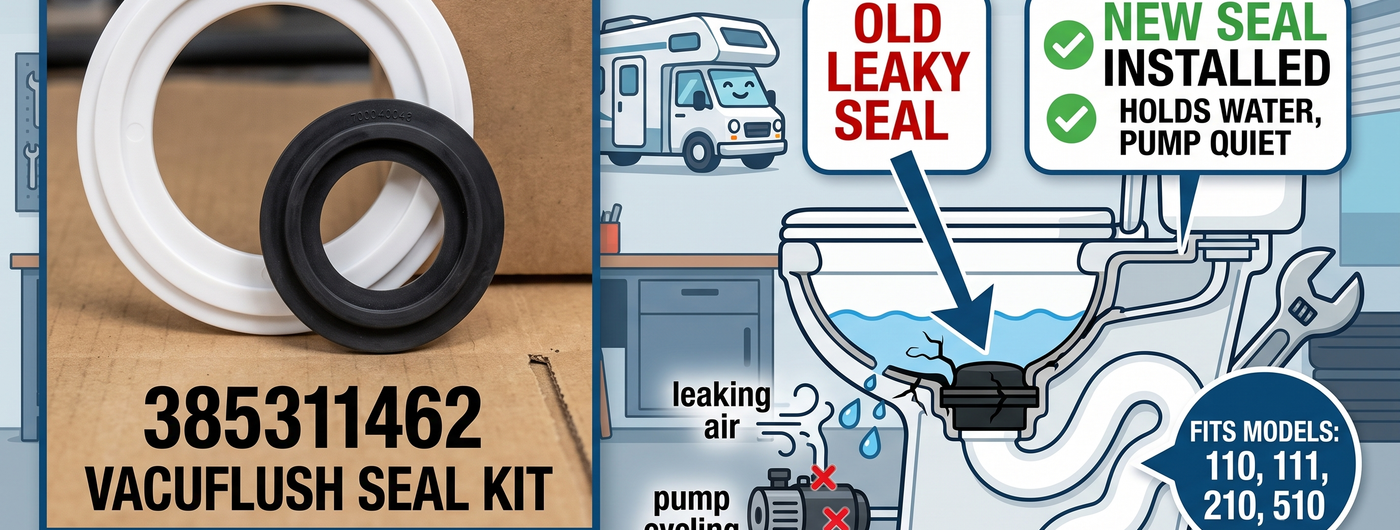
RV VacuFlush Toilet Bowl Seal Replacement: Fix That Leak and Stop the Constant Pump Cycling

RV VacuFlush Toilet Bowl Seal Replacement: Fix That Leak and Stop the Constant Pump Cycling

, by iFJF Direct, 8 min reading time

RV VacuFlush Toilet Bowl Seal Replacement: Fix That Leak and Stop the Constant Pump Cycling

If your RV toilet won't hold water in the bowl and the vacuum pump kicks on every 90 seconds, you've got a bad bowl seal. It's the most common failure point on Dometic Sealand VacuFlush systems, and the good news is you don't need to pay a dealership $400 to fix it. The 385311462 VacuFlush Toilet Seal Kit runs about twenty-six bucks and takes under an hour if you know what you're doing.

Is Your Bowl Seal Shot? Here's How to Tell

Three dead giveaways, no guessing needed:

  1. Water won't stay in the bowl. The VacuFlush is supposed to hold a few inches of water after a flush, just like a regular toilet. If the water's gone 30 minutes later, the seal isn't seating. It's leaking air past the ball, and the vacuum pulls the water right down.
  2. Pump runs when nobody flushed. The vacuum pump should only cycle after you flush — it pulls a vacuum in the holding tank side, then shuts off. If it's kicking on every minute or two without a flush, air's leaking in somewhere, and the bowl seal is suspect #1.
  3. Sewer smell when you're not using it. A worn seal means the ball valve doesn't fully close. Tank gases come up through the gap. Your nose won't lie about this one.

These toilets — models 110, 111, 210, and 510 — all use the same bowl seal design. The 385311462 kit fits all of them. Dometic's OEM seal is PTFE (Teflon) and it wears eventually. If yours is more than 3-4 years old with regular use, it's due.

What You'll Need

  • 385311462 VacuFlush Seal Kit (includes the bowl seal, ball seal, O-rings, and silicone grease)
  • Phillips head screwdriver (#2)
  • Small flathead screwdriver (for prying the old seal out)
  • Clean rag and rubbing alcohol (or acetone)
  • Silicone plumber's grease (the kit includes a packet, but having extra never hurts)
  • Paper towels or a bucket (the bowl will have residual water)

Step-by-Step: VacuFlush 110/210/510 Bowl Seal Swap

Step 1: Kill Power and Water

Turn off the VacuFlush system at the breaker or switch. You do NOT want the pump cycling mid-job. Shut off the water supply to the toilet. Then press the flush pedal a couple times to bleed off any stored vacuum.

Step 2: Pull the Toilet

The entire toilet bowl assembly lifts off the floor flange. Remove the two screws at the base (they go into the floor flange). Disconnect the water line at the back — have a rag handy, it'll drip. Now lift the toilet straight up and set it on some cardboard or an old towel. You'll see the black rubber seal in the floor flange and the ball valve at the bottom of the bowl.

Step 3: Remove the Old Bowl Seal

The seal sits inside the floor flange. Use a small flathead to carefully pry under the lip of the old seal. Work your way around. Old seals get hard and brittle — it may crack into pieces as you pull it out. That's normal. Make sure you get every fragment. A piece of old seal left in the groove will ruin your new one.

Step 4: Clean the Groove (Don't Skip This)

Take your rag with rubbing alcohol and scrub the seal groove in the floor flange. You want it bone-dry and spotless. Any old silicone residue, mineral deposits, or debris will prevent the new seal from seating properly. This is where most people mess up — they slap the new seal on a dirty surface and wonder why it still leaks a week later.

Step 5: Install the New Seal

Open the 385311462 kit. Apply a thin coat of the included silicone grease to the new bowl seal's outer lip. Press the seal into the floor flange groove, working around evenly. Make sure it's fully seated — no high spots, no twists. The flat side faces up toward the toilet bowl.

Step 6: Check the Ball Valve and Other Seals

While the toilet's off, flip it over. Check the ball valve at the bottom. If the ball seal (the one the ball rotates against) looks scored or flattened, replace it too — the kit includes a new one. Apply grease to the new ball seal before installing. Also replace the water valve O-rings if your kit has them.

Step 7: Reinstall and Test

Set the toilet back on the flange, reconnect the water line, and screw down the base. Turn the water and power back on. The vacuum pump should run for 15-30 seconds to build vacuum, then shut off. Flush a few times. Now pour a half-cup of water in the bowl and walk away for 30 minutes. Come back — water should still be there.

Pro Tips From Someone Who's Done This Too Many Times

  1. Don't overtighten the base screws. The toilet base is plastic. Crank those screws down and you'll crack the mounting ears. Snug plus a quarter turn is plenty. If it rocks, the floor flange needs shimming, not more torque.
  2. Use only silicone grease, never petroleum. Vaseline and petroleum-based lubes eat the Teflon seal. The little packet in the kit is silicone — stick with it or buy a tube of plumber's silicone grease.
  3. If the pump still cycles after replacement, the seal isn't the culprit. Check the vacuum breaker (the little check valve device on the back of the toilet), the duckbill valves in the vacuum pump, and the hose clamps at every connection. A worn duckbill is the second most common vacuum leak.
  4. Spray some soapy water on the connections. After reassembly, mix up dish soap and water in a spray bottle. Spray around the floor flange, water line connection, and vacuum breaker. Bubbles = leak. Fix it before you button everything up.
  5. Do the duckbills at the same time if it's been a while. If your seal is 4+ years old, your duckbill valves probably are too. VacuFlush maintenance kits include both — saves you pulling the toilet twice.

Common Mistakes That'll Make You Redo the Job

  • Not cleaning the flange groove. Already said it. Saying it again. Debris in the groove = seal won't sit flat = still leaks = you're pulling the toilet out again on a Sunday.
  • Forgetting to turn the water back on. Sounds dumb but people do it. The bowl fills, you flush, nothing comes back. Then you panic before remembering the shutoff valve is still closed.
  • Not bleeding the vacuum before pulling the toilet. If there's still vacuum in the system when you disconnect the water line, it can suck debris into the water valve. Press the pedal a few times with the power off.
  • Reusing the old seal "because it looks fine." A seal that looks fine but doesn't hold water isn't fine. The wear is microscopic. If you've already got the toilet off, put the new one in.

FAQ

Q: How often should I replace the VacuFlush bowl seal?

Full-time RVers should plan on every 3-4 years. Weekend warriors can stretch it to 5-6. If you use tank treatment chemicals with harsh solvents, expect shorter life.

Q: Will this 385311462 kit fit my Sealand model 510?

Yes. The kit is compatible with Dometic Sealand VacuFlush models 110, 111, 210, and 510. They all use the same bowl seal design and dimensions.

Q: My bowl holds water but the pump still cycles every 10 minutes. What gives?

You've got a vacuum leak somewhere other than the bowl seal. Check the duckbill valves first — they're rubber and wear out. Also check the vacuum switch, pressure relief valve, and every hose connection for cracks or loose clamps.

Q: Can I use a generic seal instead of the 385311462 kit?

You can, but you shouldn't. The VacuFlush uses a specific Teflon seal profile. Generic seals either don't seat right or wear out in months. The 385311462 kit is designed for these specific toilets — the fit matters.

Q: Is this a job for a mobile RV tech or can I do it myself?

If you can change a toilet wax ring at home, you can do this. No special tools, no crawling under the rig. Takes 45 minutes the first time, 20 minutes once you've done it.

Related Resources


© 2026 iFJF Direct | Sitemap

    • American Express
    • Diners Club
    • Discover
    • Maestro
    • Mastercard
    • PayPal
    • Visa

    Login

    Forgot your password?

    Don't have an account yet?
    Create account