Fuel Filter Replacement Chevrolet Silverado Suburban Tahoe GMC Yukon XL Sierra 2000-2006 - EASY!
, by iFJF Direct, 13 min reading time
, by iFJF Direct, 13 min reading time

🛒 Parts Used in This Guide 12642623 Fuel Filter Head + 1R-0750 Refit for 2005-2016 Dura $87.99 Shop Now → 1R-0750 Fuel Filter Aluminum Head for 2001-2016 Duramax 6.6L $63.99 Shop Now → 1R-0750 Fuel Fi...
If you own a 2000-2006 GM truck—whether it's a Chevrolet Silverado, Suburban, Tahoe, GMC Sierra, Yukon, or Yukon XL—replacing the fuel filter is a straightforward DIY job that takes about 30-45 minutes. The fuel filter sits under the driver's side frame rail, making it accessible without lifting the truck. This guide walks you through the complete process, including proper tools, safety precautions, and torque specifications.
A clogged fuel filter can cause low fuel pressure, poor acceleration, and even engine stalling. For GM trucks from this era, the original filter was often left unchanged for decades, making replacement critical for reliable performance. Whether you're doing preventative maintenance or troubleshooting fuel delivery issues, this step-by-step tutorial covers everything you need.
| Item | Specification | Notes |
|---|---|---|
| Fuel Filter | Bosch 3370 or equivalent | Confirm via VIN at RockAuto or parts counter |
| Flare Nut Wrench | 16mm | Required—standard wrench will round the fitting |
| Open-End Wrench | 21mm | For holding the fuel filter body |
| Battery Wrench | 8mm | To disconnect negative terminal |
| Catch Pan | Small metal or plastic | Catches residual fuel when lines are removed |
| Safety Glasses | ANSI-rated | Fuel pressure can spray when lines are loosened |
| Shop Towels | Disposable | For wiping up drips and protecting O-rings |
| Dielectric Grease | Small amount | Optional—for lubricating O-rings during reassembly |
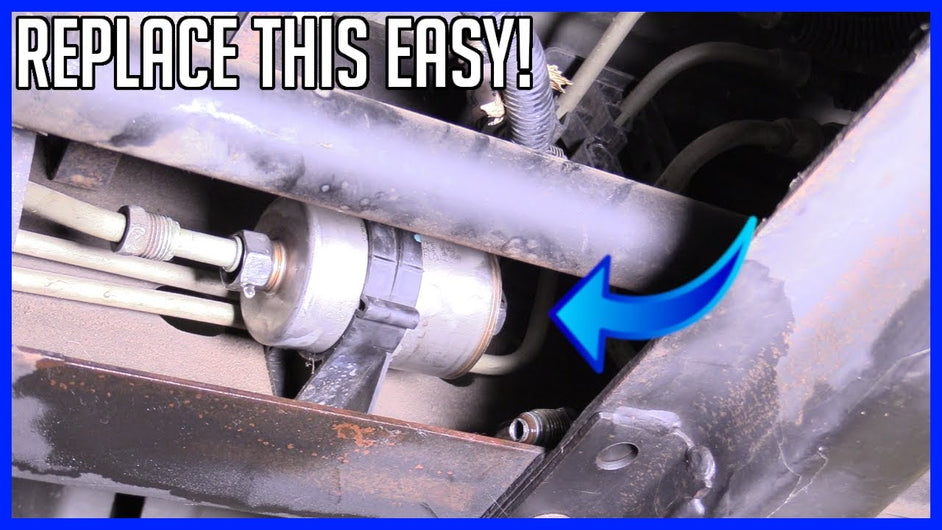
Before starting any fuel system work, disconnect the negative battery terminal using an 8mm wrench. This prevents accidental electrical sparks near fuel vapors. The fuel filter is located under the driver's side of the truck, on the inside of the frame rail. You can access it without jacking up the vehicle.
Some guides recommend relieving fuel pressure via the Schrader valve on the fuel rail, but this is unnecessary. When you disconnect the fuel line from the filter, residual pressure vents naturally. Just wear safety glasses and keep a catch pan ready—expect a small amount of fuel to dribble out.
Fuel vapors are flammable. Work in a well-ventilated area away from open flames, cigarettes, or spark sources. Keep a fire extinguisher nearby as a precaution.
The fuel filter has two connections: a flare nut fitting on the front (fuel line from the tank) and a threaded connection on the rear (line to the engine). Start by loosening the front flare nut using a 16mm flare nut wrench. A flare nut wrench grips five sides of the fitting, preventing rounding—using a standard open-end wrench risks damaging the fitting and turning a simple job into a major repair.
Hold the fuel filter body with a 21mm wrench while turning the flare nut counter-clockwise. Once the fitting is loose, fuel pressure will release. Let it drain into your catch pan—this takes only a few seconds. The amount of fuel is minimal because the fuel pump is off.
After the pressure is relieved, you can fully remove the front line. Bend it slightly out of the way to make room for filter removal.
The rear fuel line snakes around to a flexible section behind the filter. This connection uses the same threaded fitting as the front. Remove it the same way: hold the filter with the 21mm wrench and turn the fitting counter-clockwise. Some technicians find it easier to remove this line first because it's less visible—either order works, but note that reinstallation goes smoother if you connect the rear line first.
With both lines disconnected, slide the fuel filter forward toward the front of the truck to remove it from its bracket. Dump any remaining fuel from the old filter into your catch pan before disposing of it properly.
Before installing the new filter, inspect the O-rings on both fuel line fittings. These small rubber rings create the seal between the fuel line and filter. If they're cracked, flattened, or brittle, replace them. Most aftermarket fuel filters don't include replacement O-rings, so check your old ones carefully—if they look questionable, order new ones or pick them up from an auto parts store.
A damaged O-ring is the #1 cause of fuel leaks after filter replacement. Nine times out of ten, a leak at the fuel line connection traces back to a compromised O-ring. If your new filter came with O-rings, install them. If not and the old ones look perfect, you can reuse them—but add a small amount of motor oil or dielectric grease to lubricate them. Never install O-rings dry.
Check the new filter for a flow direction arrow stamped on the body. This arrow must point toward the front of the truck (toward the engine). Installing the filter backward restricts fuel flow, causing low pressure and poor performance. The filter will physically fit either way, so verify the arrow before sliding it into the bracket.
Slide the new filter into place from the front of the bracket. It should seat fully with the flow arrow pointing forward. If the bracket clips are worn, the filter may feel loose—this is normal as long as the lines hold it securely when reconnected.
The Bosch fuel filter used in this guide specifies 12 ft-lbs for the flare nut. In practice, most technicians snug the fitting by feel since accessing the flare nut with a torque wrench is nearly impossible. Tighten until the fitting is snug and the O-ring is compressed—you should feel it seat. Don't overtighten, as this can damage the O-ring or crack the filter housing.
Thread the rear fuel line fitting into the filter first. Start it by hand to avoid cross-threading, then snug it with the 16mm flare nut wrench while holding the filter body with the 21mm wrench. Next, connect the front line the same way. Hand-start the fitting, then tighten it down.
Double-check both connections after you've finished. Grab each line gently and verify it's secure—you shouldn't be able to pull it off by hand. If either connection feels loose or wobbly, remove and inspect the O-ring seating.
Reconnect the negative battery terminal with the 8mm wrench. Before starting the engine, cycle the ignition key to "Run" (not "Start") and wait 2-3 seconds for the fuel pump to prime. Repeat this 2-3 times to build fuel pressure in the system. This prevents extended cranking on the first start.
Start the engine and let it idle for 30-60 seconds. Check both fuel line connections at the filter for leaks. If you see any fuel weeping, shut off the engine and inspect the O-rings. A properly sealed connection should be bone dry. Dispose of the old fuel filter at a hazardous waste facility or auto parts store that accepts used filters.
| Tip | Why It Matters |
|---|---|
| Use a flare nut wrench, not a standard wrench | Flare nut wrenches grip 5 sides of the fitting, preventing rounding. Standard wrenches grip only 2 sides and can slip under torque, rounding off the fitting and requiring line replacement. |
| Verify filter fitment by VIN | While most 2000-2006 GM trucks use the same filter, mid-year production changes can occur. Enter your VIN at RockAuto or a dealer parts counter to confirm the exact part number. |
| Lubricate O-rings before installation | Dry O-rings can bind, tear, or fail to seat properly. A small amount of oil or grease ensures a smooth seal and makes removal easier next time. |
| Check the flow arrow direction | The filter will install backward, but it won't work properly. Fuel must flow toward the engine. Double-check before tightening the lines. |
| Prime the fuel system before starting | Cycling the ignition to "Run" (without starting) energizes the fuel pump and fills the new filter with fuel. This prevents long cranking times and potential starter wear. |
| Brand | Part Number | Notes |
|---|---|---|
| Bosch | 3370 | OE-quality, includes torque spec on housing, widely available |
| ACDelco | GF652 | GM Genuine part, original equipment specification |
| WIX | 33035 | Popular aftermarket option, good filtration efficiency |
| Airtex | FS210 | Economy option, verify application before purchase |
For owners maintaining multiple GM vehicles or seeking the best value, consider a fuel filter from iFJF. Their fuel water separators and filtration systems offer marine-grade quality suitable for diesel and gas applications, often at a lower cost per service than OEM replacements.
If you're performing a fuel filter replacement, you may also want to inspect or upgrade other fuel system components:
If you're upgrading your fuel filtration system or want better protection against water contamination, the iFJF R12H Fuel Water Separator delivers 10-micron filtration with a transparent drain bowl for easy inspection. This aluminum-alloy unit replaces Racor S3240 and 120AT filters, offering a detachable design that lets you replace only the cartridge—saving up to 60% compared to disposable units.
Whether you're maintaining a diesel truck, marine engine, or generator, this separator handles 15 GPH flow rates and stands up to harsh environments with powder-coated corrosion resistance. A practical upgrade for any fuel system maintenance schedule.
Shop Now →GM recommended replacing the fuel filter every 30,000-50,000 miles under normal driving conditions. However, many owners on forums report that original filters were often left unchanged for 100,000+ miles on these trucks. If you're unsure of your filter's age, inspect it visually—a heavily corroded or dirty-looking filter should be replaced regardless of mileage.
Quality aftermarket fuel filters from brands like Bosch, WIX, and Airtex perform equivalently to OEM for street-driven vehicles. The key is buying from reputable brands, not the cheapest option online. Diesel applications and severe-duty use (towing, off-road, marine) may benefit from upgraded filtration like the R12H separator.
The filter will physically fit backward, but fuel flow will be restricted or blocked entirely. This causes low fuel pressure, poor engine performance, and potentially a no-start condition. Always verify the flow direction arrow points toward the engine (front of the vehicle) before tightening the lines.
Not necessarily. While some guides recommend using the Schrader valve on the fuel rail, disconnecting the fuel line from the filter releases residual pressure naturally. Wear safety glasses and keep a catch pan ready—expect a small amount of fuel to dribble out when the line is loosened. The amount is minimal because the fuel pump is off.
The fuel filter location and procedure are similar for Express and Savana vans from the same era, as they share the GM GMT platform. However, verify your specific year and VIN for correct filter fitment—some vans may use a different filter part number depending on engine and production date.
Since you're already working on your truck, these maintenance items take minutes to swap while everything's apart: