
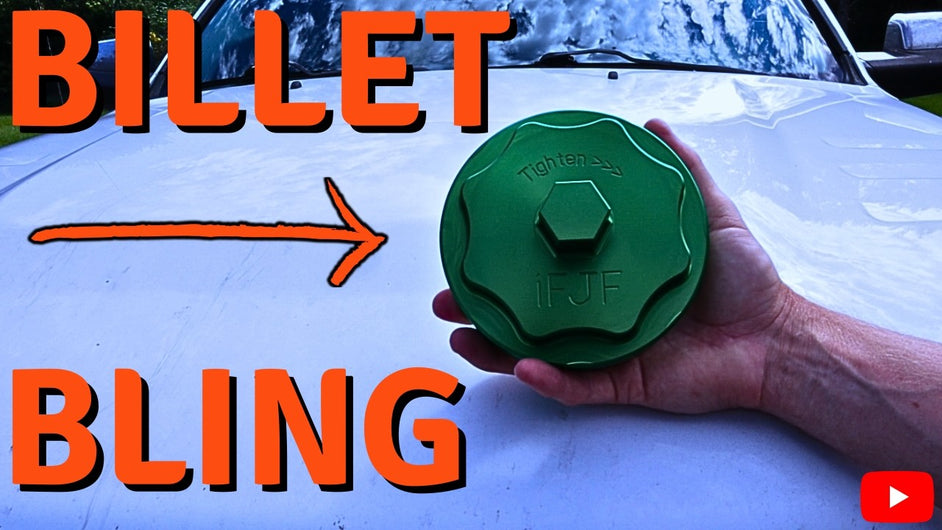
Ram 6.7L Cummins Fuel Filter Cap Replacement & Billet Aluminum Upgrade (2010-2020)
, by iFJF Direct, 16 min reading time
, by iFJF Direct, 16 min reading time

Billet aluminum fuel filter cap upgrade for 2010-2020 Ram 6.7L Cummins — DIY service guide, torque specs and O-ring tips. Shop iFJF at ifjf.net.
If you own a 2010–2020 Ram 2500 or 3500 with the 6.7L Cummins turbodiesel, you already know the factory plastic fuel filter housing cap is the weak link in an otherwise bulletproof fuel system. The OEM plastic cap uses a 28 mm hex that rounds off after repeated filter changes, leaving you wrestling with oil-filter pliers and a stripped lid in a tight engine bay. The fix is a billet aluminum fuel filter cap—a direct-thread-on replacement that uses the same 28 mm hex socket but won't strip, crack, or round over.
This guide walks through the complete fuel filter and water separator service on a 2014 Ram 2500 6.7L Cummins, including swapping the plastic cap for a billet aluminum upgrade. We cover drain procedure, filter removal, O-ring lubrication, sensor transfer, cap comparison, and leak test—every step a DIYer or technician needs to do this job correctly in under 45 minutes.
Whether you're at 15,000 miles due for your first filter change or pushing 290,000 miles like the truck in this walkthrough, the process is the same. Lube your O-rings and thread carefully—those are the two rules that separate a clean swap from a fuel-leaking headache.
| Item | Notes |
|---|---|
| 28 mm socket + ratchet | Fits both OEM plastic cap and billet aluminum replacement |
| Short extension bar | Helps reach the cap in the tight engine bay |
| Oil filter pliers | For removing the water separator canister if stuck |
| Water sensor wrench | Specialty wrench for the WIF (water-in-fuel) sensor on the bottom of the filter |
| Pick tool or flathead | For removing O-rings from the sensor and filter cap |
| 1/2" fuel hose | Attaches to the drain valve tube for routing fuel to a bucket |
| Drain pan / container | Catch drained diesel fuel—windshield washer fluid jug cut down works great |
| Motor oil (small amount) | For lubricating O-rings during installation |
| Paper towels | Clean hands and threads before final assembly |
| New fuel filter element | Engine bay filter—Mopar 68157291AA or equivalent |
| New fuel water separator filter | Chassis-mounted—Mopar 68197867AB or FS20089 equivalent |
| New O-rings | Included with quality filter kits—don't reuse old ones |
| Billet aluminum fuel filter cap | iFJF or equivalent—available in multiple colors, direct thread-on replacement |

While the housing is open, drop in the matching element. This 68157291AA upper (engine-bay) fuel filter is the direct-fit replacement for 2010–2020 Ram 2500 / 3500 / 4500 / 5500 6.7L Cummins trucks, replacing Mopar 68157291AA / 68436631AA / 68065608AA — 3-micron absolute filtration and over 95% water separation to protect the CP3 / CP4.2 injection pump.
Grab it with your cap upgrade and finish both filter services in one pass instead of a second trip to the parts counter.
Shop Now →The chassis-mounted fuel water separator on the 2010–2020 Ram 6.7L Cummins hangs below the driver-side frame rail. Start by unplugging the water-in-fuel (WIF) sensor pigtail hanging from the bottom of the filter. A quick disconnect is all it takes—no tools needed for the electrical connector.
Next, open the small petcock drain valve on the bottom of the sensor housing. A 1/2" fuel hose slipped over the drain tube routes fuel cleanly into a bucket on the ground. An alternative DIY trick: cut the bottom off a windshield washer fluid jug and slide it under the filter to catch drips—especially useful if you're working on a lift or jack stands without a long hose.
Let the filter drain fully—usually 2 to 3 minutes. Close the drain valve before removing the filter. Residual fuel will still spill from the top seal when you break it loose, so keep your drain pan positioned underneath.
Use oil filter pliers on the lower canister body to break the filter loose. If the filter is extremely tight—as it was on our 292,000-mile test truck—the likely cause is a dry O-ring from the previous installation. Always lubricate O-rings with motor oil during assembly to prevent this exact problem.
Once loose, unscrew the filter by hand. Position a drain pan underneath because more diesel will run out as the top seal breaks.
The WIF sensor threads into the bottom of the water separator filter and must be transferred to the new unit. Hold the old filter steady with pliers while using the specialty sensor wrench to unscrew the sensor—it threads right out.
Remove the old O-ring from the sensor. If you don't have a pick tool, you can remove it by hand (gloves off for better grip). Install the new O-ring that came with your filter kit onto the sensor.
Critical step: Apply a small dab of clean motor oil to the new O-ring before threading the sensor into the new filter. This prevents the O-ring from binding, tearing, or fusing to the housing—which is exactly what makes the filter so difficult to remove next time. Thread the sensor in carefully to avoid cross-threading the delicate plastic threads. Snug it with the wrench—this fitting doesn't see high fuel pressure, so it only needs to be fully seated, not wrenched down hard.
Lubricate the top O-ring on the new filter with motor oil. Thread the filter back into the housing by hand, pushing up slightly to get the first thread started—it can be tricky to align in the tight under-body space. Once threaded by hand until snug, wipe any fuel or oil from the housing and your hands with a clean paper towel.
Plug the WIF sensor pigtail back in. Close the drain valve one more time to confirm it's sealed. No need to use pliers or a wrench on the canister—hand-tight is sufficient for proper sealing.
The engine bay fuel filter on the 6.7L Cummins sits under the hood on the driver side, mounted to a canister with a 28 mm hex cap. This is the filter housing we'll be upgrading with the billet aluminum cap.
Route a 1/2" fuel hose over the drain valve outlet (the small yellow knob on the housing) and into a bucket on the ground. Open the drain valve and let the fuel drain completely. This housing holds more fuel than the water separator, so be patient.
The OEM plastic cap is notoriously difficult to loosen, especially if the O-ring wasn't lubricated during the last filter change. Use a 28 mm socket with a short extension and a long-handled ratchet. The cap sits in a tight spot between the engine and inner fender, so you may need to experiment with extension combinations to get enough leverage.
Once the cap breaks loose, continue unscrewing by hand. Use a short screwdriver to gently pry and break the initial seal if the cap resists lifting—apply pressure at the edge to pop the O-ring free. Pull the cap straight up and off the housing.
Inspect the old plastic cap: If you've done multiple filter changes, you'll likely see the hex corners starting to round over. This is the exact failure mode that makes the billet aluminum upgrade worthwhile—the plastic will eventually strip to the point where no socket can grip it.
Drop the new engine bay filter element into the canister. The center hole on the filter is oval-shaped, matching the oval post in the middle of the canister. Align these to ensure the filter seats correctly—it only goes in one way.
Remove the old O-ring from the filter cap and install the new O-ring from your filter kit. Apply a coat of motor oil to the new O-ring before placing it on the cap. This is the same critical step as the water separator—lubrication prevents binding, tearing, and the stuck-cap problem on your next service.
| Feature | OEM Plastic Cap | Billet Aluminum Cap |
|---|---|---|
| Hex size | 28 mm | 28 mm (same socket) |
| Outer diameter | Smaller | Slightly larger |
| Material thickness | Thin plastic | Thick billet aluminum |
| Weight | Light | Heavy (could be lighter) |
| Durability | Rounds over after repeated changes | Won't strip or round |
| Thread compatibility | Plastic threads on housing | Same plastic threads—careful threading required |
| Seal chamfer | Present | Matches OEM chamfer profile |
Thread the billet aluminum cap onto the housing by hand first. This is critical: the aluminum cap threads onto the OEM plastic housing threads, and aluminum will damage plastic if cross-threaded. Go slowly, turning counterclockwise until you feel the threads drop into alignment, then clockwise to thread on. The cap should go on smoothly by hand until it seats against the O-ring.
Once hand-tight, use the 28 mm socket and ratchet to snug the cap—do not overtighten. The aluminum threads can strip the plastic housing threads if you wrench down hard. Snug is sufficient; the O-ring does the sealing, not the thread torque.
Close the drain valve on the filter housing. Cycle the ignition key to the ON position (without starting the engine) 2–3 times to prime the fuel system. The CP3/CP4 injection pump on the 6.7L Cummins will pull fuel through the filter and pressurize the system.
Start the engine and let it idle. Check both the engine bay filter housing and the under-body water separator for leaks. Look for wet spots around the cap seal, sensor threads, and drain valve. A clean paper towel wiped around the joints makes it easy to spot even small seeps.
If everything is dry after 2–3 minutes of idle, you're done. No leaks means the O-rings sealed properly and the billet cap is doing its job.
| Tip | Why It Matters |
|---|---|
| Always lube O-rings with motor oil | Prevents binding, tearing, and the stuck-cap problem that makes next service a nightmare. This is the #1 cause of difficult filter removal. |
| Thread aluminum caps by hand first | Aluminum on plastic threads will gouge and damage the housing if cross-threaded. Go slowly and confirm alignment before using a wrench. |
| Don't overtighten the cap | The O-ring seals the housing, not thread torque. Overtightening strips plastic threads and makes future removal harder. |
| Use a drain hose, not a catch pan alone | The drain valve has a small outlet tube that a 1/2" fuel hose fits perfectly. Routing fuel to a bucket on the ground is far cleaner than trying to catch it in the engine bay. |
| Replace both filters at the same time | The 6.7L Cummins uses two filters (engine bay + chassis mounted). Changing only one leaves contaminated fuel flowing through the new filter. Do both every 15,000 miles. |
| Inspect the plastic cap hex during every service | If corners are rounding, it's time to upgrade to billet aluminum before the cap strips completely and you're stuck. |
| Brand | Part Number | Type | Notes |
|---|---|---|---|
| Mopar (OEM) | 68157291AA | Engine bay fuel filter | Factory replacement for 2010–2020 Ram 6.7L |
| iFJF | 68157291AA (FJ-91AA) | Engine bay fuel filter | 3-micron absolute, replaces Mopar 68157291AA / 68436631AA — shop it at ifjf.net |
| Mopar (OEM) | 68197867AB | Chassis-mounted water separator | Rear frame-rail filter, includes WIF sensor provision |
| Fleetguard | FS20089 | Chassis-mounted water separator | Aftermarket cross for Mopar 68197867AA / 68197867AB |
| iFJF | 68197867AA (FJ-67AA) | Chassis-mounted water separator | Direct fit for 2013–2018 Ram 6.7L — shop it at ifjf.net |
| Baldwin | PF7977 | Engine bay filter | Alternative aftermarket option |
| iFJF | 5083285AA (FJ-85AA) | Oil filter | Companion oil filter for the same 15,000-mile service — shop it at ifjf.net |
For a complete selection of diesel fuel filters and Ram Cummins parts, browse the full iFJF catalog.
For 2010–2020 Ram 2500 and 3500 trucks with the 6.7L Cummins, the factory-recommended fuel filter service interval is every 15,000 miles for both the engine bay filter and the chassis-mounted water separator. Heavy towing, biodiesel use, or contaminated fuel may require more frequent changes. At 290,000+ miles, the truck in this walkthrough has had approximately 19 filter services—making the billet aluminum cap upgrade a logical investment to prevent plastic cap failure.
A: Yes, billet aluminum fuel filter caps are designed as direct replacements for the OEM plastic cap on 2010–2020 Ram 2500/3500 trucks with the 6.7L Cummins. They use the same 28 mm hex and thread onto the original plastic housing. Always confirm compatibility with your specific year model before purchasing.
A: The billet aluminum cap is significantly more durable than the OEM plastic cap. The plastic cap's hex corners round off after repeated filter changes, eventually making it impossible to remove with a socket. The aluminum cap won't strip, crack, or deform. However, both seal equally well when the O-ring is properly lubricated and the cap is correctly torqued.
A: Both the OEM plastic cap and the billet aluminum replacement use a 28 mm hex. Some mechanics report a 29 mm socket also fits loosely. A 28 mm socket with a short extension and long-handled ratchet provides the best leverage in the tight engine bay.
A: Always lubricate the O-ring with clean motor oil before installing the cap. A dry O-ring bonds to the housing surface over time, making the cap extremely difficult to remove. This is the most common cause of stuck caps and stripped hex corners. A light coat of oil on the O-ring ensures smooth removal at the next service.
A: No. Always install new O-rings that come with your filter kit. Reused O-rings lose their compression set, may have microscopic cracks, and are far more likely to leak or fail. The cost of an O-ring is negligible compared to the cost of a fuel leak in your engine bay.
A: Yes. The 6.7L Cummins uses two fuel filters—an engine bay primary filter and a chassis-mounted water separator. Replacing only one means contaminated fuel from the old filter immediately flows through the new one. Replace both every 15,000 miles for proper fuel system maintenance.
A: Overtightening the aluminum cap can strip the plastic threads on the OEM filter housing. The O-ring creates the seal—not thread torque. Thread the cap by hand until it seats, then snug with a socket. If you feel resistance beyond the O-ring compression, stop. The cap only needs to be snug enough to compress the O-ring evenly.
Since you're already working on your truck, these maintenance items take minutes to swap while everything's apart:
 FS1242 Fuel Water Separator for Cummins 8.3L
$49.99
FS1242 Fuel Water Separator for Cummins 8.3L
$49.99
 FS1003 Fuel Water Separator for Cummins ISB ISC ISL ISM N14 — 10 Micron
$57.99
FS1003 Fuel Water Separator for Cummins ISB ISC ISL ISM N14 — 10 Micron
$57.99
 134001 Fuel Filter Housing Cap for 6.6L Duramax L5P 2017-2023 | iFJF
$69.99
134001 Fuel Filter Housing Cap for 6.6L Duramax L5P 2017-2023 | iFJF
$69.99
 Fuel Filter Assembly for 1992-2002 Chevy GMC 6.5L Diesel — Suburban Tahoe Silverado Sierra Yukon Hummer H1 — Replaces 10226035
$177.99
Fuel Filter Assembly for 1992-2002 Chevy GMC 6.5L Diesel — Suburban Tahoe Silverado Sierra Yukon Hummer H1 — Replaces 10226035
$177.99


